If you are new to street photography, or even if you’re not, remembering settings, nailing the composition, getting idea inspirations, and just getting motivated to get over the fear of doing it can feel daunting. To help make it easier, here’s a cheat sheet full of reminders and setting information to print and take with you, whether you’re traveling or just exploring your hometown.
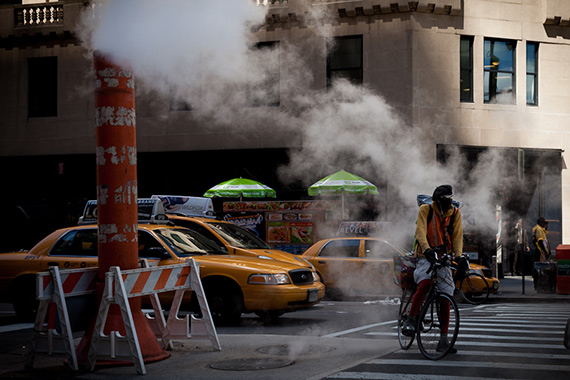
“Bike Messenger NYC” captured by James Maher.
What To Look For:
- Tell stories – Find details that hint at a larger meaning.
- Emotion – When capturing people, seek out expressive faces, hands, and postures. Also, try to capture images that will invoke a feeling in the viewer.
- Think about how a photograph will age. That storefront window or outfit may seem standard now, but could become much more interesting in 20 years.
- Make photo essays about areas or ideas that you know well.
- Capture unique people. Everyone you see is unique in some way. Figure out why and try to capture that.
- Don’t only photograph people. Capture interesting scenes that say something.
- Street portraiture. Find an interesting background and then stop an interesting person for a portrait in front of it.
Design and Composition:
- Quality and Direction of Light – Seek out interesting and dynamic light. Is the main light source in front of you, behind you, above you?
- Colors – Seek out scenes with interesting colors that complement each other.
- Lines – Are your lines straight? Diagonal Lines can add energy and can lead a viewers eyes into a scene. How will the eyes move around through the scene.
- Corners – What is in each corner of the image? Corners play a large part in creating balance.
- Create relationships – between two or more people or things.
- Balance – Does your photo feel balanced? Is that necessary?

Photo by Adriaan Terblanche
React:
- Notice people from further away. This will give you more time to get in position and create a good composition.
- Go someplace crowded. If you are especially nervous, crowded areas are the easiest places to try street photography.
- Choose a spot and wait for people to come to you. Choose an interesting background or area ahead of time and wait for people to enter it.
- Use exposure compensation. It’s the fastest way to brighten or darken a scene.
- Don’t walk too fast. It is nearly impossible to observe, walk fast, and capture things all at the same time.
- Patience. Waiting an extra couple of minutes can be the difference between a mediocre image and a once in a lifetime photograph.
- Smile! If someone notices you taking their picture, smile at them. You will be surprised how often they will smile back.
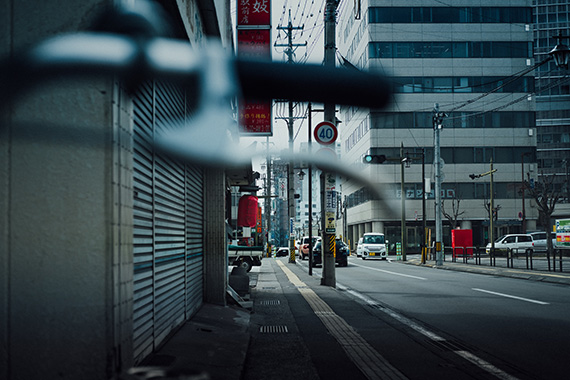
Photo by Tim Foster
Settings
To achieve maximum sharpness:
- Shutter Speed
-Scenes without moving people or objects: 1/focal length (i.e. with a 50mm lens, at minimum, you would want to be at least at 1/50th of a second.)
Scenes with moving people or objects: 1/320th ideal (1/160th minimum). - Aperture
-Use a small aperture (large number) for a larger range of sharpness (large depth of field).
-Using F16 will give you significantly more depth of field than F5.6. - High ISO
-Using a higher ISO (800/1600/3200 depending on lighting conditions) can allow you to use a higher f/stop. - Use a Wide-Angle or Normal Lens (28, 35 or 50mm)
-The wider the focal length the greater the depth of field. - Zone Focus (pre-focusing / hyperfocal distance)
-Turn your camera to manual focusing, set the distance to 10 feet away (or the distance you prefer) with a small aperture, and capture people when they are that distance from your camera. Takes practice to do well.
There are a few other considerations you may want to keep in mind such as setting your camera on shutter priority mode. Manual is good for consistent lighting situations, but is tough to alter constantly in changing light environments. Also, remember that blur isn’t necessarily bad. Photograph moving people at slower shutter speeds – 1/40th to 1/60th – to create a slight blur. It can look fantastic, especially in black and white.
About the Author:
James Maher is the author of Essentials of Street Photography, which covers everything about the genre even down to specific post processing techniques that can bring the best out of street scenes.
Like This Article?
Don't Miss The Next One!
Join over 100,000 photographers of all experience levels who receive our free photography tips and articles to stay current:


GOOD
I was taking candid pictures in a non tourist local outdoor shopping complex. I stopped to have a burger and while eating a police officer came to me and said that people were complaining that I was taking pictures. She asked for ID check me out for outstanding warrants and went on her way. I am an old retired man who is working on learning to take photograph after taking pictures for most of my life. Since I realized that for the most part I took candid pictures even when taking pictures of family, I decided to try this “street photography”. But now I see I need a better plan. I am thinking of getting a “business card” to inform anyone who may ask what I am doing. I will not photograph children, and say this on my card. I will list on this card my Flickr and SMUGMUG sites where I upload any possible viewable “photographs”. I will need to come up with a script to explain this to anyone who ask. I am taking photograph to learn, have fun and maybe get a few good works. Not looking to make money just make myself happy by getting a photograph or two I will like.
Yes, you’ll find that when it comes to COMMERCIAL PHOTOGRAPHY (as opposed to EDITORIAL), even lower-end stock agencies like 500px have very rigorous model release forms for subjects including street photography.
https://iso.500px.com/model-release-guide/
OTHOH, if you’re doing EDITORIAL PHOTOGRAPHY, it’s an entirely different situation:
http://www.bobatkins.com/photography/tutorials/photography_law_rights.html
A great list of actionable tips to get me started on street photography.
I believe you need to get a release form signed if you want to submit photos of people to reputable photo stock agencies, if the face is recognisable.
Great list James and I love your ebook. Regarding your topic Design & Composition, I’d also add symmetry/patterns/shapes/object grouping/isolation, texture, layers (top to bottom), and of course framing (foreground/reveals/camera angles). Again, many thanks for sharing.
Hey “Brian in Whitby.” Guess what? James Maher is right. Yes, a higher ISO requires less light, but a larger aperture number IS a smaller lens opening. If you are going to write rude, inflammatory comments, at least have YOUR facts correct JACKASS! Thank you for the great article James. Carry on.
“-Using a higher ISO (800/1600/3200 depending on lighting conditions) can allow you to use a faster shutter speed and larger aperture.”
This is contradictory. Higher ISO requires less light so a smaller aperture can be used.
If you are going to write instructional articles get the facts correct.
Hi Paul,
It really all depends on the situation. I try not to ruin anyone’s day – and if I don’t feel comfortable taking a photo of a specific person then I don’t do it. Sometimes I photograph candidly, but after I take a photo I often smile and on the extremely rare chances where people stop me I talk to them nicely, tell them what I am doing and give them my business card. Artist/Business cards help a lot, especially if you offer to send the photo. In over a decade, I’ve pretty much never had an issue besides one person nicely asking me to delete the photo.
With children you have to be more careful. There’s a huge, beautiful, and incredible history of photographing children for street photography, however in modern times some parents are very wary of photography, although I haven’t witnessed that personally in New York. I, personally, will photograph a child when it is a great photo and I personally don’t think I am doing anything wrong. It is legal to photograph anyone, including children in the U.S. in public, but if you do decide to do that you have to approach it the correct and tasteful way.
All this being said, if you do get stopped by a parent put a big smile on your face, act enthusiastic, tell them what you’re doing, offer to send them the photo and delete it if they want, and the majority of the time you shouldn’t have a problem.
There is only one course of action in this instance. Apologise whole-heartedly, offer to show some I.D. um….who you are,,, and delete the photo in front of the person/// even if the photo was not of his daughter…delete it in front of him, ’cause they sometimes think it is some trick and you really did photo his daughter.
How do you deal with someone not wanting there pictures taken? Last year I was taking pictures on the street and a father thought I had taken a picture of his 16 year old teenage daughter. Threatened to call the cops on me because I took a picture of an underage teen.