I would like to introduce one of the most interesting techniques in photography — “Panning”. Many might wonder and ask:” What is panning?” “Using frying pan?” Answer is no.
Panning is very simple, just set shutter speed, aperture, hold your camera and pan along with moving subject (tracking motion with your camera). Guess what you will get? Bingo! A sharp subject with blurred background. Of course, you might think this is easy, but it can be a little tricky.
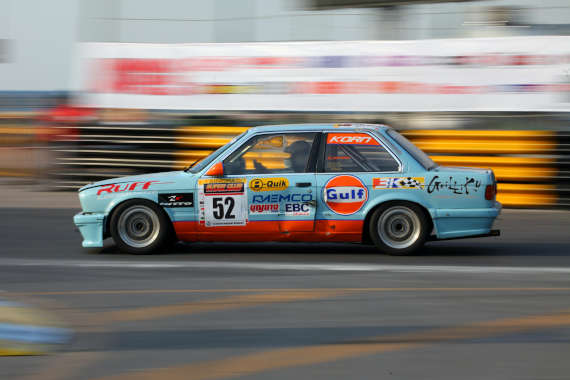
(Photo by Sippakorn Yamkasikorn/Unsplash)
Let me share some tips with you on how to master “Panning” and discover the fun of using it.
1) Slower shutter speed
Set your shutter speed slower than normal, but not too slow or it will be difficult to obtain a clear subject. For example, to pan a moving car, you may try speed of 1/60 second and play around till you get the best image. Start with 1/30 second for moving subject likes people walking or cycling. The faster the shutter speed, the more clear the background will turn out, and the less motion blur there will be.
2) Auto focus
Activate your camera’s Auto focus function, half press the shutter button to lock on, aim and pan moving subject. Let panning continue after fully press shutter, so smooth motion blur can be achieved from start to finish of your shot. If the auto focus of your camera is not fast enough, you may pre-focus it at the spot your subject will end up in frame.
3) Choose the right location
Selecting the right location to pan plays an important role in getting a good image. The place should be safe and without obstacles for panning. You may also consider using a telephoto lens to maintain a certain distance while shooting.

(Photo by Jacek Dylag/Unsplash)
Avoid having a background which is messy or too bright in colour, as this will make your subject less attractive.
4) Same level with subject
Position your camera at the same level of the subject you are going to shoot. This can help in focusing as to obtain a clear subject in your image.
5) Leave sufficient space to subject
Another important factor you should consider is leaving enough space between you and your subject. Insufficient space will constrain your pan.
6) Using monopod/tripod
Try to use a monopod or tripod during your shooting session which may help you achieve a clear subject.
Practice makes perfect

“Jen 10K” captured by PictureSocial member Bob O’Lary
Now, pick up your camera, walk to a nearby street and practice “panning”. After a few practice rounds, you should be able to master this technique and get a fantastic image. Sometimes, a little bit blur on the subject can add an even more desirable motion effect.
About the Author:
Article written by CL Wong from oohay-wong.
For further training, here is a helpful video tutorial on panning:
In this episode Mark talks about panning. Panning is an easy way to create motion in your images:
Use it for shooting sports, kids or anytime you want to create some motion in your shots.
Like This Article?
Don't Miss The Next One!
Join over 100,000 photographers of all experience levels who receive our free photography tips and articles to stay current:


Great article. Thanks for the info. I’m wondering if you have a tutorial for Panning photography at the beach. I’m not trying to capture a moving subject but the different colors during a sunset or sunrise.
Nice Post. The basic idea behind panning as a technique is that you pan your camera along in time with the moving subject and end up getting a relatively sharp subject but a blurred background. Thanks.
Are you setting your other exposure settings to auto? I’ve been playing with this lately and it takes me four or five attempts to close down the aperture and kick down the iso to a point where I don’t keep a completely over exposed image.
Hi. Good article. I would like to add that in some lenses or cameras you have an image stabilizing motor that you should turn off.
For some long professional telephoto lenses, you can turn off only part of the image stabilization. Normally you can turn off the horizontal stabilization and pan horizontally and still have some protection to vertical movements.
In Canon lenses it is the stabilizing mode 1 and 2.
It is not an easy thing to do but very nice. Thanks for the article.