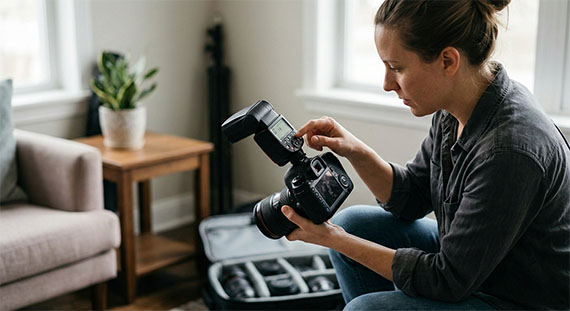
For many photographers, flash feels unpredictable. Sometimes it looks too harsh, other times the subject is still dark, and the results can vary from shot to shot. Because of this, many cameras default to automatic flash modes like TTL, where the camera decides how much flash power to use. But there’s another approach that many photographers eventually learn: manual flash photography.
Manual flash simply means you control the brightness of the flash yourself instead of letting the camera decide. Once you understand how it works, it becomes one of the most reliable ways to control lighting in your photos.
Related: Ready to make consistent progress with your camera? PictureCorrect Premium works like a photography accelerator — structured, practical, and there’s only 1 day left for the March enrollment special intro offer ⏰
What “Manual Flash” Actually Means
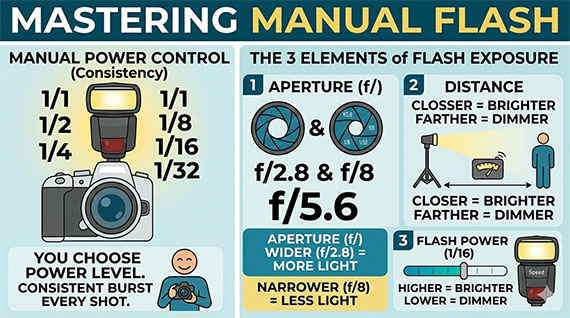
When a flash is set to manual mode, you choose the power level of the flash.
Flash power is usually shown in fractions like:
- 1/1 (full power)
- 1/2
- 1/4
- 1/8
- 1/16
- 1/32
Each step cuts the light output roughly in half.
For example, switching from 1/8 power to 1/16 power makes the flash half as bright.
Unlike automatic flash, the power does not change from shot to shot unless you adjust it yourself. This consistency is one of the main reasons photographers like manual flash.
The Three Things That Control Flash Exposure
When using manual flash, three factors mainly determine how bright your subject appears.
Flash Power
This controls how strong the burst of light from the flash is. Increasing the power brightens the subject, while lowering it darkens the subject.
Aperture
A wider aperture (like f/2.8) lets in more flash light. A narrower aperture (like f/8) reduces the brightness of the flash exposure.
Distance From the Subject
Flash gets weaker quickly as the distance increases. Moving the flash closer makes the light brighter and softer, while moving it farther away reduces brightness.
What Shutter Speed Actually Does
One confusing aspect of flash photography is that shutter speed usually does not control flash brightness.
Flash bursts happen extremely quickly—often around 1/1000 second or faster. As long as the shutter is open when the flash fires, the brightness of the flash stays the same.
Instead, shutter speed mostly controls ambient light, such as the brightness of the background.
This allows photographers to balance flash and natural light separately.
A Simple Way to Try Manual Flash
If you want to experiment with manual flash, try this simple approach:
- Set your camera to manual exposure mode.
- Choose settings like ISO 100, f/5.6, and 1/200 shutter speed.
- Set your flash to manual power, such as 1/16 power.
- Take a test photo and adjust the flash power up or down until the subject looks right.
Within a few test shots, you’ll usually find the correct setting.
Why Photographers Learn Manual Flash
Manual flash is popular because it offers predictable, repeatable lighting. Once the exposure is dialed in, every shot will look consistent until you change the settings.
This makes manual flash especially useful for:
- portrait photography
- studio setups
- product photography
- multi-light setups
Over time, many photographers find that manual flash actually feels simpler and more controlled than automatic flash modes.
And like many technical photography skills, it becomes much easier once you try it a few times.
For Further Training:
Most people struggle with Manual mode not because it’s hard — but because they’re constantly arguing with their camera.
With the PictureCorrect Premium newsletter, this is exactly the kind of thing we train through:

- Short, focused explanations
- Controlled shooting exercises
- Real-world scenarios that force understanding, not memorization
If Manual mode has ever almost made sense but still felt inconsistent, this is the missing layer.
Only 1 day left: March Enrollment Special Intro Offer
Like This Article?
Don't Miss The Next One!
Join over 100,000 photographers of all experience levels who receive our free photography tips and articles to stay current:


Leave a Reply