As a photographer, there are a lot of things we have to consider when taking photographs. One of the most important ones is composition. A photo with good composition is attractive and appealing to the human eye. It’s what will get your work recognized.
When it comes to composition, there are a lot of rules you can follow. One of the most popular ones is the rule of thirds. However, today we’re going to introduce you to a different rule: the Fibonacci spiral, also known as the golden ratio.
This article is based on concepts from A Modern Approach to Photographic Composition which is currently 50% off if you want to dig deeper for further training.
What is the Fibonacci Spiral?
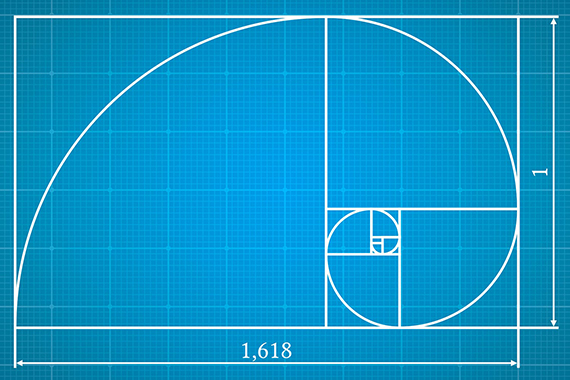
The Fibonacci spiral is a composition guide that creates a perfectly balanced and aesthetically pleasing photograph to the human eye. It stems from the mathematical principle of the golden ratio.
The golden ratio is 1.618:1, and this number is based on spirals we see in nature, such as those in ocean waves, flowers and plants. A lot of famous works of art, such as the Mona Lisa, follow the golden ratio; with the Fibonacci spiral, you’ll be able to apply it to your photography too.
Here are five tips on using the Fibonacci spiral for better compositions.
1. Place Your Subject on the Spiral End
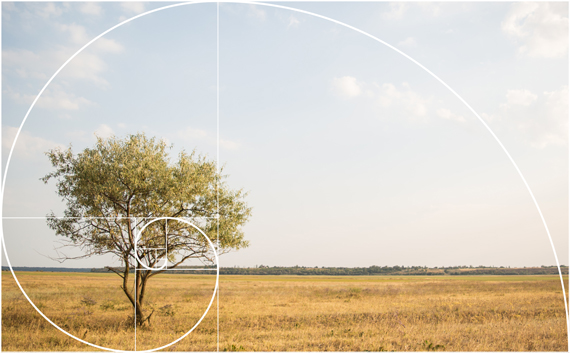
Above is the Fibonacci spiral used for photographs. You should ideally try to place your subject at the very end of the spiral for the best composition. If you really want to dig into it, try placing important details at points where different lines intersect at the end of the spiral. You can also place the details anywhere in the smallest boxes.
The spiral works by focusing the viewer’s eye on the end of the spiral and then leading them outwards to the whole scene.
So it’s an excellent technique to use when you have a single subject in a wide-angle shot or a single focal point in a landscape.
2. Don’t Stick to One Angle
The great thing about the spiral is that it works from all angles. You can mirror the original spiral, flip it upside down or place it in any direction and it will work! Many beginners think you can only use the spiral in one way, but that isn’t true.
A great tip is to pay attention to the scene you’re capturing and look at things other than your subject.
Are there elements around your subject that you want to bring into the photograph, too? If there are, choose the spiral angle, which should include them.
3. Look for Natural Curves
When it comes to the golden ratio in pictures, the Fibonacci spiral is not the only way to compose photographs. The phi grid is another way to incorporate the golden ratio.
The phi grid is best suited for photographs with many lines in them, while the spiral is excellent for scenes with natural curves.
So before using the spiral, check to see whether the scene you’re shooting has any natural curves. Natural curves can apply to anything: clouds often have natural curves, trees could be curved or even someone’s cheekbone can count as a natural curve!
If your scene is full of straight objects or lines, though, don’t try to force them into the spiral, and consider using the phi grid instead.
4. Use the Rule of Thirds to Help You
The Fibonacci spiral is a bit complex to remember, we know, and you’re not expected to remember it either! However, most cameras don’t have the spiral as a built-in grid overlay option. Instead, what they have is the rule of thirds.
Luckily, you can use the rule of thirds to help you. Turn your rule of thirds overlay option on and place your subject on the intersection of the lines. Now move your camera slightly, so your subject is a bit farther out than the intersection.
A good tip is to take many photographs, adjusting your focal point to be in a slightly different place each time. Doing so will help a lot with our next point!
5. Edit, Edit and Edit
Getting a perfect composition right off the bat is nearly impossible, especially because you don’t have the spiral with you when you’re taking photographs. To get the perfect golden ratio, you have to rely on editing.
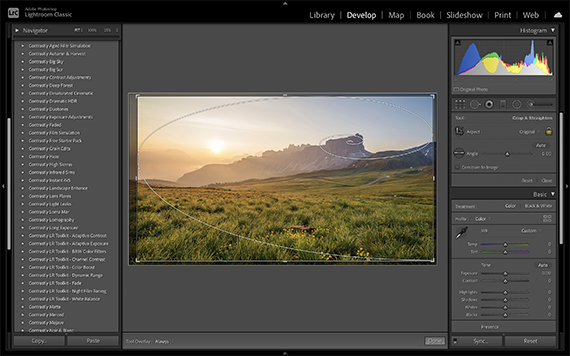
Fortunately, most photo editing software (like Lightroom Classic and Photoshop) have tools built specifically to help you get the perfect golden spiral composition. In Lightroom Classic you’ll find the golden spiral under the Crop Guide Overlay when in cropping mode. In Photoshop, you can access the overlay tools when in crop mode and cycle through the overlays by pressing the letter “O” on your keyboard.
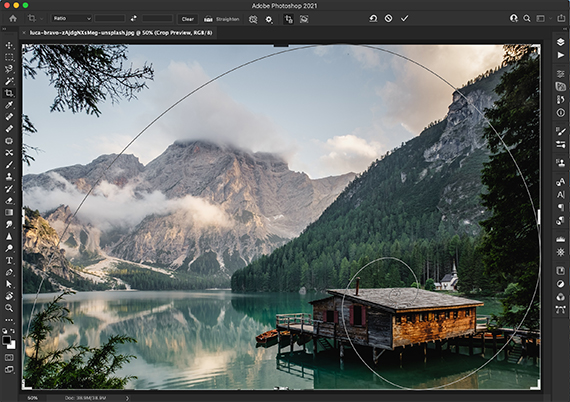
When you click this option, a spiral overlay will display over your image, and you can move it around to ensure the fine details of your picture are at the small end of the spiral.
Once you do that, you’ll get closer to having the perfect Fibonacci spiral composition.
For Further Training:
How do we make our photographs more powerful, more pointed? Learn all about photographic composition & express yourself through effectively composed photographs with the help of this in-depth guide. We were able to negotiate an exclusive 50% off discount for our blog readers which ends soon if you want to check it out.

New: Modern Approach to Photographic Composition
This eBook is broken down into 10 chapters that contain 90+ pages packed full with theory, techniques, concepts, advice, and tips & tricks to help you master composition.
Deal ending soon: Modern Approach to Photographic Composition at 50% Off
Like This Article?
Don't Miss The Next One!
Join over 100,000 photographers of all experience levels who receive our free photography tips and articles to stay current:


Leave a Reply