Lighting helps to transform a three dimensional experience into a two dimensional experience. A photographer’s goal is usually to mimic the three dimensional experience on a two dimensional platform. Light or the absence of it, in the form of shadows, achieves this goal. Jay P Morgan elaborates:
Light helps you create depth and texture, two essential parameters that give your photos dimension.
Light Source and Camera View
The closer your light is to the camera view, the less dimension and texture you are going to have. So, what is camera view? Camera view is the line of sight from your camera to your subject.
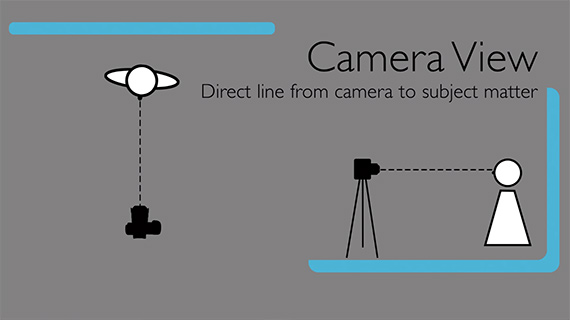
Camera View
This is the line at which the camera is looking. It’s not a vertical line or a line going side to side. It’s a line that goes straight out of the lens and toward the subject.

In the above side by side comparison, it’s apparent that the closer the source of light is to the camera view the flatter that light is and the less dimension you are likely to see.
If the only way you can shine that light on your subject is straight on, at least change the angle. The change in angle gives a bit of depth and dimension compared to what you get putting the light straight on camera view.

Light Above vs. Light Below Camera View
Light Above Camera View
In the left image (above) the light is raised above the camera view. It creates beautiful butterfly lighting and a nice drop shadow effect.
Light Below Camera View
Similarly, the image on the right (above) demonstrates the effect when the light is pulled down. The light still creates dimension because there is a lot of shadow and a lot of texture.
Split Lighting
Below is an example of a lighting arrangement that is known as split lighting.

Split Lighting
Move the light to the side, around 90 degrees or at least beyond 45 degrees. This setup produces a partially lit side of the face with the other side being completely in shadow.
If your model now turns slightly off the camera view, face toward the light, it produces a beautiful result. Like this:

Using a reflector is advisable when you need to fill in some light from a direction opposite to your key light. Make sure that you don’t use an external light that’s as powerful as the key light, as it will create two sets of shadows. That’s not a natural look.
Texture
The best way to create texture is by moving the light away from the camera view, either to the side or below or above.
This is a crumpled piece of paper with the light near to camera view. No texture, right?

Light at camera view with no texture
Here’s that same piece of paper, with the light now coming from the side.

Texture!
Here’s another example of how you can use off-camera view lighting to capture texture on a face.

So, the simple rule is light when coming from off the camera view will produce texture and dimension. Light coming in from straight on (camera view) will hide texture and leave your images looking flat.
Like This Article?
Don't Miss The Next One!
Join over 100,000 photographers of all experience levels who receive our free photography tips and articles to stay current:


Leave a Reply