Professional photographer Darlene Hildebrandt recently shared some indispensable tips on how to use the Background Removal AI tool in Luminar Neo, allowing photographers to unleash their creative potential. This tool offers unique capabilities, opening the door to endless creative possibilities:
How To Use the Background Removal AI
To get started, simply choose your desired image, then head to the regular edit panel. To find the Background Removal AI tool, go to layer properties and click on the Masking Tab, where you’ll find the tool. Once you’ve clicked on the tool, the program will begin to analyze your image, identifying the subject and background.
With a simple click on “remove,” you will see your background disappear. However, this is only the first step. Darlene emphasizes the importance of using the “refinement brush” feature, which allows you to perfect the separation of your subject from its background.
The tool also cleverly colors different parts of your image for easy identification – the subject is highlighted in orange and the background is blue. Areas in-between, known as the “transition zone,” are color-coded in gray.
Getting the Perfect Cut-Out
Achieving the perfect cut-out is all about attention to detail. The trick lies in zooming in to check your image closely and making sure all parts of the subject are included. If part of the subject is missing, simply paint over the area with a large brush using the “object” button.
The tool will intelligently find the edges and do the rest of the work for you. However, some parts of your subject might need a more detailed approach. For example, if there’s supposed to be transparency between certain parts of the subject and the background, like wires or thin elements, you’ll want to use the “transition” brush.
Saving Your Image
Once you’ve achieved a perfect cut-out, you can then save your image for future use. Be sure to save your image as a PNG file. This is crucial as only PNG format supports transparency. Also, don’t forget to tick the box for “Save transparency” to ensure your background is completely removed.
The Tool Works on Animals Too!
One of the great features of this tool is that it also works excellently on animals. Whether you’re trying to isolate your pet in a photo or you’re working on wildlife images, the Background Removal AI tool will come in handy.
Adding New Backgrounds
With the subject isolated, you can now add a new background to create unique compositions. It’s important to pay attention to the lighting in both the subject and background images for a more realistic composite. You can also make further adjustments to ensure both elements of the image match, such as desaturating certain colors.
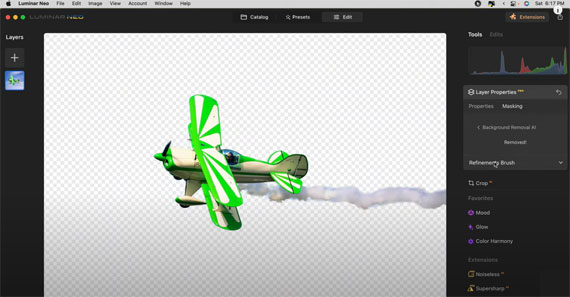
More Complex Subjects
For more complex subjects, like an airplane with smoke trailing behind, the tool may require a bit more finesse. You can use the refinements brush to include the smoke, making sure to use a larger transition brush for the transparency.
For Further Training:
Whether you’re brand new to photo editing, or want to add Luminar Neo into your workflow – this new Luminar Neo Masterclass may help. Designed to help you gain confidence in your photo editing abilities, speed up your workflow and create stunning images. It is 30% off for a limited time if you want to check it out.

You’ll learn the best approach to photo editing starting with the basics before moving on to adding creative touches. Clean up spots, powerlines, do portrait edits, replace the sky, remove the background, control the light in 3D and more.
Deal ending soon: The Luminar Neo Photo Editing Course at 30% Off
Like This Article?
Don't Miss The Next One!
Join over 100,000 photographers of all experience levels who receive our free photography tips and articles to stay current:


Leave a Reply