If you’re used to working with Lightroom, you know how convenient it is to work with the sliders. But, the sliders that affect the entire image simply aren’t enough. Using local adjustment tools is pivotal in taking your editing skills to the next level. In this video, photographer Thomas Heaton takes you through his editing workflow and discusses the benefits of using local adjustment tools in Lightroom:
Lightroom’s sliders for exposure, clarity, highlights, shadows, and so on, affect the entire image. You have very limited or no control over the area in the photograph where those parameters have an effect. These adjustments are termed Global Adjustments. On the other hand, tools like the brush tool, gradient tool, and radial filter are picky about where they affect an image. You can specify the areas that are affected by those adjustments. They’re Local Adjustments and can be quite powerful when used correctly.
Working with Local Adjustments
When working with local adjustment tools, start by breaking your image down. Identify your subject, the area of interest, and those areas that aren’t interesting. Then work your way into adding emphasis to the areas where you want the viewers to spend more of their time.
This doesn’t mean that you need to strictly stick with using local adjustments only. Heaton starts by making slight global adjustments to exposure, contrast, vibrance, chromatic aberration, and lens profile correction. Once the basic global adjustments are covered, he heads on to fine-tuning the image with local adjustments. Here’s a breakdown of what he has done to the image to make it more interesting:
- The cloud on the hill is one of the interesting aspects of his image. He increased its exposure and clarity using the radial filter. This brightened the cloud and defined its structure better. However, by making use of the luminance mask, he instructed Lightroom to affect only the brighter areas.
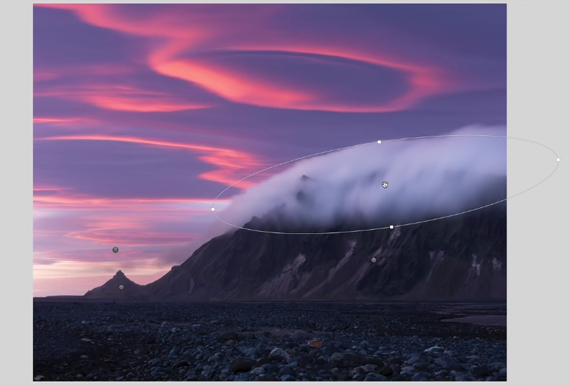
The four radial filters identified by the round pins.
- He used another radial filter on the hill to increase the exposure a little bit and increase clarity for more definition. Increasing clarity adds in a bit of contrast while removing the haziness around the hill.
- He used another radial filter on the distant pyramid mountain to increase clarity. This time again, using the luminance mask, he set the radial filter to affect only the shadow areas.
- With another radial filter on the sky that has fewer of the lenticular clouds, he brought down the brightness by reducing the exposure almost by a full stop. Again, by using the luminance mask, he instructed Lightroom to affect only the brightest part.
While a radial filter is a great local adjustment tool, it’s still not sufficient if you’re looking to make adjustments in minute detail. The brush tool helps you be very specific about where you want the adjustments to be made.
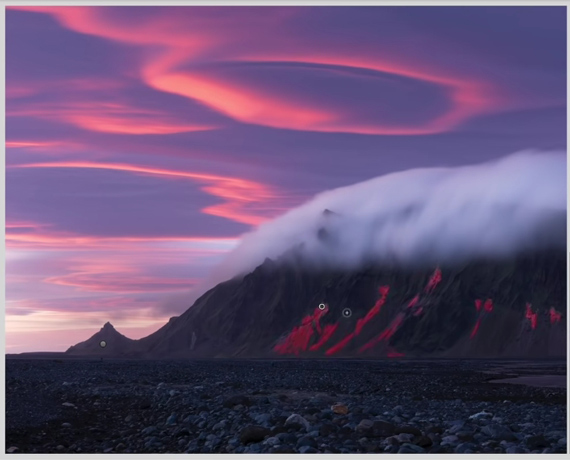
- Heaton used the brush tool on the pyramid mountain and reduced the exposure. By doing so, he got rid of the washed-out look of the mountain. Again, when using the brush tool, he used the luminance mask to prevent the adjustment from affecting the brighter areas of the sky.
- The way Heaton used the next set of adjustments is quite interesting. He used it on the sand of the hills to add some highlights by increasing the exposure slightly. This has definitely added more interest to the hill.
Getting Rid of Unwanted Elements
While it’s important that you highlight the interesting points in your image, it’s equally important to get rid of distractions. The best time to do so is obviously when you’re taking the photos. But sometimes you may miss out on doing so; this is where post-processing comes to the rescue.
In Heaton’s case, some other photographers have crept into the frame, and also there’s some trash and rocks that are distracting.
Finally, a big change that he makes to his image is the ridgeline of the mountain. He doesn’t want to give away that the ridge is going back down. So, his aim is to cover up that portion with some clouds.
To make the alterations in the image, Heaton opens the image in Photoshop and uses the following tools:
- Using the Spot Healing Tool (he mistakenly says Clone Stamp Tool in the video), he eliminated the photographers who appeared as tiny spots in the image. This is just a matter of one click on the photographers using the spot healing tool.
- To get rid of the distracting rocks and trash, he used the Content Aware Fill. This tool uses Photoshop’s intelligence to fill the selected area with relevant patterns based on the surroundings. Select the area that you want to get rid off, and go to Edit > Fill… Select Content Aware from the drop-down and hit OK.
- Finally, to cover the ridgeline on the mountain, he copied a section of the clouds with no ridgeline visible. He then pasted it over the ridge and transformed it so that the ridgeline was covered by the clouds. Next, with the inverted mask tool applied on the layer, he painted over the ridge with a soft brush tool with white selected. This makes the clouds visible only on the areas he painted over.

“Going in and editing your image piece by piece and building it up is such a fantastic way to process and edit your photographs.”
Like This Article?
Don't Miss The Next One!
Join over 100,000 photographers of all experience levels who receive our free photography tips and articles to stay current:


Leave a Reply