Waterfall photography is a favourite subject for many a nature photographer. In fact, a good waterfall can be a magnet for almost anyone with a camera.
Like any subject in nature photography, waterfall photos also come with their own set of challenges. A beginner can be disappointed with their results time and time again, simply due to simple mistakes that can be easily overcome. Really good waterfall photography is not about expensive equipment or hi-tech methods; just a decent camera and a basic understanding of a few manual settings.
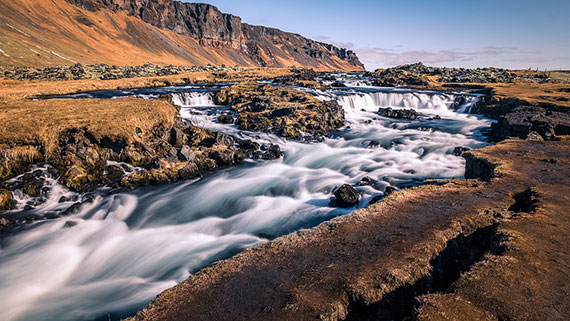
Photo by Giuseppe Milo; ISO 200, f/9.0, 2.5-second exposure.
In fact, a really good waterfall photograph probably owes more to good lighting and composition than to technology. This is great news; it means you can improve your waterfall photos no matter what sort of camera you have! Here are five simple tips to help you take some great waterfall photos of your own.
Waterfall Photography Tip #1. Choose the Right Weather Conditions.
Many waterfalls are found in the rain forest, or in heavily wooded areas. That means the same rules of lighting that apply to rain forest photography also apply to waterfall photos. Most of the time you will get your best photos in overcast weather. Cloud cover creates even, low-contrast lighting that eliminates harsh patches of light and shade from your waterfall image. While we are on the subject of lighting; avoid using your flash in most situations. It will destroy the atmosphere created by the natural light.
You should also try to avoid windy days. If you are working with a slow shutter (see tip #2), you don’t want the trees to be blowing about and blurring the background in your photo.
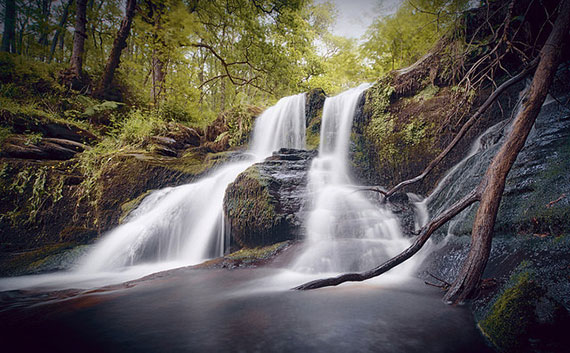
Photo by ShinyPhotoScotland
Waterfall Photography Tip #2. Experiment With Shutter Speeds and Carry a Tripod.
You have surely seen the soft wispy effect photographers create by shooting flowing water at very slow shutter speeds. This is a popular technique and has great impact for some photos. However, it is not the only method you should try. Some photos can look great, but if you do all your photos this way it can become boring and repetitive. Also, the wispy effect just doesn’t suit every waterfall. In my experience, cascading waterfalls that tumble over rocks and have several levels look great at slow speeds. I usually a shutter speed of one second. However, waterfalls that fall straight down over a ledge into a pool usually look better with a bit more definition; try a speed of about 30/sec or 15/sec. Experimenting with different speeds will always get you the best result in the end.
Regardless of the effect you are after, you should always have your tripod with you for waterfall photography. If you are in the forest on a cloudy day, the level of light will be very low, and you may find yourself forced to use very slow shutter speeds whether you like it or not.
Waterfall Photography Tip #3. Explore Downstream.
When you arrive at your location, the first instinct is usually to stand right in front of the waterfall and take the most straightforward angle. However, the best result is often found when you explore downstream. You may find an angle where the stream cascades toward you, with the main waterfall in the background. Or you may be able to frame waterfall through the branches of the trees. There really is no end to the possibilities; the point is, there is never only one shot to take at a waterfall, and the obvious photo is not always the best.
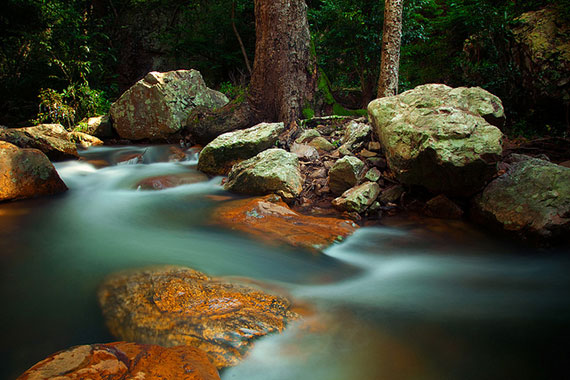
Photo by Vinoth Chandar
Waterfall Photography Tip #4. Put Your Wide-Angle Lens To Work.
A wide-angle lens comes in handy for a few reasons. Firstly, it has a naturally strong depth of field. If you are using a slow shutter speed for the water, it is important to keep the rest of the photo sharp. If your main subject is moving and the surroundings are out of focus, your result will just be a big blur. Secondly, the wide-angle lens has an exaggerated sense of perspective, allowing your viewer to feel that they are looking up the stream or into the rain forest, not just at a flat picture.
Waterfall Photography Tip #5. Let The Flow Of Water Shape Your Composition.
Whenever you compose a photo, you use the lines and shapes in the picture to create the best impact. The direction of movement in the water can create a powerful visual flow in your photograph. The viewer’s eye will naturally follow the direction of the water, so you should use this to help shape your composition. If you stand downstream so that the stream flows toward the camera, you can create a distinct visual direction in your composition that will truly catch and lead the eye of the viewer.
So, there you have five very simple ways to take better waterfall photos. As in all nature photography, writing and reading about it is never as inspiring as getting out and doing it. I hope these tips give you some motivation to grab a friend, get out there and practice. Have fun!
About the Author:
Andrew Goodall writes for http://www.naturesimage.com.au and is a nature photographer based in Australia. He manages a gallery in Montville full of landscape photography from throughout Australia.
Like This Article?
Don't Miss The Next One!
Join over 100,000 photographers of all experience levels who receive our free photography tips and articles to stay current:


Wow! Awesome tips Andrew man, this is really helpful for me. First picture is looking so nice, i tried sometimes but it didn’t happen like you. I don’t know about other people but it will helps me a lot. Exploring is very important, one day i was go for take some photos of nature but a mountain lion spoiled all so, i had to go into the car for my life.
I think here is no photo editing work is happen, sometimes photographer do this type of things because of make an image so beautiful.
In the end i must have to say this is an extra ordinary piece of writing which really will help me. so thaks
Way, way back in the film days (I’m talking 1960’s and earlier) when you wanted to make a big print, you would.be forced to use a 4×5 camera, small aperture and slow film. Add to that a cloudy day for low contrast light and a polarizer to take the gloss off of wet rocks whould give you a one second or longer shutter speed. Back then everyone had silky water. It simply came with the territory.
If you read the three volume Ansel Adams series, he talks about rendering small waterfalls in this fashion. He also mentions that he liked keeping a faster shutter speed to show the darts and texture in bigger falls. You can see the different techniques emerge as film and camera technology advanced during his lifetime. He often used a Hasselblad in his later years and his rendering of water changed.
There is so much more in these photographs than just the detail in the water, the composition background , sky , saturation , color. There are many ways to approach the photography of these great locations , have an open mind to others ideas and support fellow photographers. Critic should be on the technical side of photograhy , not the persons vision. Nice aritcle.
Rob
We are all artist who use a camera to portray beauty. Vango, Rembrandt , davinci all painted beauty differently. If you like it look at it in aww. And if you don’t, then do not look.
Shoot what you love and admire it but PLEASE! Do not put down what others find beautiful.
I almost put my camera down due to people like you who constantly bashed what I shoot, which would have been a shame, now I shoot for me and if someone does not like it so be it!
Sincerely, Robert Gancio
Glad to see I’m not the only one who is getting bored with the “silk water” look! I like to see water that is water, not frozen. I spent too much time in Alaska just waiting for spring so I could see “water being water.”
Don G. Fox & Dave’s Adventures in Photography
So Don, try to get a little more creative with the images… I love to photograph waterfall but in this area not so many waterfall to shot. But I have I agree to a point that you want the waterfall to look natural and some of the “Cotton Candy” look is overdone as is the over softening in Portrait work.
I’ll try to find the photo I took a while back of a fairly nice waterfall where I did want to get a softer look but instead of going with just a slower shutterspeed, I took multiple shots with different exposures (tripod) and combined in layers the soft cotton candy look with a faster shutterspeed shot that allowed some of the “action” of the falls to show through. Try it to get the best of both worlds.
I agree with Mr. Fox. Everyone these days is so enthralled with the “silky water” look that it’s all we seem to see anymore. It’s not that hard to do. Just use a tripod and a slow shutter speed. Big deal. I hate that look, and MUCH prefer the “frozen waterfalls” approach. I just don’t get why everyone is so in love with blurry water! Geesh!
An opportunity to take a picture of a waterfall doesn’t exactly come by often, so you certainly should know how to capture it perfectly when it does. The pictures you put up are beautiful, and certainly demonstrate what can be done with these kinds of subjects.
Really? Where on the planet will you see waterfalls that like the photos in this article.. When I look at a waterfall I see water boiling, splashing, droplets, exploding, not something that looks like cotton candy. I use a fast speed and open lens. I want to see water acting like water. The water here looks more like well combed grey hair. Sorry but you don’t get my vote.
Don G Fox
Thats what make photography different by different people. Obviously everyone’s preferences are not the same. You have your opinion and thats fine. I see waterfalls pretty much anytime and everytime I go out to take photos. The water stopped at Fast Shutter does not appeal to me at all that your talking about. The photos that this gentleman has shown you have some problems with being a little too white on the water spots. But are still beautiful will always look better than the stopped water in my opinion. So keep doing what you like and not put off on others’ work or likes
Dave’s Adventures in Photography on facebook
Have just come across your comment and couldn’t agree more. There is nothing exciting or natural about this pic. Having learned how to reproduce this effect I know I will never intentionally do so.