Waterfalls seem to grab the hearts and minds of people. Go to any location that has one or more waterfalls and it is pretty much a guarantee that they will be a major attraction, if not the main attraction, of the area. However, as beautiful as waterfalls are, it is not so easy to capture that beauty with a camera. It is easy to produce pictures of waterfalls; it is not so easy to produce powerful images.
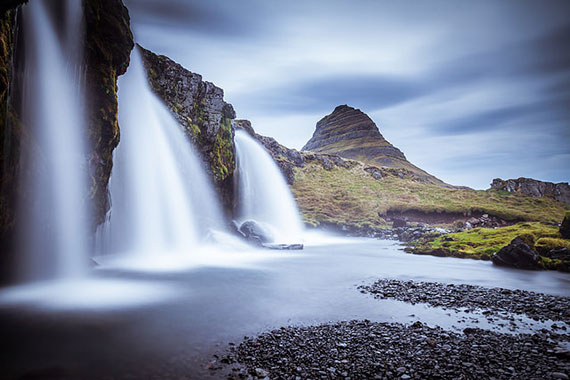
Photo by Andrés Nieto Porras; ISO 50, f/6.3, 1/30-second exposure.
Waterfalls provide their own unique set of problems which requires a unique set of solutions. This article is about those unique problems and the solutions that allow photographers to produce images that communicate the power and beauty that is inherent in the waterfalls that stand before their lenses.
Weather
Weather plays a huge part in producing great waterfall images. Quite simply, waterfalls do not photograph well in nice, sunny weather. The best time to photograph waterfalls is in overcast weather.
Some waterfalls will photograph best in light overcast. Light overcast produces a light that is gentle but which still has enough power to bring out the colors in a scene. Other waterfalls photograph best in strong overcast. Strong overcast can produce a very moody image with a power to convey that sense of mood in an image. In fact, very powerful waterfall images can even be produced in rainy weather (during a break in the rain).
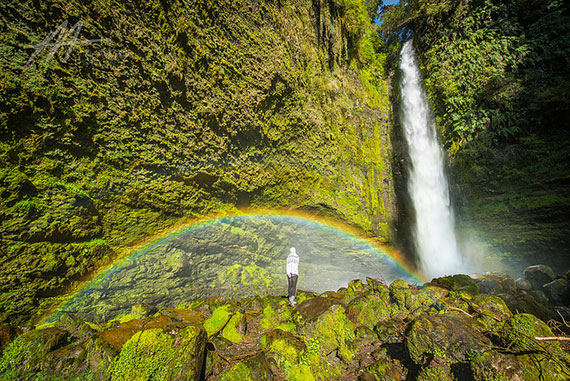
Photo by Adam Allegro; ISO 50, f/9.0, 1/40-second exposure.
An Old Filter
One of the major challenges in photographing waterfalls has to do with water getting on the lens (or the filter in front of the lens). Powerful waterfalls can drop huge amounts of water which produces a mist. In other cases, the weather may produce fog, drizzle, or rain that gets on the lens. All of this can be exacerbated by wind (which always seems to be pointed directly toward my lens).
A partial solution is to place an old, clear filter in front of the lens while the equipment is being set up. Once the photographer is ready to go, the photographer will need to remove the filter from the lens in order to take the shot.
Tripod
Don’t even think of photographing a waterfall without a tripod. A large part of the nature of waterfalls is the movement of the water. This movement is most often captured with shutter speeds that are slow enough that clear images can not be produced with a handheld camera.
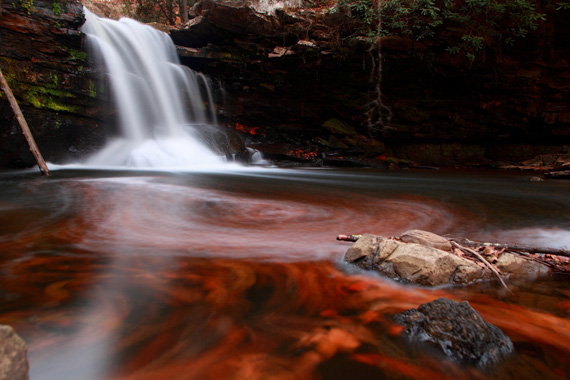
“Fiery Autumn Waterfall” captured by Forest Wander
White Balance
The lighting involved with waterfall shots can be tricky. In overcast or rainy conditions, the light will likely have a blue tint. If the waterfall is in a forest, the light may bounce off the trees and pick up a green tint. Neither the auto white balance nor the preset white balance options on a camera will guarantee accurate white balance. The best solution is to perform a manual white balance (your camera manual will explain how for your particular camera).
Polarizer
Objects that are wet tend to produce glare. This glare is often polarized. This is particularly an issue with waterfall shots because the rocks and vegetation near the waterfall will be wet and will almost certainly have a certain amount of glare. A polarizer will remove the glare. In addition, a polarizer has a secondary effect. By removing the glare, the color saturation will improve.
Bubble Level
Sadly, the human eye is not a very good judge of whether a camera is level. Luckily, a bubble level is designed specifically for leveling a camera. A bubble level is an inexpensive, small, easy to use device that fits into the hot shoe of a camera and allows a photographer to verify that the camera is level. It works in the same way as a carpenter’s bubble level. Simply center the bubble between the lines and the camera is leveled.
Photo by dahorsburgh; ISO 800, f/10.0, 1/800-second exposure.
Composition
Identifying and capturing strong composition is an extremely important part of creating powerful waterfall images. While the purpose of this article is not to carry out a thorough review of composition, a couple of aspects of composition, curves and environment, will be covered.
Curves can make or break a waterfall image. With waterfalls, two types of curves are particularly important. The first type of curve is the curve formed by the water. Waterfalls that have water that flows or falls in such a way as to form curves tend to create much more interest than waterfalls where the water simply falls straight down. In essence, graceful curves add an element of elegance to a waterfall. The second type of curve is any curved object that points toward the waterfall. This type of curve will repeatedly direct the attention toward the waterfall and strengthen it as the center of interest.
The second major component of waterfall composition, covered in this article, is the environment surrounding the waterfall. This is extremely important to many waterfall shots. By itself, falling water is not always that interesting. Rather, it is the surrounding environment that gives waterfalls much of their character. Therefore, why not include some of that environment in the image to bring out the waterfall character. The surrounding rocks, trees, and vegetation can make the waterfall image come alive.
Shutter speed
What shutter speed should be used to blur the falling water? That seems to be the first question that people usually ask about shooting waterfalls. However, there is no such thing as one correct shutter speed for shooting waterfalls! Rather, the proper shutter speed is a function of five factors.
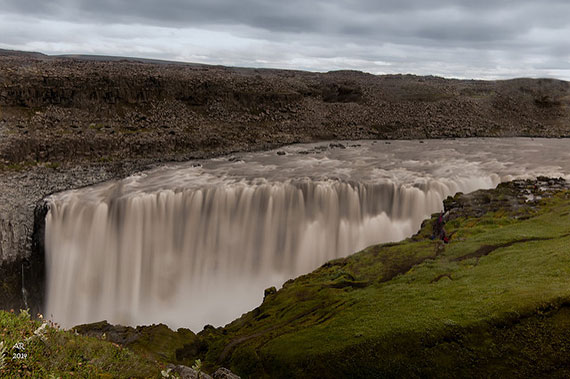
Photo by Anita Ritenour; ISO 100, f/25.0, 10-second exposure.
- The amount of blur desired
- The volume of water
- The speed of the water
- The distance between camera and water
- The direction of water flow with respect to the lens
In short, the best shutter speed varies from one waterfall to another. At first, that might sound a little bit daunting, “How can I ever figure out the best shutter speed; it changes from one waterfall to the next?” Actually, with a digital camera, it is easy to find the best shutter speed. You can simply take some test shots at different shutter speeds and examine the results on the camera monitor. Zooming in on the monitor will allow you to see the water detail fairly well.
For large waterfalls with huge volumes of tumultuous water, where it is desired to capture the violent nature of the falling water, 1/100 second is a good shutter speed with which to start. For smaller waterfalls, waterfalls with less water, or waterfalls where it is desired to produce a dreamy look, a shutter speed of 1/2 second to 2 seconds might be used.
Exposure
Getting the right exposure can sometimes be a challenge when photographing waterfalls. Probably, one of the biggest problems is that it is easy to clip the highlights in the water. What this means is that the detail in the water is lost, and the water becomes just a big area of pure white. When this happens, the water just doesn’t look very real. The solution for this problem is to take a test shot of the waterfall and check the histogram on the monitor of your digital camera. If the histogram is cut off on the right side, the highlights have been clipped. If this is the case, the exposure needs to be decreased.
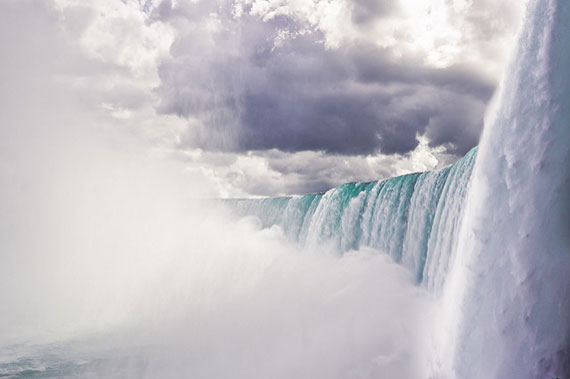
Photo by Martin Strattner; ISO 100, f/11.0, 1/250-second exposure.
Summary
With these tips, you should be on your way to capturing some great waterfall images.
About the Author
Ron Bigelow (www.ronbigelow.com) has created an extensive resource of articles to help develop photography skills.
Like This Article?
Don't Miss The Next One!
Join over 100,000 photographers of all experience levels who receive our free photography tips and articles to stay current:


This blog speaks very well. Thanks for sharing these.
I really love this post Its a next level photography
Great post! But I agree with Elenore (18 May 2015) and Faizan (December 25th, 2020 comment). The hazy water seems overdone. In my opinion, it is unnatural. Is it required in every waterfall, river/stream, and ocean photo? It doesn’t show the water’s beauty.
Thank You for sharing
very good information about photography. i agreed with you
A very good article containing valuable information about photography. It will take the photography to the next level.
Great article However, I agree with Elenore (May 18th, 2015 comment) and Faizan (December 25th, 2020 comment). The blurred water is being overdone. It looks unnatural as far as I am concerned. It is ok in some photos but does it have to done in every waterfall, river/stream and ocean photo? It doesn’t show the beauty of the water in the scene.
Pretty cool tips. I really appreciate your post. I definitely visit this blog again
Thank You for sharing such a wonderful article. Worth reading it.
I realize I’m in the minority on this, but I can’t STAND these blurry waterfalls, where the photographer looks like he’s trying to turn the PHOTOGRAPH into a video. If I want a video of a waterfall I’ll use my video feature.
Thank You for sharing such a wonderful article. Worth reading it.
I realize I’m in the minority on this, but I can’t STAND these blurry waterfalls, where the photographer looks like he’s trying to turn the PHOTOGRAPH into a video. If I want a video of a waterfall I’ll use my video feature. I just don’t get the appeal of blurry, fuzzy waterfalls. Color me old-fashioned, but I’ll take my water “freeze framed,” thank you. This has nothing to do with the author’s excellent article which is a good tutorial for those folks who want to fool around with this technique. Just not anything I’d ever want to do…. To each her/his own….
Oh, it was very helpful. I hope we’ll give you more techniques
First, all photography is subjective. That said, I totally agree with Elenore. I don’t like any of the images either. Rushing water is not silk. Or milky! If the photographer’s intentions were to create fine art… fine. Fine art photos don’t have to emulate realism. But IMO, such long exposures are an abomination because they dilute/destroy the power of the waterfall. I love to shoot waterfalls… but always with the intention of capturing the magnificent power of the rushing water falling over the precipice. That is the challenge. My waterfall images succeed to the degree that I can impart that ‘power’ in the image.
Screwing on a filter and grabbing a long exposure is simple. Maybe that’s why so many do it. Next time out, try to capture the power inherent in the waterfall and then try tell me that it isn’t a superior image! Happy shooting!
Very informative article. Thanks for adding so much value. I am a professional photographer and always scouring the internet for tips and this is a website I am going to book mark!
Wonderful Photography techniques and amazing pictures have focused here . This will very helpful for New photographer. Thank you Ron Bigelow !
Great Post!
Amazing…pics with amazing Tips….
Thank you so much for sharing
very useful…
Very helpful post.
I have always wanted to figure out how to shoot waterfalls better. This article was extremely helpful, and it was nice to read about how shutter speed can affect the amount of blur that is desired from the water. This has been very helpful so thanks for sharing this with me. I’ll make sure to practice with these techniques.
My passion is photography. I try to capture the sunset most of the day. But every time I am not satisfied. I have all of modern gadget with camera and lens. In here the 1st, 2nd & 4th images are awesome. It looks like artificial picture but I know all of these are real. Thanks a lot for your great post and it will be very helpful for my photography.
Amazing tips Really it’s very helpful and informative tutorial for all photographer. Thank you for your innovative work.
Exquisite photography – you must come visit South Africa. You will get amazing shots of the African bushveld as well. Big fan!
Excellent tips listed here. Waterfalls are always such a beautiful natural occurrence to photograph. Shutter speed and exposure play a huge roll. The photographs include in this post are wonderful. I especially like the ‘Firey Autumn Waterfall”. Thanks so much for posting!
I agree with Elenore. Almost all professional photographs I’ve seen on waterfalls, it always looks like smoke or a curtain floating down. I enjoy reality and although it takes a lot of practice to get a photo of a waterfall that looks like a waterfall, it’s worth it. I guess it’s because I’m into nature photography and tend not to be too artistic.
Some great shots! Really like the colours in the first one! Oh and would love to shoot Skogafoss (#2) in the winter!
I personally have an intense dislike for all water shots that make the water look like milk. There is not one image on this page that I like. Why oh why does almost everyone do overly long exposures of beautiful natural looking waterfalls and make them look so unnatural ???
I love taking pictures especially about nature. And like this, I’m inspired to capturing some great waterfall images. Great tips. Very helpful! :)
I think that using an ND variable filter will be a good idea!
I have deep passion on Photography. I like to visit here and there and I like landscape photo specially. Your photos are really good. Please send me related article link if you have. Thanks in advance.
Exclusive tips! After reading this article I just inspired to capturing some great waterfall images. Have you any other article related to this one?
Hi Ron! The scenery of a waterfall takes my breath! A polarizer is necessary to avoid the glare, indeed. The color saturation will improves, too. Great article
Fascinating! Very informative tips. I’m so amazed with your editing skills. Brilliant mind! Taking shots of waterfalls are not easy, but with these tips, it would be easier.
The black and white is gorgeous, wish I had the time to spend out in the country shooting landscapes. Maybe when I retire!
Thank you very much for the tutorial.Very helpful.
thanks real helpful..
whats about ND-filters?
Very helpful information. I look forward to applying these techniques. thank you.
very nice one…
Ths is a valuable lesson even for experienced photographers. Thanks for the easy to follow tutorial.
Great tutorial. Very useful.