Why do so many casual and amateur photographers shy away from taking pictures once the sun goes down? Haven’t they seen the great pictures taken at night by other photographers? Maybe they think those type pictures can only be made by professional photographers with thousands of dollars worth of equipment. Well that line of thinking is not true at all.
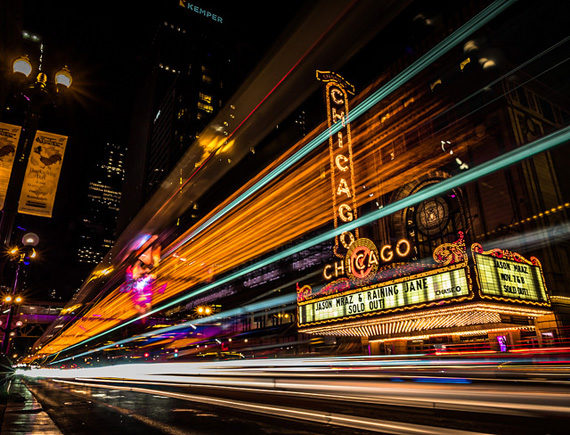
Photo by Mike Boening; ISO 100, f/22, 1-second exposure.
Taking night shots is not as difficult as some may think. If you have a camera, a tripod, and a subject you can take some great night shots. That is, as long as there is some light available. It can be artificial light, moonlight, or ambient light from the atmosphere just after sunset.
Night photography gives you a chance to have the type of shots that are out of the ordinary—not the same type pictures everyone else has.
A few of the more popular night photography subjects are city skylines, well lit downtown areas, moonlit scenes, and tourist attraction areas. However, any scene in your own neighborhood or town that has some sort of light in it is fair game for night photography.
Timing
You don’t have to be out at midnight to take night shots. Some of the best night shots are taken right after the sun has set. Sure it’s dark, but there is still a little ambient light remaining from the sunset in the air. This is important because you might be able to record a little more detail in the shadow areas of the scene at this time of evening. As it gets later in the evening, many of the shadow areas will appear very dark or black with no detail unless there is some sort of artificial light around that area.
Camera
What type camera will you need? A Digital Single Lens Reflex camera (DSLR) is the best choice for night photography. That’s because when using a DSLR camera you’ll have more control over the camera’s exposure settings. Taking pictures at night will require longer exposure times and a DSLR has more options for changing the exposure settings.

Photo by Olli Henze; ISO 6400, f/4.5, 30-second exposure.
However, you can also use a compact camera to take night pictures. Most digital compact cameras have some sort of night mode setting, such as night landscape. A night mode setting will keep the camera’s shutter open for longer periods of time so that the image sensor can absorb more light. The main problem with using a compact camera for night photography is that you won’t be able to choose the exposure settings. In spite of that, your camera’s automatic night mode setting may still be able to produce some good images at times.
Tripod
A tripod is a must! When taking pictures at night the cameras’ shutter can be open for seconds instead of fractions of a second. It is practically impossible to obtain a sharp image using a shutter speed of less than 1/30th of a second while the camera is being hand held. So make sure to use a tripod. Also try using your cameras’ self timer or a remote shutter release when using a tripod. The reason for that is because there may be some camera shake when your finger presses the shutter release even when the camera is on a tripod.
Camera Settings
What are the best camera exposure settings for night photography? There are no standard exposure settings for night photography. Just like daytime photography, the exposure settings for night photography will depend on the amount of available light in a scene.
Get started by taking a shot of your night scene. You can start by using your camera’s automatic mode or any other mode you choose. Take a look at the result on the LCD screen. If the image is too light or dark, adjust your settings accordingly.
If you’re using a DSLR camera, you will be able to manually change the camera aperture or shutter speed. If you’re using a compact digital camera, try using the exposure compensation EV+ or EV- feature. That will allow more or less light into the camera. (Note: You might not be able to use that feature while in a night mode.)

Photo by Anh Dinh; ISO 100, f/14, 30-second exposure.
Bracketing
Bracketing your exposures can be helpful when taking night shots. Bracketing your exposures means to take several shots of the same scene at different exposure settings. Take one or two that will be darker and one or two that will be lighter than the recommended exposure setting. You will then have more images to choose from when deciding which exposure setting was the best.
Overall taking night pictures is not more difficult than taking pictures in the daytime. It might be a little challenging in the beginning but it will be a fun and exciting challenge. Once you know a little about camera exposure basics and the operation of your camera, you are well on your way to getting that great night shot.
About the Author:
Keith Jones writes for http://easybasicphotography.com, a site geared toward beginners through serious amateurs who want to learn a little more about basic digital photography.
Here’s a helpful video on the topic:
In this how to video we show you something you can do with most cameras: time exposure / long exposure. We took some pictures at night and got some great results, which we also show in the tutorial. We also talk about settings and techniques for this creative kind of night photography. The best things is that you don’t need the best camera or lens to get some stunning images.
Like This Article?
Don't Miss The Next One!
Join over 100,000 photographers of all experience levels who receive our free photography tips and articles to stay current:


Republishing an article from 2012 without updating it to include advances in technology is just plain lazy.
This is so out of date, it takes no account of IS or Mirrorless cameras, as to be worthless!
Actually, the camera may be a major reason more people don’t. Back in the 1990’s, my aunt loaned me her pocket 35mm. it had “night” and “landscape,” but not “night landscape.” I learned the hard way that you don’t use “night” to shoot landscapes, no matter what time of day it is. My old Nikon FG was pretty good at night shots, even though it only had basic “program” (and aperture-priority) modes. Then I got a D60 and a Fuji Finepix Z70 (for when I didn’t want to be lugging an SLR around). Neither of them have “night landscape” modes and both consistently overexpose so badly in a night situation that I have to put the D60 in manual (the Z70 is hopeless).
Very insightful! Night shooting will be my next challenge. Thanks