Do you want to make quick selections in Photoshop?
Are you looking for how to make precise selections in Photoshop?
Then you are in the right place.
In this article, I will share with you how to use three excellent Photoshop tools to quickly make precise selections. In fact, I always use these tools to make quick selections in my post-processing workflow.
These selection tools are easy to use, and the results you will get are excellent, regardless of what genre of photohgraphy you practice.
In this article, you will learn about the following selection tools:
- Object Selection Tool
- Quick Selection Tool
- Magic Wand Tool
Object Selection Tool
If you want to select a specific object in your images, then Object Selection Tool is useful.
The Object Selection Tool automatically selects an object within a defined region.
The Object Selection Tool is one of the quickest tools to make initial selections.
Below is a beautiful flycatcher. We will select the bird and the perch.
Let’s start with steps to make selections using the Object Selection Tool
Create a background copy layer by selecting the background layer and dragging it to the Create New Layer icon ( the + symbol).

While the background copy layer is selected, click Object Selection Tool (keyboard shortcut: w).
Select “new selection”.
There are two mode options: rectangle and lasso.
If the object and background are pretty separated in the image, select the rectangle. If the main object is surrounded by other objects or distractions near the object, select the lasso.
Keep the Enhance Edge and Object Subtract options checked (enabled).

If using the rectangle, draw a rectangle around the object to be selected: in this case, the bird. The object will be selected. Yes, it is as simple as that.

If your object isn’t clear, then use the lasso. Likewise, if the shape of the object is a bit complicated, that’d another good reason to use the lasso.
With the lasso, click and drag your cursor around the object. Complete the selection by joining the end point with the starting point. (For selecting the perch below the bird, I have used the lasso.)
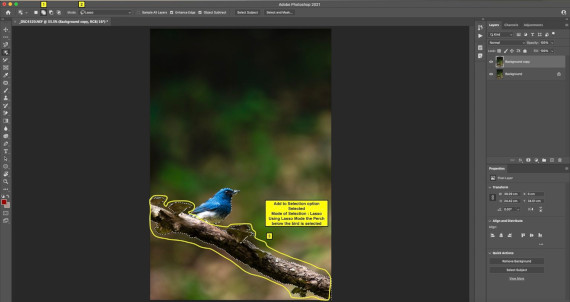
If you want to select an additional area, simply select “Add to Selection”. Use the methods described above to select an additional area.
If any area gets selected that you don’t want selected, then choose “Subtract from Selection”. Select the area which needs to be unselected. That area will be subtracted from the main selection.
While you have selected the object, you can make targeted adjustments using adjustment layers or add layer masks based on your requirements.

Quick Selection Tool
If the object in the image has distinct edges, then the quick selection tool is quite helpful.
You can make initial selections faster with the quick selection tool.
However, on the flip side, if the image does not have clear edges between the object and its surroundings, the quick selection tool may not be helpful.
For demonstration purposes, we have a spotted deer (a chital)that’s running. I would like to select the deer for some targeted adjustments.
Here are steps to use the Quick Selection Tool
Create a background copy layer by selecting the background layer and dragging it to the Create New Layer icon ( the + symbol).

While the background copy layer is selected, click “Quick Selection Tool”.
Click “New Selection”.
Adjust the size and hardness of the brush. For smaller objects, use the smaller brush size; for larger objects, use a large brush size. The hardness option controls the smoothness between selected and unselected areas.

Now, click on and drag the object to be selected. The object will start getting selected.
To add or subtract the selection, use the options Add to Selection and Subtract from the Selection.
Keep the Enhance Edge option enabled.

Once you have finalized the selection, apply the targeted adjustments using the new adjustment layer. Or you can add a layer mask to make specific targeted adjustments.

Magic Wand Tool
The Magic Wand Tool Helps you select areas with similar colors.
Suppose you want to select and edit different areas of the image with similar colors. In that case, the Magic Wand Tool is a great option.
Here are steps to use the Magic Wand Tool
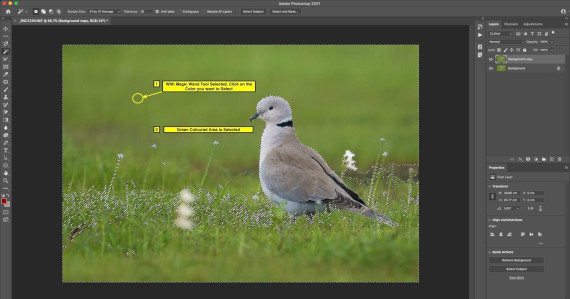
We have this image of a beautiful dove in the rain. Surrounding the dove is lush greenery. I want to apply targeted adjustments to the grass, such as vibrance, saturation and noise reduction.
We have a uniform green color in the image, so we will use the Magic Wand Tool to select the bird’s surroundings.
Create a background copy layer by selecting the background layer and dragging it to the Create New Layer icon ( the + symbol).

While the background copy layer is selected, click the Magic Wand Tool.
To start with the Magic Wand Tool, choose the sample size and set the tolerance value to default. Or you can set sample size “11 by 11 average” and tolerance at 25. (These are just starting points; feel free to change it as you go.)
The sample size determines how much area is considered for color sampling. With the tolerance number increased, the areas additional to the desired color might get selected. So it’s good to choose a tolerance value on the lower end.
If you want to select an area that is not continuous, then uncheck the “Contiguous” option.

Click on the color you want to select.
Once you have made the selection, you can apply a targeted adjusted using the adjustment layer.

These are the quick selection techniques you can use in Adobe Photoshop.
Based on the image and adjustments you are going to apply, the selection technique you need will differ. Sometimes I use three selection techniques for an image, and sometimes just one is good enough.
I hope you enjoyed these tips on selections in Adobe Photoshop.
Which of the techniques you are going to try first? Let me know by leaving a comment below.
About the Author:
Shreyas S. Yadav is an engineer and photographer of wildlife and nature. He is also a writer and lifelong adventure explorer. Through his writings, he teaches about digital post-processing and nature photography. Shreyas shares field techniques about nature photography, post-processing and wildlife photo stories on his website.
Like This Article?
Don't Miss The Next One!
Join over 100,000 photographers of all experience levels who receive our free photography tips and articles to stay current:


Thanks. Very helpful summary of commonly used selection tools.