Sharpening is a key piece of post-processing, especially if you shoot in Raw. Luckily Lightroom has everything you need, from capture sharpening to selective sharpening to output sharpening. In the video below, Adobe expert Terry White demonstrates all you never knew you ever needed to know about sharpening in Lightroom Classic CC. I bet even expert Lightroom users will learn something new:
If Lightroom is your primary editing software, you’ll be happy to learn that it has plenty of little tricks for sharpening, some that even advanced users might not know about.
If you shoot raw, there’s always going to be some sharpening you need to do during post-processing. This is true to a lesser extent with JPEGs, but it’s especially true for raw. When you tell your camera to shoot in raw, it essentially turns off all the camera’s editing capacities. So where it will always sharpen a JPEG, it leaves raw images completely alone.
As a result, no matter how good your camera is there will always be some sharpness lost during the process of loading your images into any software, Lightroom included.
“There’s an inherent amount of sharpness that is lost from the process of transferring the image from the camera to the computer…especially if you’re shooting in raw.”

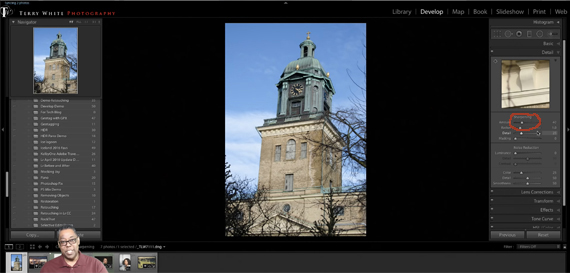
White’s raw image straight out of the camera
Lightroom, and other raw editing programs, will sharpen upon import as part of their raw file interpretation. They’re trying to make your photo look more or less as you would expect it to. (It’s worth noting that each raw editor is different in how it interprets raw files, which makes for quite a few differences in both color and sharpness.)
This version of Lightroom Classic automatically sets the slider to 45 when you import a raw file. (Older versions used to start them out at 25.) But even with some sharpness already added, you’re probably going to want to add a bit more. That’s where White’s first type of sharpening, capture sharpening, comes in.
Capture Sharpening
Capture sharpening ideally adjusts an in-focus image to the point of being “tack-sharp.” If you have a camera or lens that takes sharp photos and your shot is in focus, this is simply the step of returning the image to what it’s supposed to look like. To do this we either need to use the sharpening sliders under the Details panel or the presets to the left.
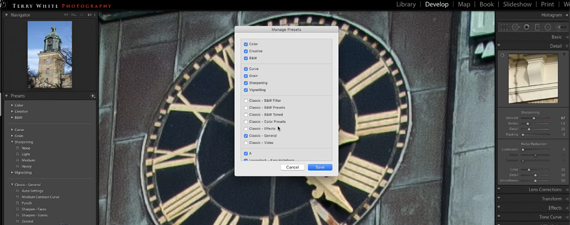
While the sliders are pretty self-explanatory, it turns out that Lightroom has a number of presets—both old and new—that can be particularly helpful. The newer ones should already be loaded into the presets. White, however, prefers using some of the older presets. You can get to them by going to “Manage Presets” and then clicking on “Classic – General.”
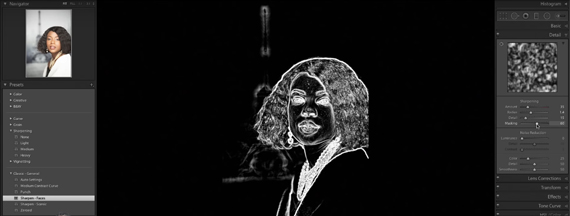
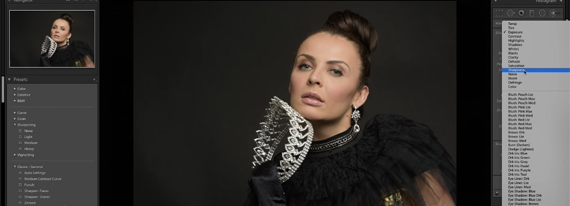
One of White’s favorite older presets is “Sharpen – Faces.” It automatically turns up the masking, which in turn, intelligently chooses to sharpen key elements in a face like eyes, lips, and hair, all while leaving the skin alone—something extremely important when shooting feminine subjects.
One cool little trick to see how Lightroom is applying the mask is to hold down the option/alt key and then click on the slider. The areas being sharpened will come out in white. Here you can see the eyes, eyebrows, nostrils, lips, hair, and jewelry are affected by the slider, while the face and clothes are masked out.
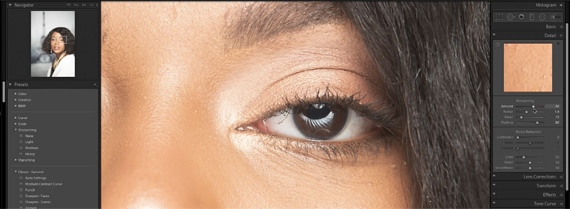
Here’s what it looks like practically speaking, where the eye’s been sharpened but the skin is still soft and glowing.
Selective Sharpening
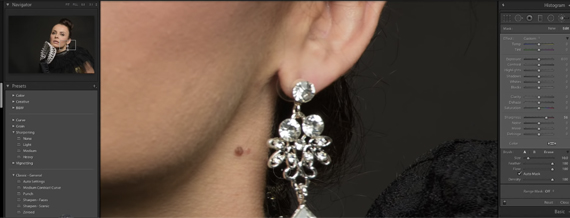
Once you’ve got your overall image looking as sharp as you’d like it, it’s time to consider creative sharpening. Elements like jewelry, for example, can usually benefit from a little extra sharpening. For this, Lightroom’s handy adjustment brush with the sharpening preset selected will do the trick.
Once your preset’s selected, bump up the sharpness slider under the adjustment panel and paint away. Here, White’s chosen to selectively sharpen the earrings:
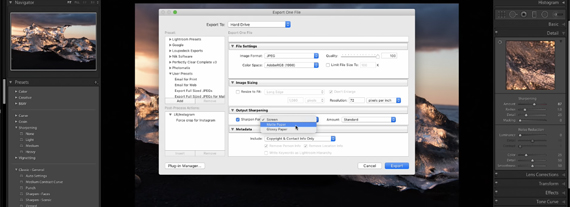
Output Sharpening
As it turns out, both exporting and sending an image to print will cause the image to lose a little of its sharpness. That’s why it’s important, if Lightroom is your image’s last stop, to make sure some type of output sharpening is selected. Just be aware, this step should be done only when you’re finished with the image, so if you’re sending the image to another program for finalizing, sharpen there instead.
Both Export and Print have a number of sharpening options. It’ll probably take a bit of trial and error see which ones work best for your needs, though. I tend to start out low and go from there. (Though, honestly, I prefer to do my final sharpening in Photoshop.)
Keep in mind, sharpening won’t make an out-of-focus photo look sharp. It may improve it somewhat, but to really get tack-sharp photos, you need to shoot them fully in focus in-camera. Also, be careful of over-sharpening. If you start to see artifacts, halos, or grains, it’s time to back the slider off.
So there you have it! Learn anything new? I did! Using the option button to see the sharpening mask was a big aha moment for me. How about you?
Like This Article?
Don't Miss The Next One!
Join over 100,000 photographers of all experience levels who receive our free photography tips and articles to stay current:


Leave a Reply