One of the hardest things about photographing babies and newborns is properly capturing their skin tones. Depending upon their specific health conditions, baby skin tones can often have an abundance of red, yellow, or blue. While the exact color of the baby’s skin isn’t the relevant point of the photograph, photographer Aaron Nace shows just how easily you can use Photoshop to balance out the baby’s skin:
Before you start making any adjustments, you need to find a reference image. This image will help you to determine your target skin tone and decide how to make the proper adjustments to match it. The reference image doesn’t have to be perfect. Its only job is to be used to analyze the color, so as long as it has the skin tone you’re looking for, it will work.
Using the Marquee tool, highlight a section of the skin tone in the reference image. It should contain a little of everything (highlights, shadows, midtones, etc.).
Duplicate the selection by pressing CTRL (or Command) and J. Choose the duplicate selection (press CTRL and click on layer) and add the Average Blur (Filter>Blur>Average). This will take all the colors within the selection, and creates the median color from all the hues.
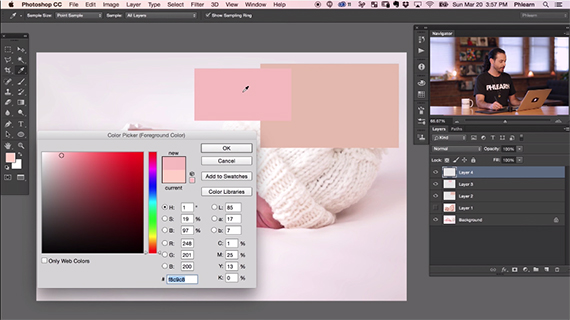
Photoshop Color Picker tool used to analyze image data.
Repeat the exact same process to create a selected section of the current baby skin tone. You can use the reference selection and your current skin tone selections (with Average Blur) to analyze the difference between the two skin tones. This is completed by clicking on the color picker and using the eyedropper to examine the color’s specifics, including Hue, Saturation, and Lightness levels. For the tutorial image, Nace’s current skin tone color was: Hue – 1, Saturation 19, and Lightness 97; with his reference skin tone color at: Hue – 1, Saturation – 19, and Lightness – 92.
After finding out the degrees of color differences, you can create a hue saturation adjustment layer to change the current skin tone of your image. Above the background layer, open a Hue Saturation Adjustment Layer. Click on the Menu and select Reds.

Hue Saturation Adjustment Layer allows you to enter in the adjustment levels.
Clicking in the dialogue box next to Hue, type the difference between the current skin tone image and the reference image. For instance, there is a 17 degree difference between the Hue tones of 1 and 18. Therefore, for the example image you would write 17 in the adjustments box for Hue and continue on by placing the differences for Saturation (2) and Lightness (-5) in their respective fields.

Before and After photos showcasing the skin tone adjustment
Whether you’re a parent looking to make a few simple edits to your home photographs or a professional baby photographer looking for a more accurate way to edit skin tones, this Photoshop skin tone edit offers a quick and easy method to accomplish your goals and streamline your entire editing process.
Like This Article?
Don't Miss The Next One!
Join over 100,000 photographers of all experience levels who receive our free photography tips and articles to stay current:


Leave a Reply