What do we mean by depth of field? The term refers to the amount of detail in the photograph that is in focus. A typical landscape photograph will will show detail over a long distance, all of which will be in focus and recognizable by the viewer.
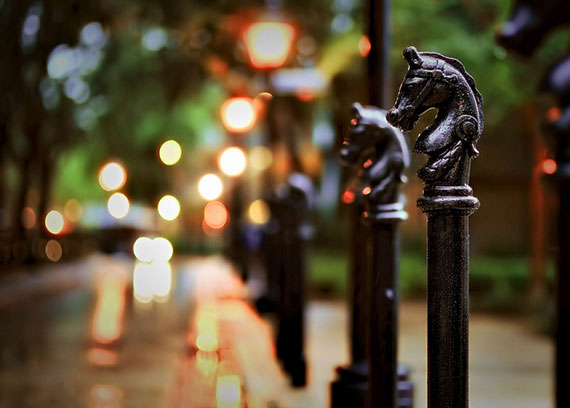
Photo by Joe Penniston; ISO 450, f/1.4, 1/80-second exposure.
A head and shoulders portrait will usually work best if only the face is in sharp focus. Often the background will be blurred and out of focus in order to remove any distractions.
Two questions usually pop up here:
- Why is this a good thing?
- How do you achieve it?
O.K., first things first. Why would you want a blurred background?
Being able to produce this effect at will is very handy and can turn a mediocre or boring photograph into something much more attractive. The landscape photograph mentioned above doesn’t really have a focal point. You’re not really sure of exactly what the photographer was aiming at when he took it. This works with a typical calendar landscape shot as it will be trying to present a broad, sweeping view.
The portrait example is very different. It’s obvious immediately what the main subject is because it is separated from the background clutter. The main subject is the only thing you can focus on, so your eye is drawn straight to it. If you’re taking a shot from a long distance it is possible to isolate the subject both from the foreground and the background using this technique known as depth of field.
What we want to do is focus on the main subject in the scene. The area that remains in focus is the ‘field’ in the term ‘depth of field’. The ‘depth’ bit is the distance of the in-focus area measured from front to back.
This can all be manipulated by the photographer to suit the particular image. The landscape and the portrait mentioned above are two extremes but there are many subjects that fall between the two.
How do we achieve this effect?
There are two things you have control over that affect depth of field when using an SLR camera.
- the focal length of the lens
- the aperture setting

Photo by faungg’s photos
I’ll go into more detail about these two settings in another article, but put simply the focal length of a lens is the feature you are changing when moving a zoom lens within its zoom range. The aperture refers to the hole the light passes through when the shutter opens. This is changed by moving the aperture ring, which is the nearest one to the camera body, and is measured in units known as f-stops. When changing aperture settings you need to keep an eye on the shutter speed. Look through your camera’s auto modes and set it on one which will allow you to change the aperture settings, but will automatically set the shutter speed for you. This is often referred to as ‘aperture priority mode’.
Aperture setting
The most important item to control is the aperture setting. The larger the aperture used, the smaller the depth of field range.
Free Depth of Field Calculator
At one time, lens manufacturers used to include depth of field guide marks on their lenses, but no longer do so. If you would like a handy little replacement for these marks, something that will let you quickly and easily gauge the effects of different focal lengths and aperture settings, there are a number of free utilities available on the web. A quick search via your favorite search engine will turn up a number of them.
Practice makes perfect
You need to familiarize yourself with how this technique works and how it affects your photographs. Remember that, with a digital camera there is no expense involved in shooting practice photographs. You get the results straightaway and you don’t have to pay for developing any film, so there is no excuse for not practicing.
You can even practice indoors if the weather’s poor. Standing a couple of items on your kitchen table and shooting them from a few feet away will soon give you an idea of how this works.
A good way to develop your feel for the depth of field effect, as well as any other techniques you may wish to brush up on, is to use a technique known as ‘bracketing’ your exposures. Put simply, this just means taking a number of photographs with different camera settings so that you can compare the results.
- Stand three coffee mugs on a diagonal line near the middle of your kitchen table then stand back a couple of paces. Set your camera on fully auto and focus on the mug in the centre of the line and take your first shot. It’s good to have a pen and paper so that you can make notes of the camera settings for each shot otherwise you’re likely to forget how things were set up for a particular shot, especially if you take quite few.
- Now take another shot, but focus on one of the other mugs, followed by a third focusing on the last mug.
- Set your camera to its aperture priority mode. This will allow you to select an aperture setting and the camera will vary the shutter speed to get the correct exposure. Now take a series of three shots as you did before. Make a note of your camera settings for each one.
- Open the aperture one stop and repeat. Do this with a variety of aperture settings, making notes as you go.
You can now load the photos onto your computer and compare the results. You should now have a good idea about how varying the aperture affects the resulting depth of field.

Photo by Giulia Mulè; ISO 200, f/1.4, 1/800-second exposure.
Go through this exercise again varying the focal length of your zoom lens if your camera has one. You will soon get to grips with the technique so try it out on a larger scale and notice the difference it makes to your work.
About the Author:
This articles was written by Mike Pepper (CashfromCameras UK) who operates a site with guides to help you take eye catching and in-demand images, where to find them and where to sell them.
Like This Article?
Don't Miss The Next One!
Join over 100,000 photographers of all experience levels who receive our free photography tips and articles to stay current:


This is a very nice article. But in the original e-mail I received there is a chart about apertures which adds to the confusion many beginners have about setting aperture. It says ‘small f-stop number, more blur’. The reverse is true. f/8 means ‘f divided by 8’ or ‘1/8th of f’. 1/8th of f is clearly smaller than 1/2 of f (f/2), To avoid this confusion, it is better to write like the author, Mike Pepper, did and refer only to ‘aperture size’ rather than ‘f-stop number’. So the chart should say ‘large aperture, more blur’.
This is really amazing and helpful.
Touche. Solid arguments. Keep up the great effort.
The world needs more pictures of Corgis
I LOVE depth of field photography. Im especially fond of natural light portrait photography using this technique. It gives the person a certain glow that you cant get in flat studio snapshots.
Great article, I enjoyed it reading.
Thanks for sharing.
I actually think that you should add another important element – distance from the subject, which is actually the most important factor when determining the depth of field.
Visit my blog for more info on the subject:
http://photoshoplightroombridge.co.uk
Marek
awesome things to remember always…
Posted here to correct a wrong.
It is more accurate to say that the two things that affect depth of field are APERTURE and MAGIFICATION. Magnification is made up of two things and that is the focal length and the distance to subject.
It should be noted that there are *3* things that affect depth of field. You failed to mention the distance of the subject to the lens. The closer the subject, the shallower the depth of field.
good writeup. just a quick correction – there are 3 factors that affect the depth of field: 1) aperture; 2)focal length; 3) lens to subject distance. The closer you are to your subject, the shallower your depth of field.
i have found to get the effect that i like…is to shoot wide open and very fast….most of my work is macro and some of my object (flowers etc) are usually very small….so my DOF is around 1″ or less..
This is a great writeup; concise and to the point. I used to always shoot wide open as frankly I didn’t know what I was doing. But with lots of practice, especially using my f/1.4 prime, I’m starting to get a much better grasp of it. Love the first example, spot on illustration of the concept well applied.