When you use the Dodge and Burn tools found in the flyout menu of Photoshop, you may be risking your entire image. These tools are destructive, meaning they permanently modify the pixels in your image. So, if you don’t want to make any permanent modifications, you can dodge and burn nondestructively by following the instructions in this video:
Deke McClelland uses a panoramic image he’s created of the Guggenheim Museum in Bilbao, Spain to show us how to enhance the drama of the scene without compromising the image.
Deke starts off by adding a couple of adjustment layers. If your right side panels are not showing, just press shift + tab to bring them back. In the Layers panel, go to the black and white circular icon at the bottom, press and hold the alt key (Win) or option key (Mac) and choose the Levels command. This brings up a New Layer dialogue box.
If you just click on the icon without holding the alt key down, the panel will appear, but without a dialogue box to create a new layer. Deke calls his new layer “Drama”. Then inside the Properties panel, click on the gamma value, press shift + down or up arrow to change the gamma value. Deke presses the down arrow twice to reduce gamma value to 0.8.
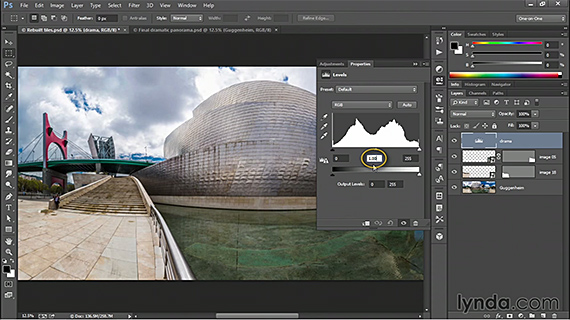
Next, he adds a Vibrance layer. You can do this by again holding alt and clicking on the black and white circular icon, this time choosing Vibrance. Deke calls his layer “Saturation”, but you can name it whatever you want. Adjust the vibrance and saturation as you wish; Deke chooses +75 for vibrance and +10 for saturation.
You can see the difference between your changes and the original image by turning off the adjustment layers in your side panel—just click on the eye icons.
How to Create a Non-Destructive Dodge and Burn Layer
At this point, Deke selectively brightens and darkens portions of the image—dodging and burning. As I said, the Dodge and Burn tools found in the flyout menu are destructive, so if you don’t want to make any permanent modifications, you can dodge and burn nondestructively using an independent layer:
- Create a new “Dodge & Burn” layer (Win: ctrl + shift + n; Mac: cmd + shift + n).
- Switch to Brush tool and increase size of cursor (press and hold the “]” key). Make sure hardness value is set to 0% (right click on the image to do this).
- Press the d key to establish the default foreground color, which is black.
- Press the x key to switch foreground and background colors so the foreground color is white.
- Paint the area you would like to brighten (dodge).
If the effect is too bright, you can change the blend mode. In the Layers panel, change the blend mode from Normal to Overlay or Soft Light (Overlay will give more brightly saturated colors).
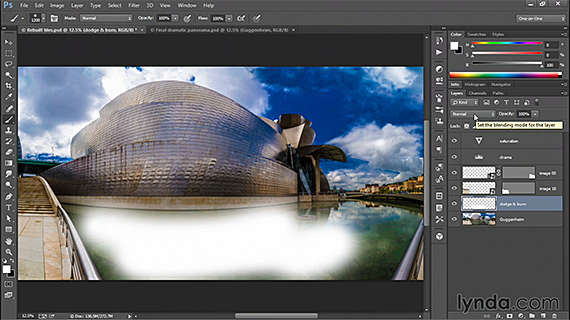
To turn off Blend Mode, press the esc key. Press the m key to switch back to the regular marquee tool so you can change opacity levels. You can try different opacity values by just pressing the number keys (1-9) on the keyboard.
Now, you can burn by adding more contrast to portions of the image:
- Select the Brush tool.
- Press the x key to switch the foreground color to black.
- Paint the area you wish to darken.
How to Erase Your Mistakes
If you paint too far over your intended target, just erase:
- Switch to the Eraser tool
- Right click in image window and increase size of eraser, then take hardness level down to 0%, hit Enter.
- Paint the area you wish to erase the black from and any other areas where you wish to erase darkness.
The idea is to paint with white in order to dodge and black to burn. Using this technique of nondestructive dodging and burning, along with a few adjustment tools in Photoshop can drastically transform a bland, lifeless photo into a bright, vibrant, and dramatic image.
Like This Article?
Don't Miss The Next One!
Join over 100,000 photographers of all experience levels who receive our free photography tips and articles to stay current:


Leave a Reply