Have you looked at a landscape photographer’s photo and wondered how they got the water coming down from a waterfall to look so misty? Or how they got the ocean in a seascape photograph to look so smooth?
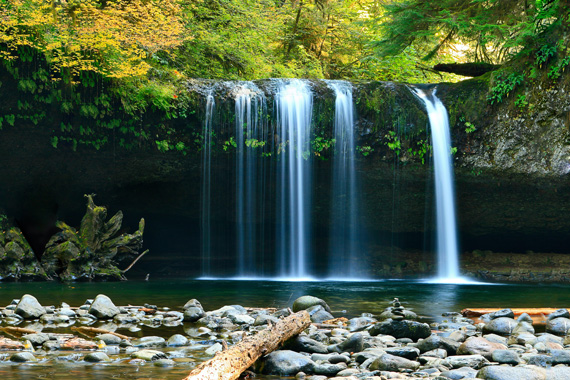
Photo by Jeffrey Workman; ISO 100, f/20, 2-second shutter.
My guess is that if you’re starting out in landscape photography it’s probably one of the first things you’ve tried to do. If you got it right the first time, that’s great. If you didn’t, then let me show you just how easy it can be to create the misty water effect.
There is every chance that if you are just starting out that you won’t have purchased yourself any filters yet. Filters will make it easier for you to create the misty water effect, but they aren’t essential; it just means you’ll have to get up a little earlier in the morning and stay out a little later in the evening.
The first thing you’re going to need to do is to get up early in the morning to get your misty water shot. It’s pretty much impossible to get the misty water effect during full daylight conditions unless you have the new breed of neutral density filters that are extremely dark. Even then I wouldn’t recommend shooting during full daylight, as you just aren’t getting the best available light. You should be ready to start shooting your subject at least 30 minutes prior to sunrise or 30 minutes after sunset. You will also need to have your camera mounted on a tripod, as you’ll need to keep your shutter open for quite a few seconds to create the effect.
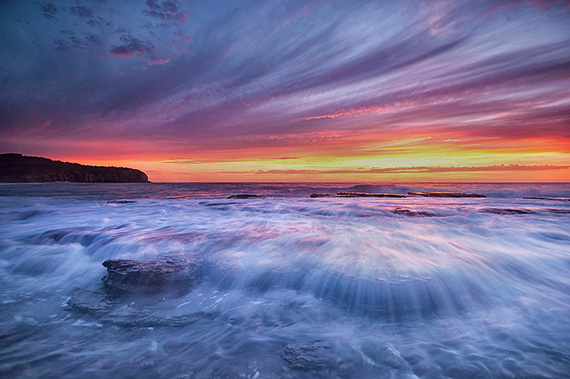
photo by Nigel Howe
Once you’re ready to go, it’s probably easiest to set your camera on aperture priority mode and use the lowest ISO setting that you possibly can. Set your aperture to a setting around f/16. It goes without saying that your next step should be to focus on your chosen subject to make sure your photo will be as sharp as possible. You should also consider getting a remote shutter release and using mirror lockup to make sure that your camera doesn’t shake. Now for the fun part; take the photo! If your shutter is open long enough, you’ll see that you too have created the misty water effect that you have been after. How hard was that?
If you decide that landscape or seascape photography is something that you definitely want to continue doing, then you should at some stage consider purchasing a few neutral density filters—the darker the better. The darker a neutral density filter the longer you can shoot your subjects after the sun has risen or the earlier you can take a photo before the sun sets.
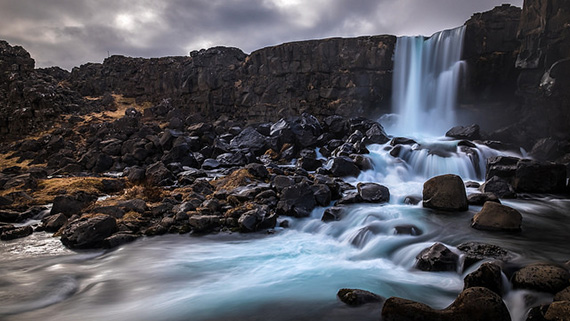
photo by Giuseppe Milo
Over the years, I have found that the best shutter speed for creating the misty water effect is anywhere between 1 to 4 seconds. Anything less than this and the water doesn’t have that silky smooth look, and anything more than that flattens the water almost entirely and makes it look almost boring. Of course, every scene is different. You may need to hold your shutter open longer or shorter depending on what you’re trying to achieve. Now for my last tip: make sure that you focus on your subject before putting on your neutral density filter, otherwise it’s almost impossible to focus.
About the Author:
Landscape and seascape photographer Jamie Paterson is based in Australia. He is always trying to capture those elusive perfect moments that nature shares with us and loves to share his knowledge to enhance others’ photographic abilities.
Like This Article?
Don't Miss The Next One!
Join over 100,000 photographers of all experience levels who receive our free photography tips and articles to stay current:


The amount of water coursing over the falls may also influence your choice of shutter speed to achieve your desired effect.
My friends dad used to actually mist his lens for this effect it was awesome but I never saw how he did this does anyone know how to safely do this
Wouldn’t it be possible on a point and shoot camera where it’s not possible to use a neutral density filter, to simply lower the exposure?
Great instructions, thank you for posting this!
I wouldn’t necessarily recommend the timing you provided, due to safety concerns… Unless a disclaimer is provided.
I capture most of my waterfalls during cloudy days or shady conditions. Once I cannot achieve those conditions, I will actually use ND or polarizing filter (Both if I can). The lowest possible ISO is always a plus!
I do like that you don’t suggest maxing out the aperture, as that actually will hinder most lenses in capturing the best image possible.
I read quickly due to time constraints, but a weight added to the bottom of the tripod is always added security.
Great post!
Oops, I just more or less repeated what momomo said. That’ll teach me not to pay attention. :-)
@Mei
You can also use an ND filter to enable the use of a wide aperture lens (to achieve a narrow depth of field) on a bright sunny day.
An example would be where you are taking a portrait shot in bright sunshine but you still want to blur the background.
Without the use of the ND filter it wouldn’t be possible to use the lens with the aperture wide open.
Thanks for the feedback :)
thats pretty much it
another example is when you use wide aperture (for bokeh) with bright sunlight and 1/4000 or 1/8000 just isnt fast enough to expose the picture correct
Besides allowing one to shoot at slower shutter speeds, what are the other uses of a ND filter?