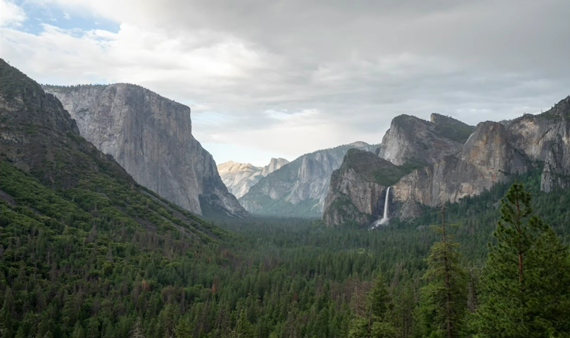
Modern cameras have decent dynamic range capabilities, but they still can’t beat our eyes in extreme lighting conditions. That’s where exposure bracketing can be of help. This technique allows you to take multiple shots, each with varying exposure levels. You can then blend them all up to create a well-exposed image. Landscape photographer, Mark Denney shares more about this technique:
While the concept of exposure bracketing may sound a bit intimidating at first, executing it is quite simple. For starters, you can take 3 images: a “properly” exposed image, underexposed image, and an overexposed image. Then, using a post-processing software, you simply blend them up and get a perfectly exposed image. Your final result will thus have adequate details on the highlight, the shadows, and everything in between.
When to Use Exposure Bracketing
Denney likes to follow the One Stop Rule to determine if he should be using exposure bracketing or not. When adjusting your camera settings to get an even exposure between the bright sky and the darker landscape, if you notice that your camera’s light meter indicates overexposure or underexposure by more than one stop, then you should probably opt for exposure bracketing. If the value is less than +1 or -1, the camera’s dynamic range should be able to handle it.
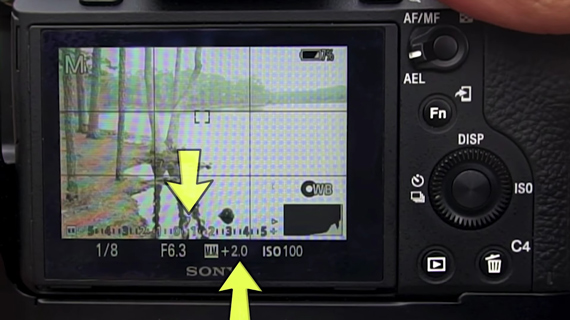
+2 indicates overexposure by 2 stops
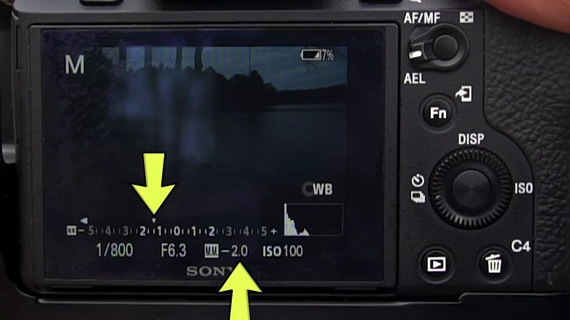
-2 indicates underexposure by 2 stops
Auto Exposure Bracketing
“Perhaps one of the coolest things about exposure bracketing is that any camera out there can do it.”
Almost any camera comes with an Auto Exposure Bracketing (AEB) feature. Be sure to go through your camera manual to find it in your camera model. Using this feature, you can tell the camera how many images the camera needs to bracket (usually 3, 5, or 9) and the difference in exposure between each shot.
In his case, Denney likes to bracket three images with the properly exposed image, 2-stops underexposed image, and the 2-stops overexposed image.
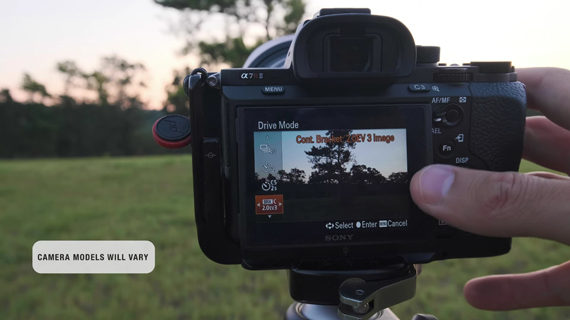
It’s important to note that since the camera will be taking multiple images of the same scene, the composition shouldn’t change. Be sure to mount your camera on a tripod.
Exposure Bracketing Manually
Don’t panic if your camera doesn’t have the AEB feature. Exposure bracketing is something that you can conveniently do manually as well. Just make sure that shutter speed is the only factor that is varying when changing the exposure. Here’s how you can do it:
- Take an image with proper exposure.
- For your overexposed image, slow down the shutter speed by two stops.
- For your underexposed image, increase the shutter speed by four stops (two stops if you compare with the proper exposure).
Again, when following these steps, make sure that you don’t change the composition. You can even use a remote shutter release or self-timer to avoid camera shake when pressing the shutter release button.
Blending Multiple Exposures in Post
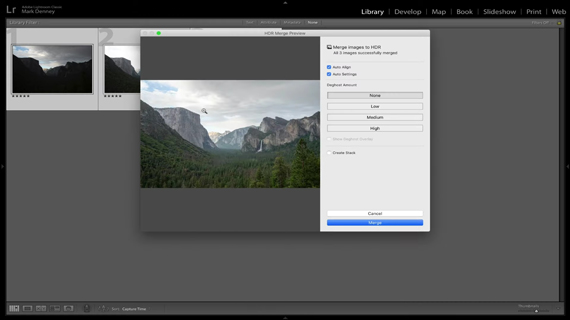
The bracketed images can be blended in any post-processing software. For the purpose of this video, Denney shows you how you can blend them using Lightroom.
- Start by importing the bracketed photos into Lightroom.
- Holding the Shift key, select all the images to be merged.
- Right-click and go to Photo Merge > HDR…
- Keep the Auto Align option selected. This will let Lightroom align the images in case the composition is off by a bit.
- You can leave Auto Settings selected as well.
- Leave the Deghost Amount to none. This option comes in handy if there’s something moving in your frame between each shot that creates a ghosting effect.
- Click on Merge.
Lightroom will take some time and create a final image that is a blend of the photos that you took. Remember that the motto is to create a final image that looks as natural as possible. If you feed Lightroom with, let’s say, five images, each having a 2-stop exposure difference, then you may end up getting something that looks very unnatural. In Denney’s case, the three exposures with a 2-stop exposure difference have definitely resulted in a pleasing result.
What if you simply try to achieve the result with a single exposure? You could’ve simply raised the shadows in the image with the proper exposure to get the final result right? Well, not really. As you can see in the comparison below, the blended image has much better saturation, richness, and details than the single exposure.
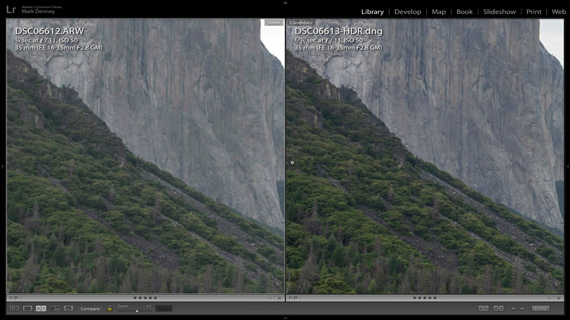
Notice the better shadow details in the HDR image (right)
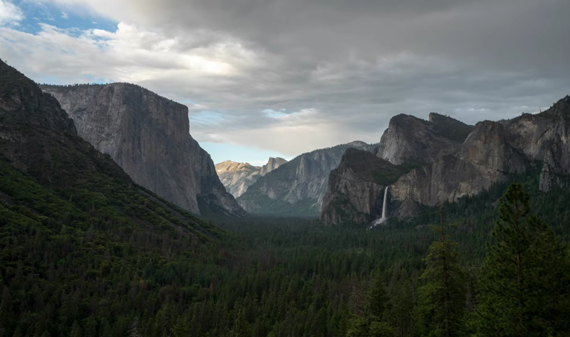
The case is the same with the highlights. The HDR result has much better details compared to the single exposure with highlights recovered.

Notice the better details in the clouds and better saturation in the sky in the HDR image (right)
Editing HDR Results
Once Lightroom prepares the HDR result for you, you’re not stuck with it. You can go ahead and fine-tune it to your liking by making adjustments.
Not that difficult, is it? So why not give exposure bracketing a try on your next landscape photography outing?
Like This Article?
Don't Miss The Next One!
Join over 100,000 photographers of all experience levels who receive our free photography tips and articles to stay current:


Leave a Reply