Frustrated with your studio’s lack of space? Turn things around and start thinking big! Photographer Gavin Hoey demonstrates that a little bit of creativity and technique can transform even the smallest room into a grand production:
In this step-by-step guide, we’ll be going over just what Hoey had to do in order to bring this fanciful circus shoot to life.
Setting Up for a Circus Photo Shoot
As you might have guessed, getting the lighting spot-on played a crucial role in creating the illusion of a larger environment. A well placed spotlight shining through the dark adds depth to a scene as well as drama, implying a world of possibilities just outside of the viewer’s line of vision. Here, we’ve included a diagram detailing how Hoey went about arranging his equipment.
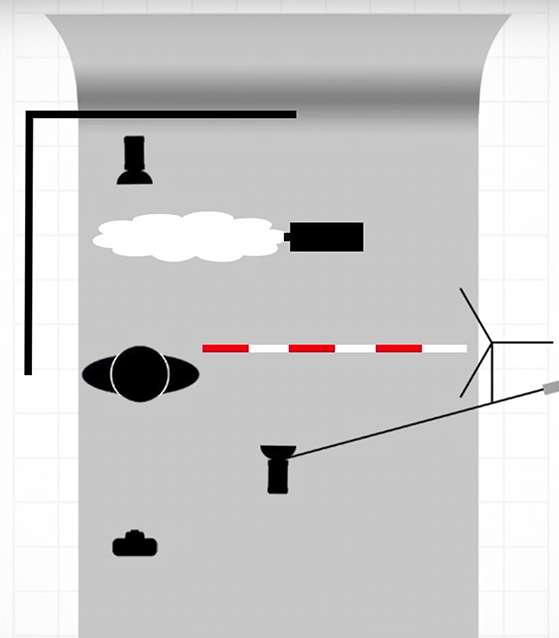
Circus Themed Photo Shoot Setup
Believe it or not, creating this circus illusion required just two strobes. The first was a light perched toward the ceiling and shining downward. This light functioned on two levels, creating a bright overhead capable of illuminating a wide area that simultaneously captured the texture of the fabric functioning as a curtain.
The second light was placed behind the model to create a separation highlight to differentiate the model from the dark background. A smoke machine placed between the light and model essentially served as a diffuser, preventing the bright light from overpowering the scene. The smoke also added detail and breadth to the scene.
Once the lights were set in place, the next step was hang a black drop that sort of wrapped around the model and the prop curtain. As Hoey explains, the less light reflected onto your black fabric, the better. Not only does it block out most of the evidence alluding to the studio setting, the black also happens to be significantly easier to select and mask in post processing.
Executing the Shot
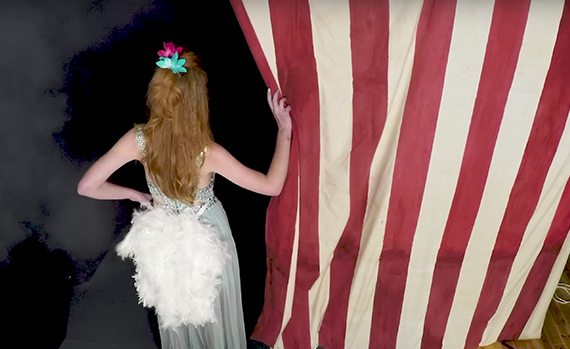
Before bringing in the model or revving up the smoke machine, Hoey took a picture of just the striped circus curtain against the black background. As a standalone image, there’s not much to it; however, in the post processing phase, it comes in handy.
Initially, it’s important to go easy on the smoke, as it can completely alter the lighting and quickly fill up a room, shrouding the subject. As such, anyone attempting to recreate this scene should be prepared to make adjustments accordingly. Hoey started by setting his strobes to a low setting and seeing how the image elements interacted with one another.
Post-Processing
Should you attempt this shoot, the smoke is likely going to bounce light into segments of the image that you didn’t necessarily anticipate illuminating. The first move to make in Photoshop is to use the healing brush to clean things up and create a more cohesive scene. Hoey also brings up the benefits of adding additional artificial smoke in post, which can be used to block out any studio equipment that may have sneaked its way into the frame.
Once satisfied with the composition, Hoey went back to the image of the stand alone curtain image and pasted it over the photo of the model. After positioning the curtains in a way such that they framed the figure, he then switched the blending mode on the top layer to Screen. As the tutorial demonstrated, the blackness of the image instantaneously blended together.
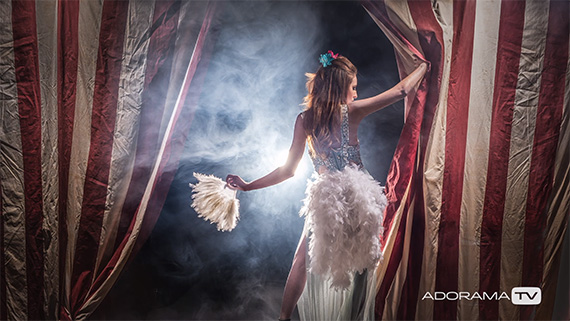
And so, with a bit of vignetting, contrast adjustments, and minor tweaking, the final image is complete. Of course, you can always use Gavin Hoey’s tutorial as a starting point to go above and beyond. It’s always possible to go bigger and better, but that’s not the point this tutorial is trying to make. Rather, this demonstration serves as proof that it doesn’t take a whole lot to truly spark an audience’s imagination.
“Even in a small space like this, you can still think big and create some amazing images.”
Like This Article?
Don't Miss The Next One!
Join over 100,000 photographers of all experience levels who receive our free photography tips and articles to stay current:


Leave a Reply