High Dynamic Range images are a fairly recent subject matter. It’s fair to say that HDR should be an area of photography all to itself. In case you’re not familiar with HDR, I will be sure to give a recap. While HDR is primarily photography, I consider it to be a mixed medium art, because of the digital processing which takes place after the images have been captured. An HDR image is, of course, only as good as the sequence of images captured to produce the final image. There are several considerations that have to be made before capturing any images for HDR post-processing. Let’s jump into it and address all aspects of capturing a successful set of images for HDR.
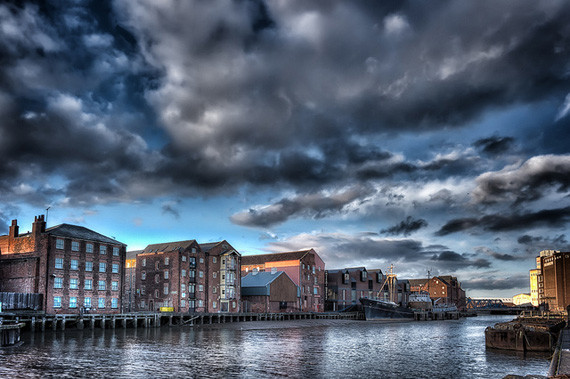
Photo by Andi Campbell-Jones.
What is HDR?
First and foremost, let’s talk about what HDR images are. Because this is a fairly new subject in photography, the term may not be known to you yet; however, the concept behind it is rather old. Dynamic range, simply put, is a measure of how many levels of light an image capture device, such as your digital camera or film, can capture. Think about shooting a bright sunrise. Why is it that when the sun is exposed properly, the rest of the image appears dark and underexposed? It’s because the camera used to capture the image has less dynamic range than the scene being captured. A sunrise is a high-contrast situation.
The rising sun and the surrounding sky are hundreds of times brighter than other elements in the image. While digital sensors are extremely sophisticated, some scenes are still too much for them to render for bright highlights and deep shadows. This is where the concept of an HDR image comes in. You know that if you shoot a sunrise and meter for the sun, the rest of the scene will be dark. Likewise, if you meter for the rest of the scene, the sun and the sky will turn into a sheet of white. What if you could bracket your exposures but later take properly exposed portions of each exposure of a particular scene and put them all together into a single beautifully exposed image? That’s what an HDR image is.

Photo by Edwin Escobar.
HDR Software
Using special software (Photomatix is what I find to be best) you merge the exposures together, let the software generate a 48 bit image, and you then tone map the image—or in plain English, you adjust the image to make sure that both highlights and shadows are represented correctly.
Capturing Photos for HDR
Let’s talk about the details of capturing an HDR image. First and foremost, unless you can shoot very still and at a fairly high rate of speed, a tripod is necessary. Most serious photographers already use a tripod despite having fast lenses, often with optical image stabilization, so take them as an example. Second, while shooting a completely static scene is the most common method, dynamic scenes produce beautiful HDR images, when shot correctly. The most important part of producing a good HDR image is spacing exposures correctly. I wish I could say, “Always bracket by 1.5 stops and you will have an excellent sequence!” That would be easy. Unfortunately, the spacing between exposures will vary, based on the scene.
There is no limit, other than your computer’s memory, to how many exposures of the scene you use. Realistically, most situations are covered by three exposures. Unless I can see that a scene has extreme variations in contrast, I space the images 1.5 or use a one-third stop if the camera offers it. I always shoot RAW. Using RAW, I cheat at times, and underexpose or overexpose a copy of one of the images in an HDR sequence. I then use this under or overexposed image along with other “real” photos to generate my final HDR composite image. Some cameras offer a custom setting, which you could program with any settings. With my 5D I have a custom switch on a thumb wheel, which I use for my HDR shoots.
I have this custom switch pre-configured with Bracketed exposures, and an ISO setting of 50. I can always change the ISO, but I try to keep it at 50 to reduce noise. Remember, as you combine exposures, you also increase noise. Your choice of software will vary, and every image will look best at different settings. There is no one silver bullet here; you will have to use a lot of trial and error.

Photo by Daniel Mennerich.
To summarize, producing high quality HDR images is primarily in the exposures you make of the scene. Expose your primary shot for the part of the scene that’s most important, and bracket other exposures from there. Try to capture fewer exposures at first, and study your final products to figure out what you need to do better. Experiment with exposure bracketing. Try different spacing, and with time you will find what works best for you. After all, even with HDR imaging, some people will choose to expose for more shadows, while others for more highlights.
Try to streamline your image capture process with custom camera functions. There is a lot of information online about the available software, and the process itself. This article is a good start, and will hopefully get you on your way toward great HDR images. Nonetheless, use other resources and experiment!
Like This Article?
Don't Miss The Next One!
Join over 100,000 photographers of all experience levels who receive our free photography tips and articles to stay current:


Leave a Reply