Even the most mundane subjects look interesting when placed in front of a macro lens. And the best part about macro photography is that you can take breathtaking images in your backyard. Photographer Spencer Cox explains everything you need to know for getting started with macro photography:
Key Terminology and Macro Lenses
Working Distance
“Working distance is the physical distance between the front of your lens and the subject.”
A 200mm macro lens will have a greater working distance than a 100mm macro lens. Working distance depends not only on the focal length of the lens but also depends on the actual physical length of the lens. For instance, when you use a lens hood, you reduce the available working distance.
As getting too close to a subject will not always be possible when taking macro photos, especially when taking photos of bugs, it’s recommended that you get a macro lens with greater working distance. Macro lenses with focal lengths of 100mm or more are generally recommended.
Magnification
“Magnification refers to how big your subject is on the camera sensor versus its size in the real world.”
A true macro lens has the ability to reproduce a life-size image of the subject on the sensor. This is termed as 1:1 (1 to 1) magnification, also represented as 1x magnification. Similarly, if you set the lens at a magnification of 1:2, the lens will produce an image which is half the actual size of the subject on the sensor. The magnification factor, in this case, becomes 0.5x.
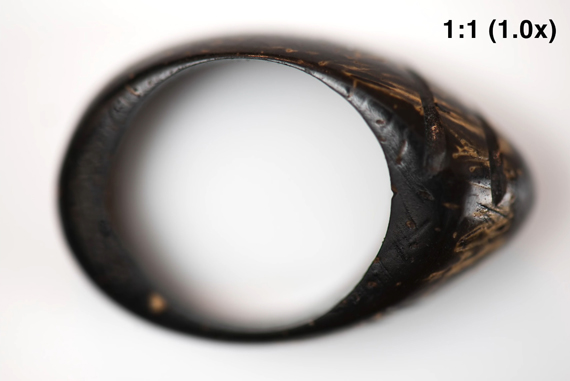
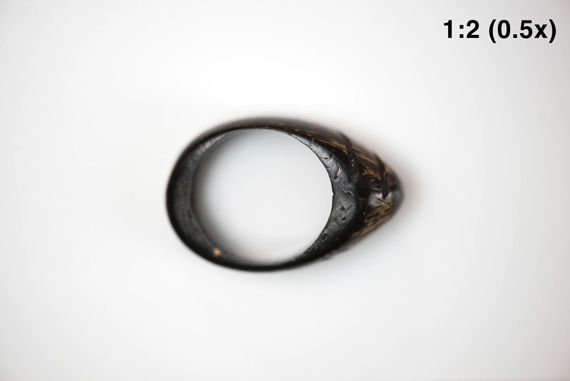
Keep in mind that magnification is independent of sensor size. Even if you use a larger medium-format camera, 1:1 ratio would mean that the image cannot get bigger than the actual subject.
When choosing a macro lens, it is recommended that you get a lens with at least 1:1 magnification. Some lenses claim to have macro capabilities but cannot go beyond 1:2 magnification, or even less.
Challenges in Macro Photography: Depth of Field and Light
Depth of Field
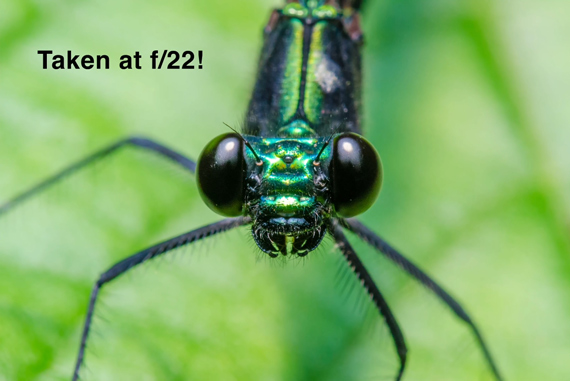
“Going into macro photography, it’s important to know that higher magnification decreases your depth of field. There’s no way around it. If you’re at 1:1, only a small part of your subject will be completely sharp and the rest will be out of focus.”
The simple solution would then be not to shoot at 1:1. But, this doesn’t solve the problem entirely. There can be many subjects so small that they need to be shot at 1:1. But, if your subjects are large enough, not shooting at 1:1 is one solution to the depth of field issue. However, when working with smaller subjects at 1:1, you will need to use narrow apertures like f/16 or f/22 to get a reasonable depth of field. But again, what about light?
Light
Working with narrow apertures cuts down a significant amount of light. Moreover, with the lens placed too close to the subject, the amount of light is again blocked out. Combine that with the fast shutter speed to avoid camera shake and you have a recipe for underexposed images. So, how do you expose your macro photos properly? There are a few approaches.
Use wider aperture settings: This trick works if you’re okay with a shallow depth of field or if you’re looking for an image where most the areas are out of focus. However, this may not be a practical approach every time.

Focus stack at a wider aperture: Focus stacking is when you take multiple images of the same subject, each focused slightly farther back than the one before it. You can then merge these multiple images in post to show only the sharpest part of each image to form a single image that’s sharp from front to back. The challenge with this approach is that the camera and the subject both need to be stationary throughout the process.
Use a narrow aperture with flash: The first two options have challenges of their own. The best option might be to continue shooting with a narrow aperture while using flash to solve the lighting issue.
“You don’t want your subject to have ugly shadows and bright specular highlights. So, to get nice light, you need to diffuse your light.”
Thus to ensure that your flash produces beautiful, soft lighting, you can get yourself a pop-up diffuser for as little as $10. Alternatively, you can make a diffuser for yourself by using cardboard and plastic.

Camera Settings for Macro Photography
Aperture
Consider that you’re aiming for a 1:1 macro with greater depth of field and that you’re using flash. While setting your aperture for greater depth of field, be sure not to set your aperture too small. At such small aperture settings, the images turn out soft and blurry due to a phenomenon called diffraction.
For a 1:1 macro using a full frame camera other than Canon, Cox recommends that you stick to aperture values somewhere in between f/16-22. In this range, the images have a good balance of sharpness and depth of field. For an APS-C camera, it is an equivalent of f/10-14, and for a micro four-thirds camera, that’s f/8-11.
However, due to some technical factors which are beyond the scope of this article, these values are to be treated slightly different in Canon cameras. If you’re working with a Canon camera, cut these numbers in half. So, for a Canon full frame camera, you’d want to have an aperture value of around f/8-11. And for a Canon APS-C camera, work around f/5.0-7.1.
“You need to be more careful about your aperture if you’re a Canon shooter because you might be effectively shooting at a smaller aperture than what the camera says.”
Shutter Speed
Selecting shutter speed is relatively easy. All you need to know is your camera’s flash sync speed, which is usually around 1/200 or 1/250 second. Going through your camera’s manual will be of help in this case.
Flash Power
It’s a good idea to set your flash manually to 1/3 or 1/4 power. Setting it to full power will cause the flash to recharge manually and you don’t want to be waiting out there when you know that your subject can jump or fly off any second.
ISO
To set your camera’s ISO, have something like a flower or a leaf to photograph at 1:1. Then, starting from a lower ISO value, gradually increase it until it gives you a good exposure. Suppose you get a well-exposed image at ISO 400. In that case, leave your camera at ISO 400 and don’t change it. Then, go back to the flash power and set it to auto (TTL mode). This will allow the flash to change its own power based on the available light and how reflective your subject is while keeping the power around 1/4.
If you still notice that the images are consistently coming out under or overexposed, adjust the flash compensation accordingly.
“Your camera settings are now perfect for 1:1 macro photography. Although of course, you should experiment with these numbers and make sure that they work for you.”
Focusing Technique for Macro Photography
Focusing is critical in macro photography, as it’s very easy to miss focus at higher magnification. Also, remember that your camera’s auto-focus system will be of almost no use at higher magnification. It is thus a good idea to work in manual focus mode when working at high magnification settings. Cox recommends that you use the following steps to focus when taking macro photos:
- Focus manually to your desired magnification.
- Ensuring that all your camera settings are right, look through the viewfinder and compose your shot.
- Rock the camera forward and backward slowly until the right spot is in focus, and then hit the shutter button.
- If your subject is not moving, using a tripod is a good idea.
“Focusing can be a nightmare in windy conditions. And even a light breeze is a huge factor in macro photography.”
So, if it’s windy out there, you’d be better off waiting for calmer weather to head out for macro photos.
If you’re planning to try your hand at macro photography, I’m sure this elaborate explanation will be very helpful!
Like This Article?
Don't Miss The Next One!
Join over 100,000 photographers of all experience levels who receive our free photography tips and articles to stay current:


Leave a Reply