Most of us have seen and admired the classic night sky photo with the stars circling the sky. A well taken star trail photo leaves everyone in awe as it shows us the sky in a way our eyes can never see it naturally. Matthew Saville presents a quick guide on how to take star trail photos:
Before we start off with star trail photography, here are some of the things that you will need besides your camera and lens:
- a sturdy tripod
- an intervalometer
- a flashlight or headlamp (for you to see in the dark)
- warm clothing, hot drinks, and light snacks
Star Trail Photography Tips
Shoot in winter for better quality photos
Heat causes thermal noise, which slightly degrades the quality of the image. During long exposures, the battery heats up and the thermal heat interferes with the image by introducing purple or blue blobs in the corners. Heat also introduces another type of noise called dot noise, which Saville calls Christmas Light noise because it produces random red, blue, and green dots in the image. So, by shooting during winter, you can do away with thermal noise and get better quality star trail photos.
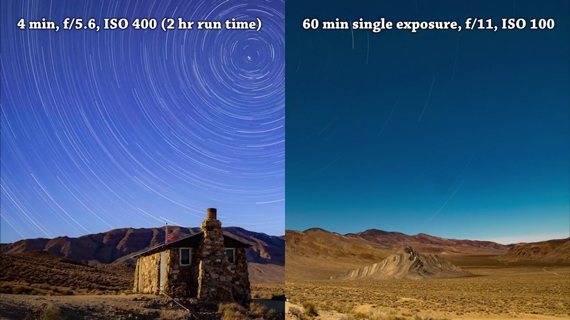
Decide if you want to stack short exposures or take a very long exposure
If you take a one hour long exposure instead of stacking exposures that are one or two minutes long, the former photo will have fewer stars in it. Since the stars are continuously moving, they will appear bright at one instance but slowly as it starts moving, they will appear dimmer or become invisible over time.
However while shooting short exposures, it is important to be aware that gaps between star trails can be prominent compared to star trail photos taken at longer exposure. Although there is software that can help you smooth out the gaps, Saville believes you’re better off using a slightly longer exposure.
Evaluate these two factors and decide if you want to stack multiple images or take one long exposure.
Choose exposure settings
A general practice to determine the camera settings would be hit and trial method. But, considering that star trail photography requires long exposure photos to be taken, that can take a while and can be time consuming. Saville shares this neat trick of choosing the exposure settings for star trail photography.
- 1 second exposure at ISO 6400 = 1 minute exposure at ISO 100
- 2 second exposure at ISO 6400 = 2 minute exposure at ISO 100, and so on
For the sake of testing, you can fix your ISO to 6400 to shorten the test duration and see what aperture works for that. For practical example here’s what Saville chooses to do:
- Initially, he has his lens set at f/4, ISO 6400, and a 5 second shutter speed. This translates to 5 minutes exposure at ISO 100 if the aperture is still f/4.
- Later, he decides that he wants to stop the aperture down 2-stop i.e. from f/4 to f/8. This means that the ISO will need to be increased by 2 stops (i.e., from ISO 100 to ISO 400) to keep the exposure the same as previous.
- Before moving on to shoot continuous trials for hours and hours, he takes one shot to ensure that the exposure is correct and once he has made sure that it is, he sets the intervalometer to take back to back 5 minutes exposure for some hours.
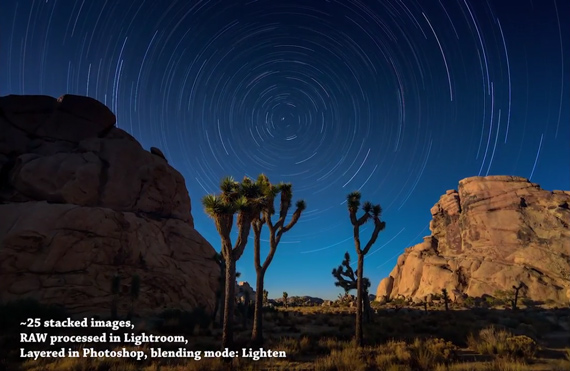
25 Stacked Images
Now that you have an understanding of how to take star trail photos, go out there and give it a shot. You can start from your own backyard!
Like This Article?
Don't Miss The Next One!
Join over 100,000 photographers of all experience levels who receive our free photography tips and articles to stay current:


Leave a Reply