With every new iteration of any software, developers push out improvements that usually make the performance better. While Lightroom works great most of the time, it does tend to get slow and sluggish. In this video, photographer Pye Jirsa from SLR Lounge shares 9 tips to speed up Lightroom performance:
1. Enable GPU Acceleration
Lightroom 8.4 and above supports GPU-based acceleration that you should always keep enabled. To enable GPU acceleration, simply follow these steps:
- Press Ctrl/Cmd + ,
- Go to the Performance tab
- Look for Use Graphics Process and select Custom
- Enable Use GPU for image processing
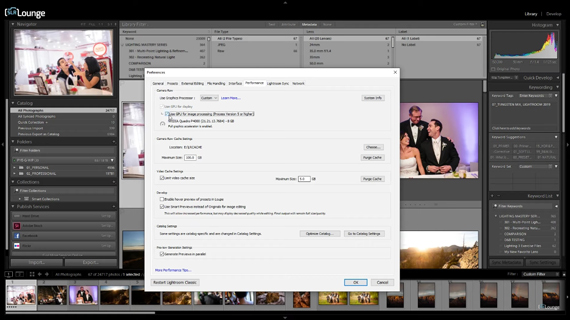
Ensure that you’re using the latest drivers for your graphics processor.
Click on the Learn More button to see if your processor is supported by Adobe.
2. Use Your Fastest Internal Drive
If you have multiple storage options, the best option is to store your catalogs and work from your fastest internal drive. SSD and NVMe drives are pretty fast compared to conventional mechanical drives. So, if you find yourself wishing that Lightroom worked faster, get yourself an SSD or an NVMe drive and use it to store all your Lightroom files and catalogs.
3. Update the Maximum Size for Raw Cache Files
Going back to the dialog box that we made changes to in the first tip, make sure that you’re using your fastest drive for the raw cache files. Also, increase the Maximum Size depending on the number and size of files that you work with. In his case, Jirsa sets it to 100GB, because his catalogs tend to have 10,000 to 20,000 images.
4. Use Smart Previews Instead of Originals for Editing
In the performance tab, look for “Use Smart Previews instead of Originals for image editing” in the Develop section. By enabling this option, Lightroom will load smart previews in the Develop module. Since smart previews are smaller files, they load more quickly and make your overall workflow faster. Even moving from one image to another will feel much faster with this option.
When working with smart previews, you might notice a slight decline in image quality when viewing the image. However, when you export the final image, it will be fine.

5. File Handling Setting Within Your Catalog
Open the Catalog Settings dialog box by pressing Alt/Opt + Ctrl + , . Then, go over to the File Handling tab. The settings that you’ll see here are catalog specific. This means that you’ll need to change these settings for every catalog you work with. Here, you can speed up Lightroom by lowering the Standard Preview Size and Preview Quality. For instance, if you use a 1080p display to edit, you don’t need a preview size of 2880 pixels; 1680 pixels will do just fine. Similarly, try using Medium quality previews instead of High.
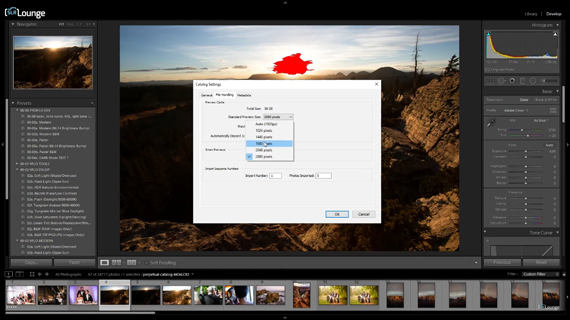
Again, keep in mind that these changes will reduce the quality of the previews. The final export will come out high quality.
“This can be very beneficial especially for those that are working on laptops.”
6. Disable Writing to XMP Files
Whenever you make any changes to the files in your catalog, Lightroom saves those changes in two places: the catalog and a sidecar XMP file. Since Lightroom has to save those changes in two places, your system can feel slowed down. To prevent writing to XMP files automatically, move on to the Metadata tab from the Performance tab, and deselect Automatically write changes into XMP.
“There are benefits to keeping XMPs. One of those being, if the catalog goes corrupt, you have a second set of file settings as a backup. But, if your system is slowing down, then go ahead and deselect it.”
7. Disable Automatic Face Detection
The face detection feature in Lightroom uses AI to go through all the images in the catalog and detect faces. This uses quite a bit of processing power resulting in slower performance. You can disable it in the Face Detection section of the Metadata tab.
8. Separate Your Shoots By Catalog
If your catalog has a huge number of files, 20,ooo+, for instance, you’ll start to notice that the performance will degrade due to catalog bloat. If you shoot different types of images–portraits, landscapes, wedding–it’s a good idea to maintain a separate catalog for each of them. Like Jirsa showcases in the video, they maintain a separate catalog for every client to ensure that Lightroom works at peak efficiency.
9. Hardware
This tip comes in handy if you’re looking to upgrade your machine for editing purposes.
“When it comes to hardware, think CPU, hard drive, and GPU. These are the three primary things that are going to speed up Lightroom performance from the hardware side.”
- Choosing a CPU with a higher clock speed will give you better Lightroom performance than a CPU with more cores. This is because Lightroom isn’t optimized for performance with many cores.
- For storing your files, get the fastest possible hard drives. This means getting an internal SSD or NVMe drive. They are exceptionally fast compared to mechanical drives. Also, keep note that if you work with external USB drives, they dramatically degrade the performance of Lightroom.
- Get yourself a GPU that supports full acceleration during image processing. And as we discussed in the first tip, make sure that you set up Lightroom to utilize the GPU.
If you’ve been aggravated by Lightroom’s slow performance, try these tips out!
Like This Article?
Don't Miss The Next One!
Join over 100,000 photographers of all experience levels who receive our free photography tips and articles to stay current:


Leave a Reply