We’ve compiled thousands of photography tips for photographers of all sorts, from beginners to pros. Follow us for new tips every day, all from the world’s leading photography experts.
Want your images to have effects that’ll make it stand out more and show up well on every background tones? With Photoshop, you could achieve these effects for your images by its features that work on light and dark edges.
This tutorial is to help you learn how to straighten crooked photos. Sometimes in a photo the horizon is just a bit off but is totally noticeable. This technique can fix crooked subjects or horizons.
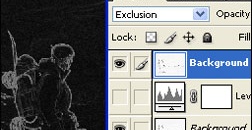
This photoshop tutorial is to help you learn how to convert photos into good looking sketches. And then if you want to learn more we will show you how to make an inverse sketch.
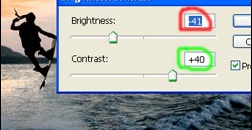
This tutorial is to help you learn how to create a silhouette from a photo that didn’t quite have the right exposure for it. For this photo, it was supposed to come out as a silhouette but it was a little too overexposed. But this technique will work well for any photo that has a bright light source in the background.
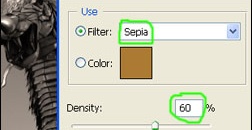
This tutorial is to help you learn how to convert a regular color photo into a sepia toned photo. This can turn a dull photo into a more interesting artsy photo.
This tutorial is to help you learn how to separate a subject or object from it’s surroundings in order to create more serious effects without including the isolated subject.
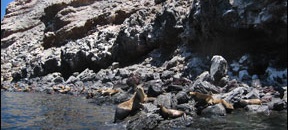
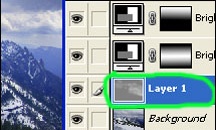
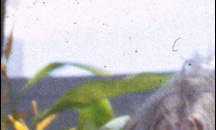
This tutorial is to help you learn how to adjust landscape photos to bring out the detail of the background and horizon. Much of the time a digital camera will bring out the colors more in the foreground, but with this tutorial you can learn how to emphasize the whole scene.
There are times that people may have old photographs they would like to restore to save the memories. Photos usually get damaged through the times. The pictures may get blurred, the color fades and the picture might acquire marks and scratches.
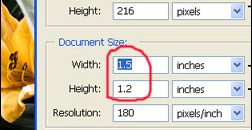
This tutorial is to help you learn how to blow-up or enlarge a picture. You might wish to do this to make a bigger print or for numerous other reasons. Photoshop does a pretty good job but you will still lose a bit of sharpness depending on how much larger you make the photo.
We are always looking for more interesting and insightful photography tips and techniques to share with our readers. We would love to publish an article by you if you are interested in writing for us. See what we are looking for and get in touch.