Light is a tricky thing; some of it we can see, but a huge portion of it we can’t. The areas of the electromagnetic spectrum that we refer to as “light” but are unable to detect with our eyes are the ultraviolet (UV) and infrared (IR), located just past the edge of the visible. Though our eyes are not built to see infrared light, cameras are not quite so picky. As far as they’re concerned, light is light. They would capture almost anything if we didn’t engineer them to see only what we do. In this video, Kai W gives us a rundown of how to reverse that filtering and let in the longer light-waves of the infrared spectrum:
Every camera sensor has a IR-resistant coating that blocks out infrared rays. If you have an old junk camera, you can actually remove this coating. It will usually be on a piece of glass covering the sensor, which you can take off and scrape clean with a razor blade (do this at your own risk, and PLEASE be careful if you do). If your camera is too valuable to mess with, you can get comparable results by simply making longer exposures, allowing enough IR rays to penetrate the filter.
Whichever way you go, you’ll need an IR filter on your lens. This filter looks almost pitch black at first sight, but if you hold it up to light you’ll notice that it’s just tinted a very very dark red. Its purpose is to block out all other light, letting in only the long infrared waves. With your camera on manual exposure mode, you’ll need to do some experimenting to get your exposure right, as the camera’s light meter isn’t designed for this.
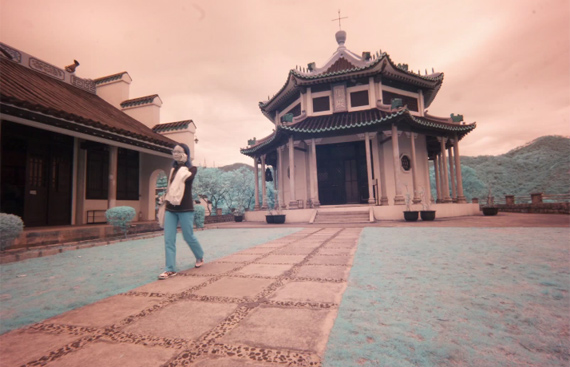
The result is a shockingly different view of the world than we’re used to, but one that is 100 percent organic. It is similar to the way some creatures see, including types of fish, snakes, and mosquitoes. Humans sense infrared light as the feeling of heat, so in IR photography, things that are warm, such as plants, animals, and people, will turn brighter than inanimate objects. This is why trees and grass tend to glow.
This process is an enlightening way to mix up our sensory perception. Some people with crossed wires in their brains may taste color and feel music, but with infrared photography, any one of us can quite literally see warmth, and we can share the experience with each other, too.
Like This Article?
Don't Miss The Next One!
Join over 100,000 photographers of all experience levels who receive our free photography tips and articles to stay current:




Nice video and brief intro to IR photography – I specialized in this field, and have a few remarks:
1. The false colors achieved with IR photography do NOT come from the long bandwidth of infrared light itself as stated. They simply come from regular light (400-700 nm) which passes through the filter. The shorter the cutoff of the IR “filter” in nm, the more light gets through and more blueish/yellowish cast can be seen.
2. Focusing technique with filter: mentioned, but not shown in the video – After focusing before attaching the filter, you need to refocus according to the IR scale of the lens after the filter is attached. Otherwise you will get blurry photos! The focus changes in IR light.
3. The ISO number only increases or decreases the noise, it has nothing to do what kind of white foliage IR effect you will get!