At some point in your life, you’ve probably seen an amazing photograph featuring smoke. The smoke might be flawlessly lit against a solid background or feature breathtaking colors, leaving you wondering just how on earth you could possibly duplicate it. While photographing smoke can be difficult due to its unpredictable nature, thankfully, it doesn’t take a lot of special equipment. In fact, once you study a little more about how to light and shape smoke, it’s all about trial and error.
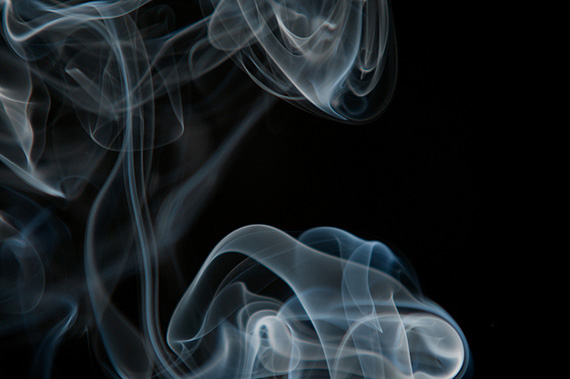
photo by Paul Hansen
Supplies and Setup for Smoke Photography
As with any photo shoot, the first thing you need to do is to prepare. Make a list of all the supplies you will need, and get everything set up in advance. Typically, you will want to use the following supplies when working with smoke photography:
- Black Background / Backdrop. Compared to other colors, a pure black backdrop helps to blend the smoke into your images easier. (You can also minimize the size of backdrop required by using a telephoto lens.)
- Your Camera. If possible, use a telephoto zoom lens. This will help minimize the required backdrop, and make it easier to control your composition.
- Extra Memory Card. When photographing smoke, you will typically capture a lot of frames.
- Flash or Lamp. This needs to be an external source and does not count your camera flash.
- Incense (including incense holder). While you can use other options, incense not only provides a long-burning smoke source, but it also will not set off a smoke detector or sprinkler system.
- Reflector (optional)
- Snoot. If you don’t have one, try using pieces of cardboard. The point is to help direct your flash toward the smoke and away from the backdrop.
- Tripod. Although it is possible to shoot without one, a tripod helps to ensure stability and keeps your camera steady if you need to walk away to make changes.
After you have gathered all your supplies, you will want to set up in a nice dark and draft-free location. If necessary, wait until it is dark out, and avoid working near open windows. Remember, smoke is easily directed. Even with the slightest puff of air, smoke can move, so always make sure to turn off any fans, and cover up any vents that could cause issues during your shoot. If at all possible, use a cool room with a high ceiling to allow somewhere for the smoke to go.
Although you don’t need a lot of room for your setup, you typically will require around five feet between the camera and backdrop. Your light source should never be placed directly in front of the backdrop; it should always be placed to the left or right to avoid light from hitting it. A great starting point for your light source is between 30 and 45 degrees away with the snoot directing the flash toward the smoke; the incense (or other smoke source) should be in the middle with your camera pointed directly at the backdrop.

photo by butch
Photographing Smoke
During your shoot, you should always shoot in RAW format. This will make your post-processing much easier, and provides you with as much information as possible. However, if you do not plan on editing your images, you can consider JPEG.
Like most shoots, your camera settings can vary depending upon your location. However, there are a few specifications you can keep in mind. Your ISO setting should be placed at the lowest possible option, and your shutter speed lower than your normal settings, with 1/250 of a second as a good starting point.
Like sports photography, auto focus is not an option. Smoke is continuously moving, so you will need to ensure your focus is in manual mode. Start by focusing on the tip of the incense, using a dim lighting setup. Be prepared to experiment, because what works for some photographers doesn’t necessarily always work for others. Keep experimenting until you fine tune your camera settings, position, flash, and reflector to where your images consistently have a pure black backdrop, as well as a good tonal range and highlights for your smoke.
When working with smoke, make sure to keep safety in mind, not just for you, but for your equipment as well. Smoke has the ability to create a film over your lens, destroy plastic (as well as other parts)—and more. You paid good money for your equipment, so don’t damage it because of small oversight.
It may just be incense, but you still will never want to set up in a location where chemicals or other flammable materials are stored. A good rule of thumb is it is better to be safe than sorry; so while you may not think you need to, always take breaks throughout your photo shoot. Ideally this should be around every 20 to 30 minutes. This will allow you time to open any doors or windows to let out any extra smoke within the room.
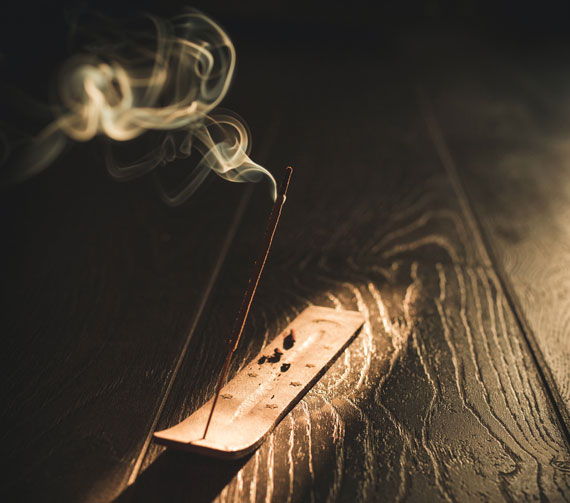
Photo captured by petr sidorov
Post Processing Photos of Smoke
For most photographers, the fun begins during the post-processing stage. You can remove unwanted smoke areas, change the contrast, levels, curves, and/or other aspects until your highlights and shadows reflect the look you’re trying to achieve. Looking for something different than the same old black background or white smoke? Then try inverting the image (Image > Adjustments > Invert) or using layer masks to change the colors of your smoke. The possibilities are endless, and the only thing that can limit your creativity is you, so play around with the image.
Despite the difficulty, photographing smoke can be lots of fun. Often times, it is hit or miss to capture an amazing shot; but it has the potential to be a big hit. So while you may experience some bumps along the way, the positives far outweigh any of the troubles you had to achieve it.
Like This Article?
Don't Miss The Next One!
Join over 100,000 photographers of all experience levels who receive our free photography tips and articles to stay current:


Thank you for taking the time to write and share such a detailed tutorial. Very cool.
And I thought you were going to discuss Oregon and California’s smoke.
Absolutely amazing pictures
Very artistic
A so simple things transformed in a pure beauty
This is the powerful results when you join talents with today’s technology
CONGRATULATIONS !
Photography leaning is a process. To be abreast you constant tutorial and personal experiment.
All these I gain from this forum.
Thanks a lot.
Jide Steve O.
Hi Pam,
I believe that is the purpose of the “snoot”. Just Google it and it will explain how it works for you. :) I had to do it. hehe
Mark
Hi,
Excellent post… Very helpfull and detailed :)
One question.. how do you put the different color on the smoke? with some kind of light trick? or is it just post production??
Thanks :P
I think your teq works very well i’ve been struggling with this especially with the type of thing i have in mind. Wanted to say thank you though for all your advice I’m sure it’s helped & inspired alot of young photographers.. Thanx again
Wonderful post.
You really inspired me.
Thanks
does the room need to be dark or can it be done say in your living room during the day?