Topaz Adjust just got better. The popular photo adjustment program was upgraded to include more powerful functionality and many new features. Many professional photographers have started using Topaz as a part of their post-processing for stunning yet subtle improvements.
The newest version can be found here: Topaz Adjust V5
Some of the new features found in Topaz Adjust V5:
- Auto-create layer. Automatically creates a new layer where your adjustments will be saved to.
- Apply button. Stack multiple effects and presets during the same workflow.
- My Collection. Users can now save their presets under My Collection.
- Preset Collections. Presets are organized into 5 unique collections.
- Local Adjustments. Intuitive selective adjustment brush for burning, dodging, smoothing, and brushing out (erasing) added adjustments – plus edge-aware options.
- Histogram. Shows the tonal range of your image.
- Curve Tool. Easily adjust image tonality to help emphasize tones, contrast and brightness.
- Finishing Touches Tab. Features options for diffusion, grain, borders, vignettes, tone adjustments and overall transparency adjustment.
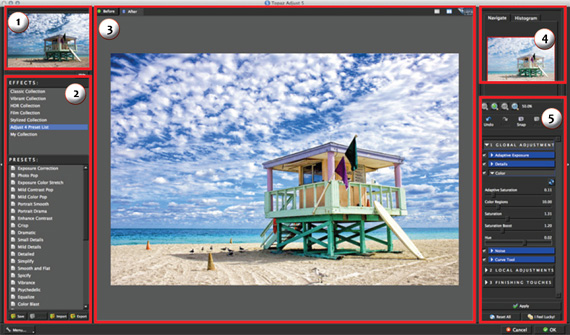
Topaz Adjust 5 Interface:
- Presets/Effects Preview – Displays previews of presets & effects.
- Presets Panel – Provides “snapshots” of pre-defined effects.
- Preview Window – Displays the preview of the original and adjusted image.
- Preview Navigator – Displays the region of the preview image you are currently focused on. Also displays histogram.
- Settings & Parameters – Sliders to adjust and fine tune the various effects.
Sample Photo Edit in Topaz Adjust 5:
In this sample edit, we take a look at a quick example going through the workflow to show you the layout of the program and help you get acquainted with the tools and setup of Topaz Adjust.
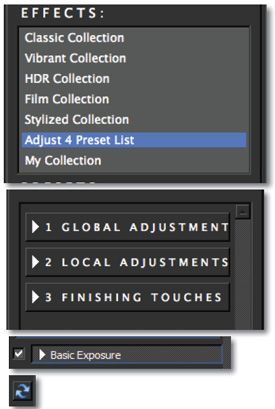
As you begin, you can choose a Collection type from the Effects menu and then apply one of the included presets or you can start your work manually using the tabs and sliders in the tool panel. Whether you decide to work with presets, manual adjustments or both, you will be able to customize your enhancements using the tools in the three adjustment tabs.
So let’s take a look at the purpose of each tab and what tools and features are inlcuded in each.
Global Adjustment: This step includes basic tools (original Topaz Adjust tabs) for adjusting exposure, detail, color and noise. It also includes the new curve tool.
Local Adjustments: This step allows you to selectively apply image adjustments using an advanced brush. Adjustments include burning, dodging smoothing and erasing/brushing out applied adjustments.
Finishing Touches: This final step is for applying important finishing touches to your image. It includes toning, vignettes, grain and more.
Important: Next to each sub-adjustment tab is a small checkbox. To enable the effects in this tab be sure that the check box is Checked. You can also uncheck it at anytime to disable the effects.
Each sub-tab also includes a local reset button. Clicking this button will reset all of the sliders in that tab to their default values.
So let’s get started…
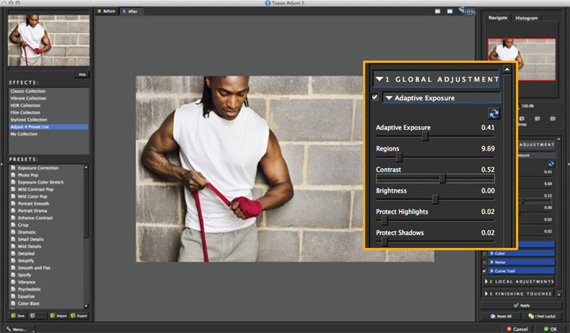
1. Click on the Global Adjustments tab to reveal the individual adjustment tabs and then click on the Exposure tab.
Adaptive Exposure is a very unique tool which makes it easy to add detail and depth to your image. The Adaptive Exposure tab uses an adaptive technique to enhance the dynamic range of your image…giving it that WOW factor.
Here you can apply a variety of tone mapped effects using the unique sliders to adjust the range of the highest and lowest luminance regions where detail is visible. You can also correct exposure, balance lighting and redefine tonal values.
The Regions tool offers added flexibility for your Adaptive Exposure Adjustments.
The Regions slider determines how your Adaptive Exposure selection is disbursed across your image.
The value of the Regions slider determines how many regions to divide your image into. The Adaptive Processing settings will then be applied locally to each of these regions.
The larger this number is, the more localized tonal balancing your image will have.
2. By increasing the Adaptive Exposure and Regions sliders we can increase the local contrast in the image and introduce more variations of color and detail. You can see that the background looks less flat and is starting to show some definition.
You can also adjust overal image contrast using the Contrast slider, or reveal lost details hidden in shadows and highlights using the Recover Shadow and Recover Highlights sliders.
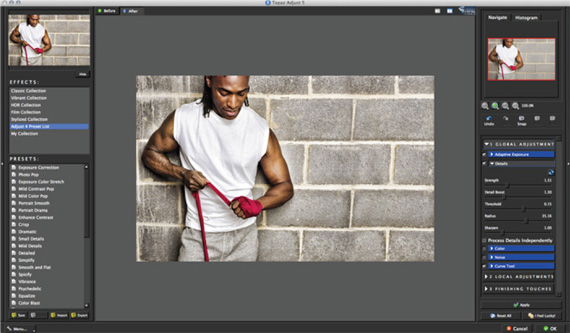
3. Moving to the Detail tab, we can increase the detail in the image and aslo use the small boost slider to give it more texture. Be sure not to over use the Detail Boost slider as it can often create an unwanted noise-like effect.
Process Details Independently: Adjusts exposure and details separately. When enabled, only underlying exposure will be adjusted through the Exposure tab. The details will only be adjusted through the Details tab. This tends to reduce the overall noise and amount of “gritt” in the final image.
For this example we will not be making any adjustments in the Noise Tab or the Curve Tool Tab, however you are welcome to use these tools in your workflow.
The Noise tab offers basic noise reduction capabilities. This tool often comes in handy because Adjust can enhance the noise that is already there or sometimes create noise as a side effect of the adjustments made. It is best used as a mid-workflow tool specifically for eliminating the noisy effects that can occur while working in Adjust.
The Curve Tool offers additional control and flexibility over image contrast, brightness and tone. You can make adjustments here manually or use any of the pre-loaded curves presets. There is also a built-in histogram for added convenience.
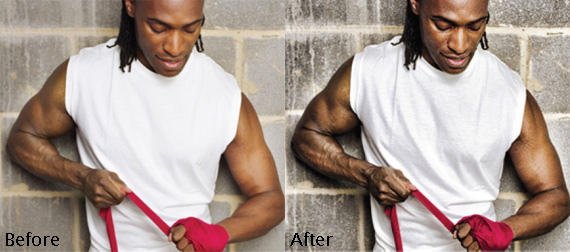
If you look at the boxer’s face and arms you may notice that the applied effects are too harsh on his skin. We can use the brush in the new local adjustment tab to fix this. By brushing out some of the effects we can create a more pleasing effect and detail balance. I’ll show you how to do that shortly.
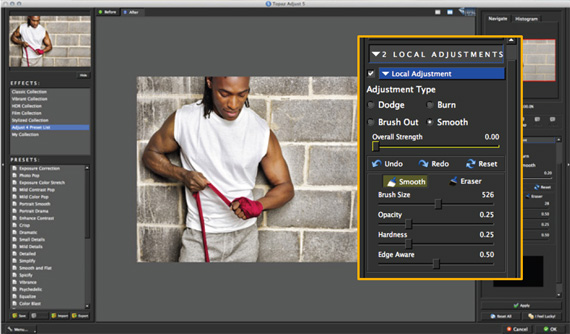
The Local Adjustments tab allows you to selectively apply adjustments using an advanced, yet very intuitive brush. Adjustments include burning, dodging, smoothing and brushing out applied effects.
4. Click on the Local Adjustment tab to reveal the slider tools.
The Dodge and Burn adjustment types are used to lighten (dodge) or darken (burn) specific areas of your image by increasing or limiting the exposure in those areas. Use the Overall Strength slider to determine how strong or weak the dodge/burn is applied to your image.
The Brush Out tool allows you to selectively taper or erase applied adjustments anywhere in your image.
The Smooth tool allows you to smooth out areas of your image. It is great for cleaning up skin and sky.
Edge Aware controls how edge aware the brush is. Higher values indicate an increase in awareness, which is good for precise selections. Lower values indicate less awareness, allowing for a more natural brush stroke and transition.
5. Select the Brush Out option. This will allow us to brush out (or erase) the applied effect in any area. Be sure to set the brush parameters.
- Brush Size – Sets the brush size
- Opacity – Controls how much of the effect is removed.
- Hardness – Determines the hardness of the brush.
- Edge Aware – Controls how edge aware the brush is.
6. Once the brush settings are made we can go ahead and brush over the boxer’s face and arms. If you make a mistake or erase too much detail then you can use the local Undo/Redo buttons to move backwards and forwards through your brush strokes or you can select the Eraser button which will bring back that brushed out detail. There is also a reset all button that will reset any adjustments made in this tab.
If you are happy with your adjustments click OK to process your image and save it back to Photoshop or you are also welcome to continue making additional adjustments.
For this example we are going to make a few additional adjustments, but before moving ahead we are going to click the “Apply” button (located at the bottom of the tool panel). This will allow us to save the adjustments made this far so that we can stack effects.
7. Click Apply to process the current adjustments.
Now we want to add some color to the image to make it pop. The quickest way to do this is using one of the included presets.
8. Find a preset that you like or use the sliders in the Color tab. For this example we applied the Photo Pop preset to the image. You are also welcome to tweak the preset effects using the sliders to optimize the look for your image.
Again, if you are satisfied with your adjusments then click OK to process your image. We are actually going to go to the Finishing Touches tab
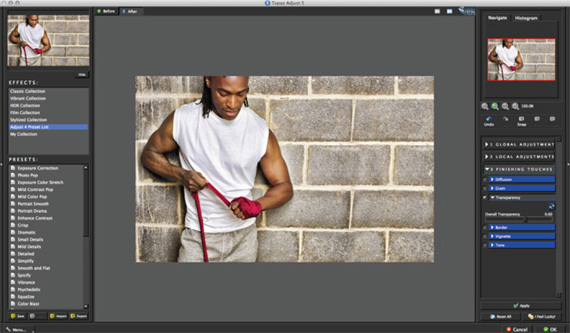
to make one last adjustment to this image using the transparency slider. The Finishing Touches tab offers additional effects like diffusion, grain, borders, vignettes and tone adjustments.
We are going to be workng with the Overall Transparency slider in the Transparency tab. This tool allows you to control how strong the overall effect that you have created is applied to your image.
9. For this image we lowered to Overall Transparency setting to 0.60.
Be sure to compare your adjustments using the before and after tabs – or the spacebar (shortcut key)
10. Click “OK” to process the adjustments and save the image back to Photoshop.
Video Tutorial on HDR Retouching:
Topaz Adjust works very well for creating HDR-like images, using a single image; which is a common reason many photographers have been picking up this software.
In this video Deborah Sandidge presents her own workflow and technique when creating single image HDR looks within Adjust. *This was with Adjust version 4, but the same techniques still apply to the new upgraded version.
How to Get a Copy:
The newest which is version 5 can be found here: Topaz Adjust
Like This Article?
Don't Miss The Next One!
Join over 100,000 photographers of all experience levels who receive our free photography tips and articles to stay current:




This isn’t a review, it’s a walkthrough… I found no information here to help me make a purchasing decision.
I am a long time user of Adjust 4. I find Adjust 5 has smoother results but the workflow is much slower. The slider panels close automatically everytime you change presets. The nested panels are slow to move through. The number and organization of the presets is somewhat laborious. And the automatic layer creation was removed from the demo software. I find Nik’s Color Efex 4 more straightforward right now.