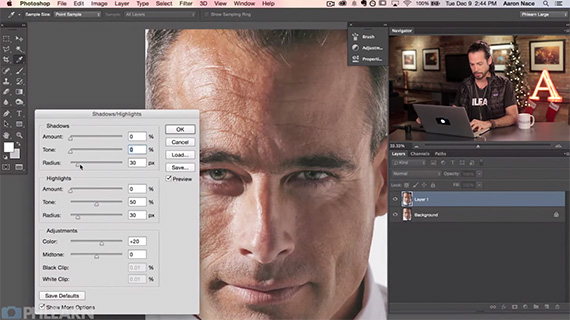
Every now and then the photographer in you is challenged by the demands of an exceptional request. Outside of the entertainment industry, most photographers don’t really need to sit down, roll up their sleeves and do extensive retouching to an image. For the most part global adjustments take care of everything. However, at times you might have to resort to some serious retouching. Aaron Nace demonstrates one such instance, retouching the portrait of a handsome mature man:
This tutorial works on Photoshop CS6 and newer.
1. Duplicate the background layer.
Duplicate the background layer by using Ctrl / Cmd + J.
2. Open the Shadows and Highlights adjustment window.
Click on Image > Adjustments > Shadows / Highlights to open the Shadows / Highlights window. By default the values will be random. You want to slide everything back to ‘0’ before beginning to tweak them. This gives you the right base to get started.
3. Adjust shadows and highlights.
The next step is to tweak the shadows and the highlights.

Adjust the shadows and highlights
The precise degree of tweaking that you need will vary depending on the image; there’s no single rule. If the result appears too ‘fabricated’ or ‘plasticky’ or even ‘unnatural’ then it probably is. Train your eyes and trust your judgement.
In this video Nace works predominantly with the shadows and the Color Adjustments. Color adjustments help bring back some of the colors on the face.
4. Take care of wrinkles and pores in the skin.
Wrinkles and pores are inevitable aspects of aging. Every mature face has some.
The next step is to take care of those. Photoshop has an excellent tool for this step—the Spot Healing Brush Tool. You can get to it by clicking the Healing Brush tool and selecting it from the options. Ensure that Content-Aware is selected at the top.

Spot Healing Brush Tool
Start by duplicating the layer. All you have to do is paint over where you see any wrinkles and blemishes and the spot healing brush tool will sample adjacent areas that are a close match in terms of texture and color and then fill those in places you’re painting over.
This tool is incredibly powerful and exceptionally accurate, so it’s very easy to go overboard with it. Ensure that you don’t attempt to remove any and all wrinkles and blemishes, as the result is going to look too unnatural.
5. Reduce the opacity of the wrinkles and blemishes adjustment layer.
Unless you’re hell bent on rolling back the years on the subject by two or three decades, you may want to reduce the opacity of your adjustment layer, just to make things more natural.
6. Bring back the colors.
Create a new Hue/Saturation adjustment layer. The saturation adjustment is really intended for bringing back some colors on the face. If the face is really pale you may want to use it. If you prefer the natural look with just the wrinkles gone then this is not required.
Here is a comparison of the original and the final retouched image side-by-side:

Comparison of the original and retouched image.
Retouching makes quite the difference. How much do you retouch your portraits?
Like This Article?
Don't Miss The Next One!
Join over 100,000 photographers of all experience levels who receive our free photography tips and articles to stay current:


Great post I like it. Thanks for sharing with us.
Awesome tips of skin retouching. We implement these tips in fashion photo retouching.
Thank you for the article. Aaron you are the best tutor in retouching.