It’s easy to overthink studio lighting and become convinced that you need elaborate equipment setups that include multiple strobes and reflector panels, all meticulously positioned and expensive to boot.
However, as portrait photographer and Adobe Photoshop expert Glyn Dewis explains in the following short tutorial, making compelling portraits with just one light source is not only easily possible, but also incredibly effective. Watch his technique here:
Rembrant lighting is more modernly known as “cross” lighting among professional studio photographers. As Dewis explains in the video, he creates this effect in two easy steps:
- He has his subject stand several feet away from his backdrop to prevent shadows.
- He positions an Elinchrom 175cm Octa Softbox directly to one side of the subject and then pulls it toward the camera until the light is also falling onto the other side of the subject’s face.
In the absence of a large Octabox, Dewis recommends using a Rogue Flashbender XL Pro illuminated by a Phottix Mitros TTL Flash for Canon or Nikon, which should be placed closer to the subject due to its smaller surface area, but at the same exact angle as the Octabox.
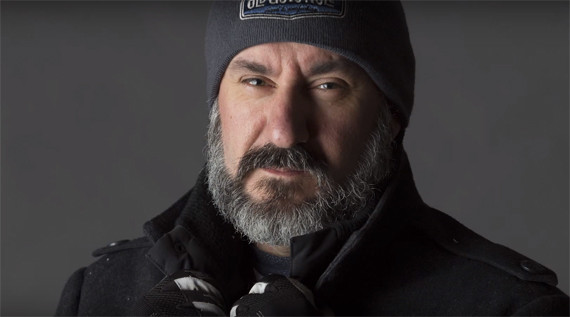
An example of Rembrandt or “cross” lighting.
“You can play with it, how much [light] you want on the other side of the face by how far forward you put that light,” said Dewis. “The further forward you take that, the more the modifier is going to start to creep around and see that side of the face and light it up.”
Like This Article?
Don't Miss The Next One!
Join over 100,000 photographers of all experience levels who receive our free photography tips and articles to stay current:


Leave a Reply