Real estate photography is all about presentation. You really want to showcase the best look of the location that you’re shooting. This means that the composition should be spot on, and you may want to be picky about what you want or do not want in your frame. Besides the shooting process, how you choose to post-process your work also matters a lot. Photographer Rich Baum takes you through how he typically photographs a master bedroom, and the editing process in this video:
Composition
Before you even take a photo of any room, take your time to understand what it has to offer. Keep an eye out for interesting viewpoints of the room, and think about how you can include them in your composition.
Typical shots can include a view from the entry way, view from the bed, and any other interesting features of the room. Also pay attention to how the room looks best. If it looks boring from the eye-level, try a lower or a higher perspective. Feel free to compose the way you like. It is also a good idea to talk to the client to understand if they have any specific requirement.
Photographing a Real Estate Interior
You’d typically want to take two types of images when shooting rooms: with ambient light, and with flash. The idea is to take these two photos, and later create a composite.
When taking the ambient shot, set up your composition and expose the image so as to capture the essence of the room with pure natural light. Don’t worry if the exterior is over-exposed. You’ll be taking care of that in the next step.
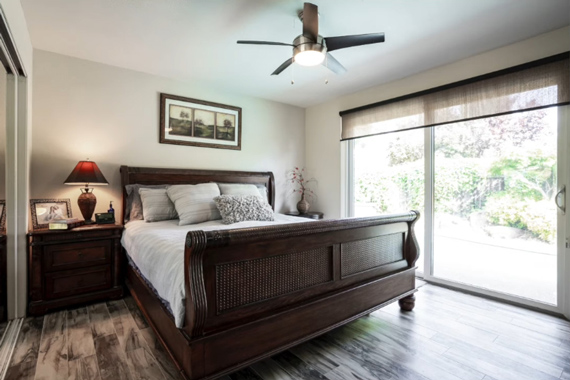
Image taken with ambient light only
Next, without making any change to the composition, adjust your settings to expose for the window light. Then, using your flash, light up the interior of the room. You may end up getting some unwanted shadows in the image but don’t worry about that too much. The image you take with the ambient exposure will come in handy to take care of the shadows.
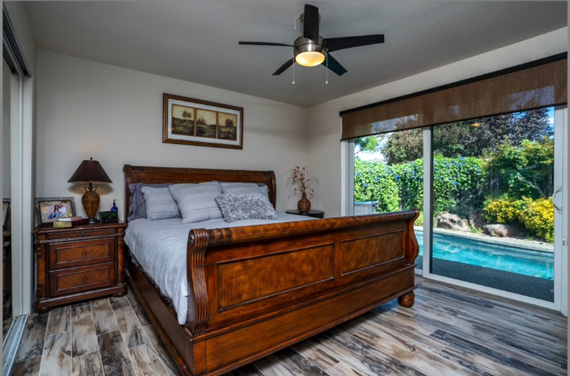
Image taken by metering to the window light, and by using flash
Editing Real Estate Interior Images
The basic principle when editing real estate interior images is that you want to superimpose the images taken with the ambient light and the flash, and mask in only the good bits. But before you do that, feel free to make slight adjustments to the individual images. Such adjustments may include recovering shadow and highlight details, adjusting saturation, vibrance, clarity among others.
Once you’re ready with both the images, follow these steps to make your final edits in Photoshop:
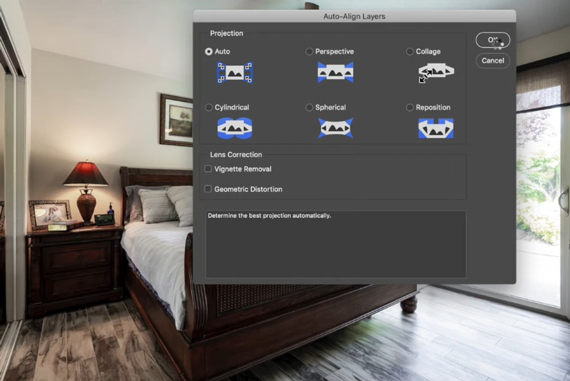
- Select both the images in Lightroom and right click. Then select Edit In> Open as Layers in Photoshop…
- In Photoshop, select both the layers and go to Edit> Auto-Align Layers… Select the Auto option and hit Ok. This will line up the images in case there was some slight camera movement when taking the images.
- In the layers panel in Photoshop, ensure that the ambient image is above the image taken with flash, and then click on Add a Layer Mask while holding the Option key (Alt in Windows). Doing so will add an inverted mask and make the ambient exposure invisible.
- Select the Brush tool with Hardness set to 0%, and Flow set to a low value (around 10%).
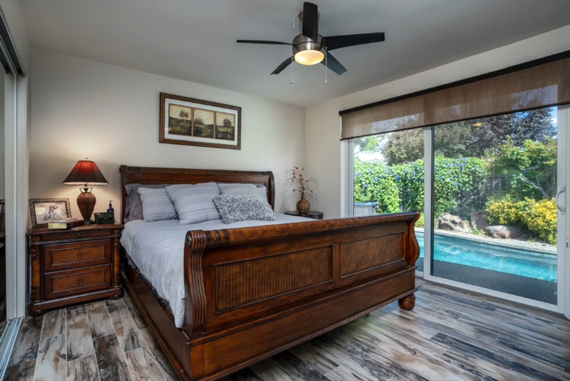
- Now, with the white color selected, slowly paint over the section of the image taken with flash, where you want to introduce ambient light. In his example, Baum uses this technique to get rid of the shadows on the wall, and the highlights on the bed.
“You play with it as much or as little as you want. That’s the key. That’s the fun of this.”
Baum’s technique is an awesome way to bring about a balance between the ambient and the flash exposure. This takes the image quality to an entirely different level and that’s what real estate clients love to see. Mastering this technique will definitely help you improve your real estate photography.
Like This Article?
Don't Miss The Next One!
Join over 100,000 photographers of all experience levels who receive our free photography tips and articles to stay current:


Nice to see real estate photography tips from time to time. Thank you.
In this particular case, in which ambient and flash are used to compose the final image, I have a recommendation that I hope will help you to reduce the time you spend on editing.
Instead of starting directly with the brush I think it is easier, faster and more intuitive to place the flash layer as a base and the ambient layer on top of it in luminosity mode. Once this is done, you have two ways to adjust the blend: one is through the opacity of the ambient layer and the other is, as shown in the video, giving the little finishing touches by revealing or concealing with a brush on a layer mask.
Try it, you can go from minutes to seconds editing an architectural, real estate and interior design image in Photoshop.