Twilight is a magical time. Just because the sun is down doesn’t mean you should put away your camera. When the sun sets, a different looking world exists for photographers. Colors don’t appear the way they do in daylight. Instead, colors display based on your camera’s white balance setting and how that setting matches the various light sources in your scene.

Photo by Andi Campbell-Jones; ISO 100, f/9, 3-second exposure.
Backgrounds become less distracting. Street lights and lit building interiors give you outlines and shapes of various colors. Chances are not everything in your scene is lit. So what you see in your viewfinder is very close to what you’ll get if you expose carefully and properly. People in your scene don’t matter as much unless you want them to. Passers-by don’t register in your image. Even if they do, they are a blur unless you “freeze them” with a flash.
Cars show up as trails of red and amber lights. Skies take the color or aura of the city’s lights especially if there are low lying clouds to reflect it. Compared to other subjects, night photography doesn’t require a whole lot of equipment. The following are necessities:
- a steady tripod
- a cable release to trip the shutter. Most people can get by using the self-timer. The key is to not shake the camera when you trip the shutter.
- a flashlight to illuminate the knobs and dials of your camera.
- optional– a portable flash with lots of batteries
You pretty much will get what you see in your viewfinder. You don’t have to worry about trying to light anything except when you want to include a person in the picture. But I’ll discuss that later. The various elements in your picture lights itself freeing you to just concentrate on your composition and exposure. Fountains tend to have spots and colored lights on them, Christmas trees are never displayed in public without multicolored lights and beautiful majestic architecture in most civic centers are usually brightly lit up showcasing a city’s pride.
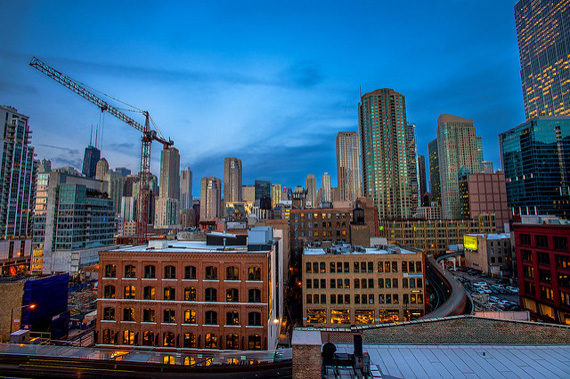
Photo by Christopher|F Photography.
How to Set Up
- Change the ISO on your camera to 1600 or whatever the maximum number is.
- If you have a DSLR, attach your longest focal length lens on your camera and take a light reading. The idea here is to use the narrower field of view so that your light meter can give you a more accurate light reading. If you have spot meter reading mode on your camera, that will give you a similar result.
- Take note of the exposure reading you get in step 2.
- Calculate that exposure reading for ISO 200.
- Switch lenses to a wide angle or even a more “normal” focal length lens and compose your shot. Mount your camera to the tripod.
- Tighten your tripod head so that your camera doesn’t move in during the exposure.
- Finally, set the camera to the self-timer mode. Some cameras give you a choice of 2 seconds or 10 seconds. The whole idea is that you don’t want to jostle the camera when you press down on the shutter. Let the camera settle on its own—2 seconds ought to be enough for that.
Calculating Exposure
Making your camera’s CCD or CMOS more sensitive to light makes it easier for you to get a light reading. If you leave your camera’s ISO at 100 or even 200, your meter might not register a reading especially if the scene is something lit only by moonlight. Remember that there are always three components to exposure: ISO, aperture, and shutter speed. For the sake of our discussion, let’s say when you pointed your camera in step two at the scene, your meter recommends 1/15 of a second at f/2.8 ISO 1600.

Photo by Nick Fisher; ISO 6400, f/2.8, 6.5-second exposure.
If you haven’t read this yet, then just take my word on this. High ISO settings yield images that are extremely noisy. That’s the equivalent of grain in the analog or film world. So what we’ll do next is figure out equivalent exposure at say ISO 200. How did I arrive at a shutter speed of 1/2 a second for an aperture of f/2.8 when I switched the ISO from 1600 to 200?
ISO 200 is three f-stops less sensitive than ISO 1600. There are two ways for me to do achieve equivalent exposure. Let’s examine the first method which entails leaving the aperture the same at f/2.8 and only changing the shutter speed. That means I’m only increasing the time the shutter stays open, allowing in more light by the same three f-stop factor.
So I’ll need to set the shutter speed from 1/15 -> 1/8 -> 1/4 -> 1/2 second (counting from 1/15 second to 1/2 second = 3 stops). Now that you have your exposure for an aperture of f/2.8, let’s say your subject has some depth and you want to be sure more of it is in focus. You can figure your exposure by changing the just the aperture, leaving your ISO the same at 200.

Photo by Vincent Ferron.
Let’s say you decide you want make your picture at f/11 giving you more depth-of-field. You again have to increase the time the shutter stays open in the same ratio or f-stop to get the equivalent exposure. F/11 lets in four stops less light than f/2.8. So you’ll need to set a shutter speed of 4 whole seconds. (Counting the aperture settings from f/2.8 -> f/4 -> f/5.6 -> f/8.0 -> f/11 = 4 stops). (Counting the shutter speed settings from 1/2 second -> 1 second -> 2 seconds -> 4 seconds = 4 stops.) The second alternative to achieve equivalent exposure, opening the aperture to let in more light, is not always practical because I would be restricted to using my “fastest” lens, a 50 mm f/1.4. Even that lens has physical limits–its widest aperture is f/1.4. The resulting image would still be underexposed by one stop. I would need to buy a 50 mm f/1.2 lens. Have you priced one of these?
If you have a tripod, you have the luxury of dropping your shutter speed without worrying about camera shake. That is often your best option because you really don’t want to be making pictures the whole time at your widest aperture whether it is f/1.4 or f/2.8.
At those apertures, focus is critical since the depth-of-field is very shallow. If you happen to set up on a pedestrian bridge and people are working on it as you are making the exposure, then you might have to wait for a lull in foot traffic.
About the Author:
Peter Phun is an adjunct photography instructor at Riverside City College. He is a freelance photographer, web designer, and stay at home dad. He previously worked as a staff photographer for 18 years at The Press-Enterprise, SoCal’s fourth largest daily newspaper. Peter is the webmaster for the Mac group in the Inland Empire.
Like This Article?
Don't Miss The Next One!
Join over 100,000 photographers of all experience levels who receive our free photography tips and articles to stay current:


Thank you for sharing this article..
I’m new to this too, so don’t take my word for it, but my guess to your question Fran Robillard, is that you could set camera to Aperture priority, then the camera decides on the shutter speed, then you can see those values. Or visa-versa, the camera will decide on aperture if your manually setting the shutter speed. A & S and semi-auto modes
anyone correct me if I’m wrong though.
I’m new to this, how do you get the initial exposure reading? Is the camera in auto mode to see those settings?
Thanks
As noted in the comments there were several errors in the article regarding f-stops and light transmitted. But for mike penney, you should get your “corrections” correct… 2 to the 4th power is 16, not 32.
Small setting changes seem to magnify at night. Nice tips guys!
May be mistaken but four additional stops from 1/2 sec is 8 seconds, not 4 seconds.
Error: The difference between f2.8 and f11 is 4 stops but that does not mean 4 times less or 1/4 the light is transmitted. The difference is 2 to the 4th power which is 32 times less light.
the picture of the trees in the woods is breath taking, amazing how something so simple can make someone feel so much by looking at it.
I heard Scot Kelby books are great! There are tons of books out there…. You can look on Amazon and get some reviews about the best books for photography!
If you want me hands on, check out youtube for photography tutorials!
hey, im 14 and im sooooo interested in photography. do u have any recommendations on books or other websites so i can study some more,
thank you!