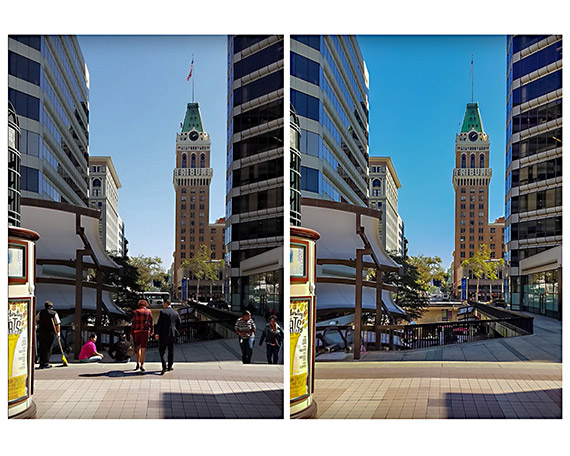
Most photographers have been in a situation where the only thing standing between their camera and a breathtaking scene happens to be a handful of pesky bystanders. Sometimes, it’s possible to simply wait for tourists to move out of your frame and quickly snap a shot. However, at some high traffic locations, it’s almost impossible to capture a frame completely devoid of human activity.
Luckily, with some simple image stacking techniques, it’s completely possible to create the incredible, people-free photographs that many photographers dream of. The algorithms involved in making stacked image calculate the average image information over multiple frames and compile the resulting data into one composition. Therefore, by taking multiple exposures from the same vantage point as tourists move and out of the frame, it is possible to completely omit them from a final composite image. In the following tutorial, Jesus Ramirez shows just how it’s done:
The easiest way to ensure that your images line up as perfectly as possible and create the strongest final image is to utilize a sturdy tripod. This way, there will be minimal camera movement between exposures. While shooting steadily with your hands may seem like a convenient and tempting course of action, it’s important to keep in mind that you should wait at least 20 seconds between exposures so that cars, people, and other moving elements within the frame have a chance to move away from the camera’s line of vision.
All that it takes to properly stack an image is somewhere between 8 and 20 similar photographs featuring the same subject at the same angle. Once you’re at a computer, you’ll want to create a single composition in Photoshop with each individual photograph on its own layer. In post, it’s possible to bring in each file layer into the scene individually or automatically stack an entire folder into separate layers.
The key to this particular technique is to align the frames as closely to one another as possible. Of course, there’s no such thing as perfect and each frame will contain minute differences. If you find that you’re having an especially hard time lining up your photographs, you can use Photoshop to provide some additional assistance. All that’s necessary is to highlight the layers in question and select the Auto Align option under the Edit drop down menu. From there, you can combine the layers into a non-destructive Smart Object.
After creating the Smart Object, you can go into Stack Mode and select the Median option, which calculates the average of each pixel’s information and creates a composition based on what data is constant throughout all (or most) of the photographs. Any inconsistent pixels are subsequently eliminated—namely, those occupied by people in motion. This effect can also be attained by using Image Statistics and selecting the “Attempt to Automatically Align Sources” checkbox.

A before and after view illustrating the capabilities of image stacking through Photoshop
Although this overall technique does an excellent job at removing human interference and traffic, it does produce some residual errors. Luckily, these are easily fixed. One of the most common issues photographers using image stacking techniques face comes from constantly moving objects relegated to a specific area, such as a flag waving in the wind. Since this technique utilizes Smart Objects, all of the files original layers are still in tact. A photographer can go through each individual image, pick out the best looking detail, and paste it into place over the final combined product.
Another issue that photographers must watch out for are distortion, color, and artifacting errors that stem from minute changes in perspective or vantage point. These can be solved by using the transform tool or simply cropping out problem areas along the image edges.
With just a few tweaks to contrast, sharpness, and overall tonality, the image is complete. The next time you find your perfect photograph obstructed by a tourist, don’t spend hours clone stamping or disregard the scene all together. Just take a little bit of time to take a series of similar exposures—your computer will do the rest of the work for you!
“This technique requires you to take multiple images and a bit of planning, but it is all worth it in the end because the results are amazing.”
Like This Article?
Don't Miss The Next One!
Join over 100,000 photographers of all experience levels who receive our free photography tips and articles to stay current:


Can this be done within Elements as well?