Some photographs benefit greatly from a little texture. You can change the style and feel of a photograph quickly and easily in Photoshop by layering different textures on top of your image, but there are few details you should know that will help you get the best from your images. Watch this short video tutorial hosted by Julieanne Kost:
Kost starts with her base image, a bamboo tray of snails, and two texture layers opened up in Photoshop. The first texture is a blue paper and the second is raindrops on a windshield. She starts the edit by turning off the raindrops layer and begins working on the paper texture. To blend the texture layers into the image, Kost calls on Blending Modes. These are found in the Layers panel.
“The easiest way to blend two images together is…to simply use a blend mode. And you’ll notice that these blend modes are grouped together, so the top group of blend modes will always make a darker image because it’s taking the darker of the values of the layers that are being blended. If I select from the next group my image is going to get lighter. If I select, however, from the third group, now I’m able to add a little contrast in my image because Photoshop is splitting up the image. The darks will get darker and the lights will get lighter.”
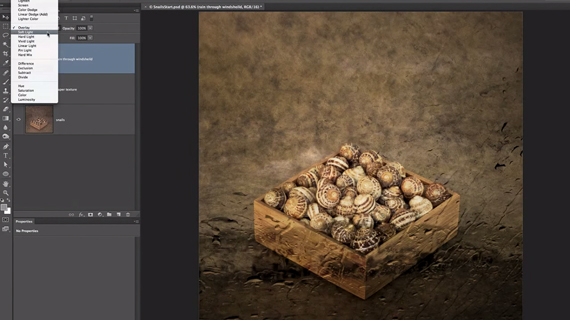
You can change the mask mode to change the appearance of the texture layers.
Kost settles on the Soft Light blending mode, which produces a nice soft texture over the image. The texture mode did tint the image blue, but as soon as she enables the raindrop texture layer the blue tint goes away. But, there’s still a problem: Kost likes the raindrops on the image, but she doesn’t want them to be visible on the snails.
Her solution? Using the Lasso Tool, she makes a rough selection of the snails then Feathers out the selection edges by clicking on Selection > Modify > Feather. She chooses a wide feather radius of 100 pixels to make sure the selection falls off into the background appropriately. With the selection now feathered, Kost adds a blur to the raindrop texture layer by clicking on Filters > Blur > Gaussian Blur and putting blur radius of 94.2 pixels.
Once she clicks OK and de-selects the snails, the image is finished.
Like This Article?
Don't Miss The Next One!
Join over 100,000 photographers of all experience levels who receive our free photography tips and articles to stay current:


Leave a Reply