I love water. Coming from Ontario where lakes and rivers abound, I’d spend entire summers at our cottage as a kid either in or on the water. I’m still drawn to it like steel to a magnet, so it’s not surprising that after learning the technique to create the beautiful pictures like in this article, I was shooting every waterfall I could find!
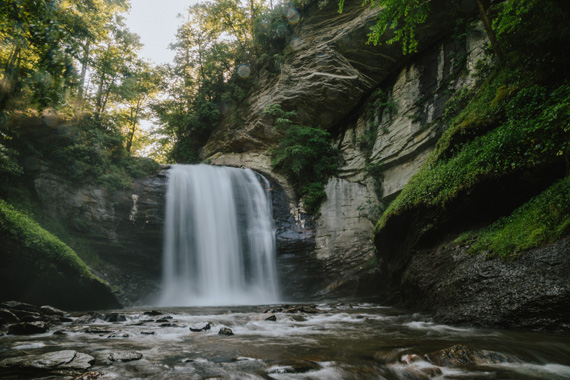
Photo by Wes Hicks; ISO 100, f/22.0, 0.6 sec, 24mm.
If you have waterfalls in your area, or are planning a trip where you will have access to waterfalls, rapids, etc, keep the following few tips in mind for some beautiful and dramatic captures.
As mentioned in my article How to Shoot Fireworks, a tripod is at the top of the list for equipment, including a remote cable release. Mirror lock-up is good if your camera has it. The reason for all this is that we’re aiming for that silky, surreal effect, which requires the shutter to be open one second or more.
Some important factors are film speed, or ISO setting if you’re shooting digital. Because we want a nice long exposure, ISO 100 or lower is ideal. An overcast sky is best, as it provides diffused light, as opposed to the harsh shadows and highlights of direct sunlight. Filters are important here too: see the list just below.
In the end, all these elements work nicely together to get the ideal shutter speed of two to five seconds, possibly more.
For equipment, you’ll need a…
- good SLR that you can put into either manual or aperture priority mode.
- tripod.
- neutral density filter, and filter holding system such as Lee or Cokin.
- polarizing filter.
- remote cable release for the camera.
So the setup goes as follows: find a nice composition of your water subject, which doesn’t have to be a full-frame of the entire waterfall, as sometimes just a small portion of it is all you need for an effective and beautiful shot. And, it doesn’t have to be an actual full-blown waterfall – any water moving over rocks and such still come out beautiful with this technique. Set your tripod at its lowest possible height for stability, and if it’s windy, hang your camera bag off it to add weight.

Photo by Dennis Burger; ISO 100, f/11.0, 30-second exposure.
The f-stop should be set for maximum depth of field, not only to maintain focus across the entire image, but also to minimize the amount of light entering your camera – remember, we’re looking for a long exposure. A setting of f-22 may cause a slight bit of blurriness due to light fringing. Photons actually bend a slight bit around sharp edges (i.e. your camera’s aperture blades), so you’ll need to experiment. Perhaps f-13 or f-19 will best suit your lens.
Adjust the polarizing filter to eliminate as much reflection as possible, then take a reading of the subject with your camera in aperture priority, noting the shutter speed. If it’s too fast, then you will want to either stop down the aperture, and/or add a neutral density filter or two. I carry a one-stop as well as a two-stop, so not only do I have the choice of a one or two stop reduction in light, but if I stack them, I can get three stops of light reduction which is great for those really long exposures.
So, you’ve composed your image, and found the right combination of f-stop and filters to achieve the ideal shutter speed. There are two techniques for firing the shutter. If you keep the camera in aperture priority, and move your face away from the camera to trip the shutter with your remote cable, your exposure will be incorrect. Light entering the eyepiece affects the in-camera metering, so either keep your eye in the eyepiece, or cover it with your hand when firing the shutter.
The other method it to note the shutter speed when composing, put the camera into manual mode, and set the shutter to that metered value. You can then back off from the camera and trip the shutter with no worries about the camera changing any settings on you. If you happen to have forgotten your remote cable at home (which I’ve done more than once), just use the camera’s timer feature. That way, you’re not jiggling the camera when the shutter fires.
A quick word about image stabilizing technology: whether it’s in the camera or in your lens, turn it off unless the manufacturer says it’s designed to be activated while on a tripod. Some even sense when they’re on a tripod, and dampen mirror slap, such as Canon’s 70-200 f2.8L IS USM lens. Otherwise, leaving it on actually will blur your image.
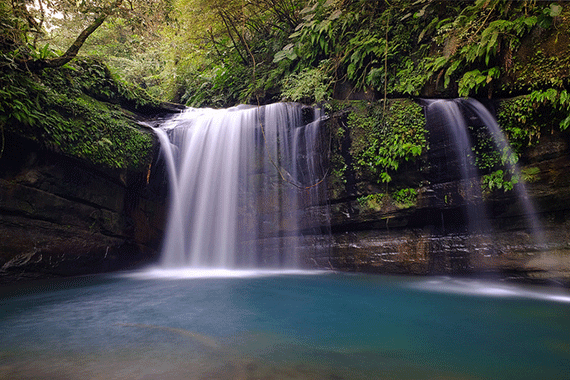
Photo by jack.chih; ISO 200, f/11.0, 20-second exposure.
So, experiment with your settings. Play with longer and shorter shutter speeds, under and over exposing, etc. You will then get a good feel for your camera’s capabilities, which leads to more beautiful pictures to add to your collection. Although this is a technique used to create many images you see in coffee table books, etc, it’s still a satisfying experience creating your very own!
Enjoy!
About the Author:
James Hutchison is a graduate of the New York Institute of Photography, and a member of the National Association of Photoshop Professionals.
Like This Article?
Don't Miss The Next One!
Join over 100,000 photographers of all experience levels who receive our free photography tips and articles to stay current:


I agree with everyone that says that this is overdone and unnatural. The same goes for HDR. Bob Dumon’s 9/19/17 post echoes my sentiments exactly. I prefer a more natural look. Catch the splash of the waterfall or stream or whatever. Show the scene as it is in nature. Yes, this technique shows movement, however in my opinion, it takes away from the beauty of the scene itself. If you are shooting fall scenes and you blur the water, to me it distracts from the fall scene that you are trying to project.
OMG how I hate that fake “cotton candy” look in waterfalls. I know it’s very “trendy” these days to blur water, but I can’t STAND it! Drives me nuts to see. I have no idea why so many photographers think it’s cool to try to make a still image into a video, and even videos don’t look fake like these photos. Will never understand the appeal of this technique and it’s blurry results. But that’s just me. I’m old and a traditionalist….
Sadly, I agree fully with the comments from Greyfox Studios, Bob Dumon, et al. I remembered years ago when the slooow shutter speed was invoked when shooting moving water. Prior to that most people were using the highest speed possible to keep the water sharp read “frozen”. It’s true, that can be very unnatural looking — but no worse than those shown in this article. It’s like the old adage: “If a little is good, then a whole lot must be that much better”! This is taking things to the extreme, so, please, try to encourage newcomers to find the optimum, that of motion in the water AND splashing drops captured in mid-flight.
The water looks more ice, no life, no movement, dead, and unnatural. Really, so this is where this concept of making water look like snot comes from. Where is the splash, the beads of water flying in the air, where are the bubbles, the life that nature gives to water, Every time I see this I think of them as being beginners, someone who hasn’t seen a real waterfall, or just can’t see the beauty that nature has to offer, it really sad that someone could go through life and never know what the real world has to offer. It’s more like the blind teaching those with sight how to become blind.
Or it may be that the teacher sees everything in slow motion?
I also greatly dislike the “silky water” look! IMHO it is a highly overdone gimmick, and does not look natural. For me the blurry water is a distraction from an otherwise beautiful scene. I realize a lot of folks love doing it, but why? Just because it can be done doesn’t mean it should be, in my view. I think it looks goofy, and while I’ve done it just to see what it might look like in one of my own photos I didn’t like it any better when I did it than when I’ve seen it done by others. Give me a nice bubbling brook any day compared to the fuzzy, cotton candy water look…
Why is it that nearly every picture we see of moving water has to be silky and surreal? It doesn’t really look that way. How about sometimes real instead of surreal?
I love this article and have learned about the same as others have mentioned. I have always loved the way my photos usually turned out, and to be honest I think Silky way with the Water is the Only way to get beautiful photos of the waters. But just my opinion. Anyone can check out my photos on facebook at Dave’s Adventures in Photography.
Thanks for sharing all this wisdom with us.
Dave
Nice tips for smooth water, but not to my taste. I like to see what the water is doing, feel the noise, capture the sparkle. Nice photos and technique though.
I fully agree with Troy. Creamy, smooth waterfalls are a distortion of what we actually see when looking at a waterfall, and have become an overused cliche.
Oops! I didn’t realize this was a recycled article. I now see I had already made my opinion known when it first ran and I’m happy to see I wasn’t the only one who feels similarly about creamy water.
My sentiments as well.
Some solid tips on what the best aperture setting is for getting the ethereal water flow looks. Fantastic photos too.
very informative indeed… now i’ve learned that “A setting of f-22 may cause a slight bit of blurriness due to light fringing”… thanks!
nice