Strobes are often the tool of choice for photographers when it comes to freezing action. In this video, photographer Jay P. Morgan from The Slanted Lens demonstrates his technique:
To demonstrate this technique, Morgan uses a set of Baja B4 monolites. He also uses a model to photograph and a trampoline to employ step 3, explained below. The idea is to photograph a model dressed as a warrior princess while she jumps.
Now, before we move on to the interesting stuff we need to understand the technical stuff.
How Do Strobes Work?
Strobes are basically flashlights. Because they fire so rapidly, most photographers think flashes or strobes are instantaneous. This is not correct. Strobes have what is known as flash duration. Flash duration is the time frame over which a flash is triggered, comes to peak power, and then tails off.
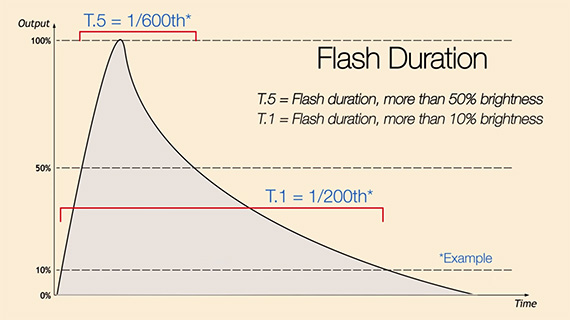
Flash Duration
If you look at the chart above, T.5 measures the time frame during which the flash is at over 50 percent power. T.1 measures the time frame when the flash is between 10 and 50 percent power. T.1 is a more accurate measurement of the flash duration because that is when more than 50 percent of the power is produced.
Insulated-Gate Bipolar Transistor (IGBT)
IGBT is a spiking technology that cuts out the flash when it’s at its peak; the resulting graph appears like a sharp drop.

A graphical representation of IGBT
Modern strobes like the ones Morgan is using have this technology. It allows you to freeze action much more effortlessly.
The Process of Freezing Action
The actual process of freezing motion requires Morgan to use three important steps.
Step 1: Dial Down the Flash Power
Morgan dialed down the power on the Baja B4 by 50 percent. That actually results in a reduced flash duration. In other words, it is a step toward freezing movement. Now here’s the catch. Not all strobes allow you to do that. On some strobes, reducing the power actually extends the flash duration. That, needless to say, is counter-productive.
Step 2: Determine Shutter Speed
To determine the right shutter speed, Morgan quickened the shutter speed on his camera significantly until he clipped the image. That’s the cue. He slowed down the shutter speed by one stop. If you’re wondering what the settings were for the images, they are ISO 640, shutter speed 1/60 of a second, and aperture f/13.
Step 3: Shoot at the Right Moment
The final step is shooting at peak action. The simple theory behind this is that everything that goes up must come down. But before it comes down, there’s a small fraction of a moment when the object pauses. That’s the window of opportunity to shoot something moving—or in this case jumping in the air.
Here are some final images from the shoot before they were retouched:


Check out the rest of the video for more tips on lighting, special effects, and posing.
Like This Article?
Don't Miss The Next One!
Join over 100,000 photographers of all experience levels who receive our free photography tips and articles to stay current:


Leave a Reply