The zoom hyperlapse is like a timelapse on steroids. It’s a visually engaging stop-motion timelapse technique that gives us an accelerated view of real time, with an added 3D movement effect. It differs from timelapse in that the photographs are taken of a single vantage point over a long distance, rather than a short dolly movement. The technical jargon may sound confusing, but creating a hyperlapse is not all that complicated. In this tutorial, Eric Stemen shows you how easy it is to capture your very own zoom hyperlapse with a simple DLSR:
How To Create a Zoom Hyperlapse
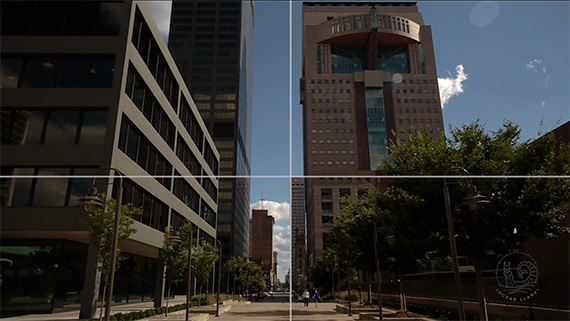
A crosshairs overlay will help with aligning your shots.
- Place your camera on a tripod at eye level. You will be picking it up and moving it forward about 100 times, you don’t want to have to bend down to check out the screen before each shot.
- Pick an object you will be able to see during the entire move. The more it pops the better. Make sure to place your subject in the middle of the frame.
- Turn on your camera’s guide frames. They are a set of crosshair screen guides that can be positioned wherever you want them. Set the crosshairs over your subject. If you’re using a building, align the crosshairs with the corner.
- Take a few sample photos. Take one photo from set up point. Walk forward a step, make sure the crosshairs are aligned with your subject, zoom out, and take a second shot. Walk forward again, zoom out, and take a third shot. Scroll back and forth through the photos to see if the effect works for you. Make sure your location choice makes good use of the effect.
- Level your tripod. Use the half ball head level to make sure the horizon is always as level as possible.
- After lining up the crosshairs, take your first shot. Use auto focus between each shot for best results. This is because a lot of camera lenses are parafocal meaning each time you change the zoom it loses focus slightly.
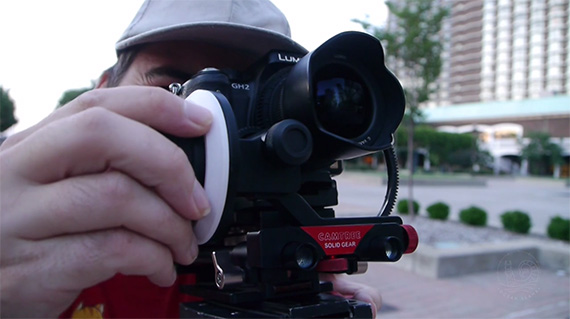
- Take a step forward (move about a foot), level your tripod, set the crosshairs and zoom out ever so slightly. A follow-focus mechanism makes it easier to zoom out in extremely small increments, which is really important to creating a good looking zoom hyperlapse.
- Take about 100 steps while repeating the process.
- Take your collection of images into Photoshop, or your editor of choice for color correction.
- Pull the images into After Effects and use Warp Stabilization.
- Revel in the awesomeness you have just created.
Zoom Hyperlapse Equipment
Here’s a list of the gear Stemen used to make the video:
- Panasoinc GH2
- Panasonic 7-14mm lens
- Genustech Universal Adapter Bar System – to hold the rails for the follow focus
- CAMTREE Solid Gear Follow Focus – to zoom the lens out between each shot
- Manfrotto 535 Tripod legs
- Sachtler FSB-8 Tripod head
The technique can be used for just about anything, but it works particularly well with architecture.
“It’s a really unique effect that you can’t see normally with your own eyes.”
Like This Article?
Don't Miss The Next One!
Join over 100,000 photographers of all experience levels who receive our free photography tips and articles to stay current:


I have a question about this workflow.
At point 7) you say that you have to move one step forward, align the building with crosshairs and then zoom out slightly. What if I zoom out and the realign?
Thanks a lot