HDR, as the name suggests, attempts to extend the light and tonal range of images taken under normal conditions. And once a balanced HDR image is compared with the original shot the results are often outstanding.
Ever hear the expression, “You just had to be there,” when someone is showing off photographs? What they are really saying is that their camera just cannot compete with the human eye when capturing the total range of light and dark areas in an image.
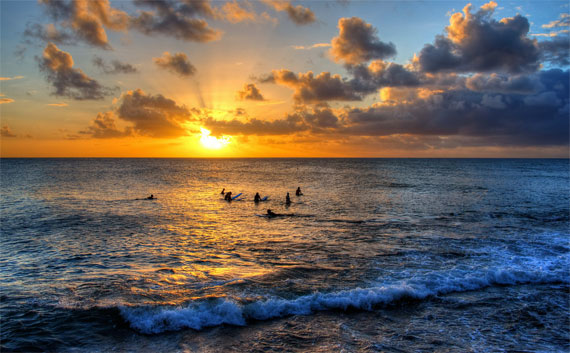
Photo captured by tdlucas5000; ISO 100, f/10.0, 35mm
OK. So it’s about light, right? So why don’t we take more than one shot of the same scene at different shutter speeds and then combine them in a way to get the best of all of them? That is exactly what we do to prepare for HDR processing. Here are the requirements and steps to generate an HDR image.
You will need the following:
- A camera with the capability to adjust exposure settings (bracketing preferred). If you have a camera with a bracketed function and multiple shot capability, with a quick scan through the manual you will find out how to take say three shots of the same scene: one at normal exposure, one say two stops below normal and another two stops above.
- A sturdy tripod. If you’re going to be taking multiple shots it will help if there is as little camera movement as possible between shots.
- A high contrast scene. HDR works best here. An HDR photograph of a grey card will always be just a grey card, but one of a threatening thundercloud formation over a sunlit landscape can make one drool!
- HDR processing software
- Time to learn and experiment. It doesn’t all happen by magic; you do actually have to work at it.
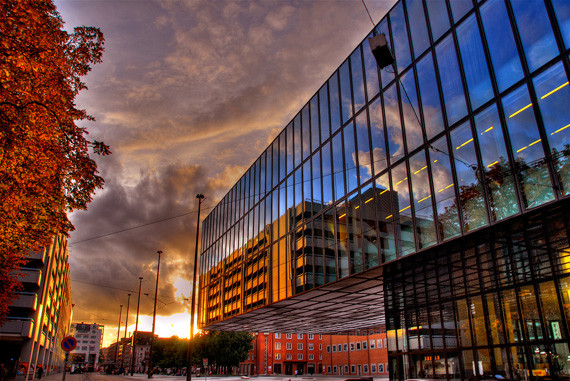
Photo by Flickr user slack12.
How to Produce an HDR Image
- Find your high contrast scene.
- Place your camera on a tripod and, if possible, use a remote control to operate the shutter. Also, if you are shooting with a remote, cover the eyepiece.
- Set your camera to shoot RAW images. These images contain so much more exposure detail than JPEGs.
- Set the camera to aperture priority. This will maintain the aperture setting to your chosen value and vary the shutter speed to obtain different exposures without upsetting depth of field.
- Set the camera to manual focus and focus on your scene.
- If possible, select Auto Exposure Bracketing from your camera menu options, and select multiple shot mode.
- Take your three shots.
- Back at home, import your photos into an HDR processing application.
- Generate the HDR (which will look awful on the limited capabilities of your monitor), and then tone map the HDR to your liking. There it is!
Note: If you don’t have bracketing or multiple shots then you will have to manually change the shutter speed between shots–but don’t move the camera!
The good and bad about HDR:
- Good: Spectacular images can be produced with the right scene and the right tone mapping.
- Good: The process is simple and flexible–you are the maestro!
- Good: It lends a ‘fresh string to your bow’.

Photo by Flickr user highlights6.
- Bad: It takes time to get it right. It’s a bit like riding a bike. You get the basics weighed off and then you start on the tricks.
- Bad: Well, a consideration. Not all images lend themselves to HDR imaging. High contrast images work best.
- Bad: HDR will always introduce a degree of noise into your images. This looks like grainy film.
- Good: This has been recognized. Some noise can add a special effect, but, there are now software applications to remove or limit the noise. Noiseware is one of them.
- Bad: You can go completely overboard with HDR and produce some of the most hideous images imaginable. Take it easy and focus on creating an image that you feel truly represents what you – or your eye, was seeing.
As stated previously, not everyone will turn out a success, so be patient and learn.
About the Author:
Article written by Terence Starkey from CampersCircle. A long-time camper and a keen photographer especially when out camping.
Like This Article?
Don't Miss The Next One!
Join over 100,000 photographers of all experience levels who receive our free photography tips and articles to stay current:


I have seen so few HDR shots that have impressed me to any real degree. I like tone mapping a lot better, and I think looks even better. I fail to see all the hub-bub about it. I don’t know how much it is even increasing, as the groups I deal with, often refer to HDR as boring, and have reduced or even quit using it. I am seeing a major reduction in the form, which is actually not surprising, and relieving. It seemed to be a fad for a while, but looks to be dying out, as most fads are, they will have a few still loving them.
But I do not really expect to see this lasting in any amount for much longer.
The nice thing about a decent camera is that if you are new and didn’t know about HDR, you can use single shots as HDR, just make your copies of the photo, adjust the exposure on the different photos and HDR away. Plus when you have moving objects (wind / grass / etc) a single shot helps with ghosting as well. Though Sometimes that movement is nice in a photo, but if you have a long enough exposure off of your main photo, it still works well.
Quote: “A good quality SLR camera”. Unquote. Not true at all. Many professional photographers also use ‘prosumer’ cameras like the Canon PowerShot G, 9, 10 or 11. They take excellent images and are better than a lot of DSLR cameras. The image taken ability relies on the lens quality and not the camera type. I have known people that have bought excellent DSLR cameras, but obtain inferior results because they never changed the cheap lens that the camera was sold with to keep the price down. Many of the compact cameras brought out over the last two years have all of the requirements needed to take excellent HDR images. This includes the abilty for AEB (auto exposure bracketing). Compact cameras like Canon, Nikon etc. have excellent lenses.
Nice tutorial. Keep in mind that CS5 can now do HDR :D
You can also mask out certain areas of your image with hdr in some spots, and with other spots with it left out to different degrees etc
Good information about HDR for newbie like me….still learning HDR with my Canon 400D..