High dynamic range photography is still in its infancy as an art form, but it’s becoming more and more popular every day.
Never before has an image on your computer been able to compete with the imagery in the human brain. Now, of course, I’m not saying that this high dynamic range photography is better than being on the scene with your own eyes and the emotions, but it’s a step in the right direction. As we explore this high dynamic range process, these images will start to arouse those deep memories and emotions, deceiving the mind into much more than just a normal photograph.
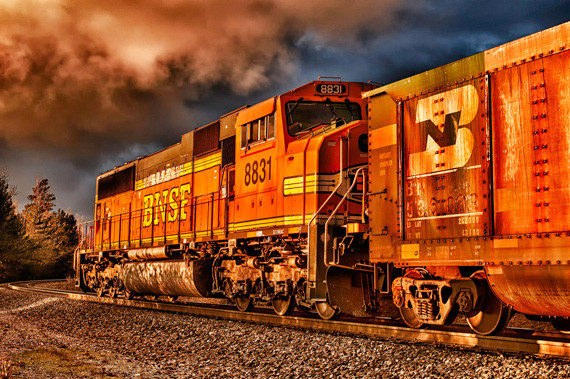
Photo by Jonathan Sureau.
What is high dynamic range photography (HDR)?
Basically, it’s taking multiple photos of the same image with many different exposures. The next step is to take those different components and run them through the high dynamic range or HDR algorithm software. Here’s a good example of how this is comparable to what we do as humans, only it’s done in a nanosecond.
Your eye really isn’t very smart; it just captures data. It’s the brain that helps you understand this data. Well, when post-processing high dynamic range photography, the camera is your eye and the software or computer is the brain. The final step is to bring that human element back in. If something is too computerized, you lose a lot of that emotion. During the final cleanup of the image, you make the shot expressive in the human sense.
High dynamic range photography is not old school compositing where you take a big chunk of one exposure and combine it with another big chunk of exposure. This is happening at a pixel by pixel level. The algorithm runs through and chooses which pixel to show based on the tonal ranges of its nearest neighbors. This is similar to what your eye does. It builds this image and patches it all together in your mind. High dynamic range is really about the light. It’s not necessarily about the color.

Photo by Humberto Santos.
What do you going to need for high dynamic range photography?
First, you’ll need a camera that is capable of taking the same image at three different exposures, You’ll also need a tripod because these images need to line up exactly.
Now let’s get down to the task at hand. What you want to do before you start taking any images is to turn off any image stabilization. And you also want to be in manual focus. Keep the ISO as low as possible, maybe at 100 or 200, and shoot in RAW. Next, you want to turn on bracketing. Put the camera on a two-second timer; that way when you hit the button, the camera will beep and then you can take the three exposures. This gives you time to take your hand away without shaking the camera. Double check that you have three different images in light, middle, and dark exposures. Then it’s time to get these photos over to Photomatix to start processing them.
Before going into Photomatix, process the images in Photoshop from the RAW files. I highly recommend you get the pro version rather than the essentials version because you will eventually upgrade when you see how amazing the software is. Now let’s load the three images up into Photomatix. You need to confirm that your source images are aligned, you don’t have any ghosting, and you have done all your noise reduction in Photoshop. If you don’t have Photoshop, this program does an excellent job aofdoing all three things just mentioned. We all know there are other software programs out there, I’m just going by what I use; you can use whatever you feel comfortable using. When you hit OK, the next screen will be tone mapping. To me, tone mapping is a more dramatic look than exposure fusion, but again, it’s your preference. At the bottom of the screen, you will see several presets. I tend to start with enhancer-painterly, but click on the one you like.
Let’s get to the settings. Strength is how fake or realistic the image will look and tends to give a little halo around trees and buildings. Color saturation is pretty much self-explanatory: black and white or a color explosion. The luminosity setting is darker or brighter. Detail contrast is basically more or less contrast. Scroll down a little and you’ll come to lighting adjustments. Now these settings will vary, and there is no one correct setting. It’s all about what you think is pleasing. Smoothing highlights is another self-explanatory setting.
There are many more settings but the main thing to understand is that there is no right or wrong when it comes to this. When you’re finally done playing around with the settings and want to share the picture, all you have to do is hit process and remember to save before exiting.

Photo by Thomas Smart.
High dynamic range photography can take an amateur photographer’s pictures and turn them into amazing images. Once you start playing around with this software and your camera’s capabilities, you’ll be inspired to start taking action with your newfound knowledge in the HDR realm. The dramatic black and white photos that you will be able to capture are well worth learning more about this subject and perfecting the steps. Don’t forget about the color explosion in the photos–something you would never be able to achieve with regular photography and post processing.
To me, high dynamic range photography is one of the most enjoyable types of photography, and I think you will agree. So get out there and give it go.
About the Author
Ray Pepito writes for PicturePerfectHQ.com.
Like This Article?
Don't Miss The Next One!
Join over 100,000 photographers of all experience levels who receive our free photography tips and articles to stay current:


awesome .. . . . .
but, i cant do it this effect manually ^^
These pictures you are showing as “HDR photography” are interesting and nice looking. The only problem I have with it is that the techniques being used don’t really have much at all to do with HDR photography per se. All you are doing is using the label HDR for a collection of techniques that obviously involves oversaturation of color and even exaggeration of contrast. Oversaturation of color has nothing at all to do with HDR, and exaggeration of contrast is an effect that is fundamentally inconsistent with HDR photography, which could as easily be referred to as “reduced contrast photography”. If it is not obvious to you why I would say that, then you don’t understand anything at all about what high dynamic range photography is really about. The pictures you are showing have virtually nothing to do with high dynamic range photography. All you are doing is causing confusion.