To succeed at flower photography, you won’t need any fancy equipment, but you will need to pay attention to detail. If you want to take beautiful flower pictures, like the ones in magazines, this article will help show you how it can be done.
The first thing to do is plan to take your flower pictures when the lighting is good and the wind is still. Even the most gentle breeze can cause enough of a quiver in the stem to create blur in a close up. Usually the calmest time of day is around dawn. Dawn is also the time when you can usually find the best lighting.
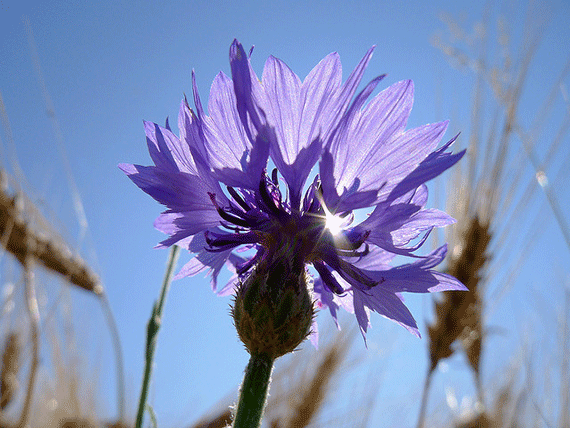
Photo by 夏爱克; ISO 80, f/5.0, 1/1000-second exposure.
But if you don’t want to get up early, you can still get great flower pictures. Other good times for lighting are the hour before sunset and anytime there is high overcast (bright overcast). These times offer soft light without the dark, harsh shadows. The times just after dawn and before sunset add a warm glow. And if it’s a little windy, you’ll need to set up a blind or a temporary windbreak.
Many of us have taken a picture of a flower and thought it was perfect – that is until we saw it enlarged or on a computer screen. Another problem many new flower photographer enthusiasts find is that their pictures come out blurry and out of focus. Blurry or poorly composed pictures are all things that are easy to avoid if you know what to do.
The other main cause of blurry or out of focus flower pictures is the camera, more specifically taking a close up without the proper setting. Depending on how close of a shot you want, set your camera to Portrait or Macro. The macro setting lets you shoot from within an inch up to a foot depending upon your camera (check your camera’s manual). If using manual settings, choose a wide aperture (small F-stop number). All of the above settings sharpen the subject and put the background out of focus, even blur it.

Photo by Istvan; ISO 64, f/5.6, 1/250-second exposure.
Let’s look now at turning that pretty flower into the perfect subject for your photo.
- Look for a flower with pristine undamaged petals. Or if you find a flower that’s almost perfect, except for a ragged petal or two, simply remove them. If removing the petals will leave a gap then leave it alone and move on to another flower.
- Look for tiny bugs and loose particles like dust, and then remove with them with a soft, makeup or artist’s brush.
- For a dewy look, gently sprinkle or spay the petals with a few drops of water.
Next it’s time to compose your picture.
- Look at the flower from different positions to see what angle looks best in your viewfinder or preview LCD. Make sure to look for shadows and other things in the background that may not look good in your picture. Notice how the light plays from different angles. You should also look at taking your picture from different angles or vantage points. Try standing directly above the flower and then try lying on the ground to see which angle looks best.
- Make sure that if you’re leaning over the flower you don’t cast a shadow on it. And if the flower is backlit (which can create a nice, iridescent effect), avoid lens flare by using a lens shade or wearing a broad brim hat to prevent light from entering the lens.
- Also look at the tones in the background. Contrasting tones will make your image pop.

Photo by Paul Hudson; ISO 200, f/4.0, 1/2500-second exposure.
Once you find the best angle to take the flower, fill the viewfinder with the flower and use classic composition methods like the “rule of thirds” to position the flower in the best position in the camera frame.
Then focus on the part of the image you want to be the sharpest – this could be the stamen, a ladybug, etc. Then keeping super steady, press the shutter down.
As you can see, flower photography is all about detail. And how you display your flower photo also makes a difference so make sure to display it in a picture frame that compliments it.
About the Author:
Autumn Lockwood is a writer for Your Picture Frames (www.yourpictureframes.com) and loves taking pictures. Your Picture Frames makes it easy for you to find just the perfect frame for your photo or artwork.
Like This Article?
Don't Miss The Next One!
Join over 100,000 photographers of all experience levels who receive our free photography tips and articles to stay current:


Hi Deepak,
Shallow depth of field can be one of the more difficult aspects of macro and closeup photography. Shooting at such close distances will naturally produce a very short depth of field.
One way to remedy this is to use a method known as focus stacking. In focus stacking, multiple images are taken at various focusing distances and these images are then merged in post processing. The result is a photo with a greater depth of field than any of the individual images.
There are lots of articles about this technique. Google ‘focus stacking’ for more specifics.
As far as an optimal aperture size for depth of field, there’s no way to really say. Aperture size isn’t the only factor that determines DOF. Focal length and camera-to-subject distance also affect it. So if your camera features live view and/or a depth of field preview button, use those to get an idea of what your current aperture setting is doing to your image.
I’m ordering a bunch of flowers for my sister’s wedding. I loved these tips, and I’m hoping to get some cool pictures of the flowers for her. I liked your tip to look at the flower from different positions to see what angle looks best in your viewfinder or preview LCD. Thanks for sharing this article!
These flower photography tips are simply amazing! Photography is one of my main passions and flowers are one of my favorite objects to take pictures of! Thank you so much for all your help!
I have used split-lens filters to get some very nice shots. Deepak, you might try that as well. They bring in a macro fine detail, and blur the background out easily.
What is the best filters to use for my NIKON and CANON cameras. Need some help. Some filters can mess things up.
Hi,
I like the tips!
Here are a couple of things that I find useful.
First, I try to head out to shoot flowers early in the day because there’s less of a breeze in the morning. Air movement can cause problems when you’re trying to capture a delicate subject like a flower.
And, I like to get down on my knees when I’m shooting flowers because I think that’s gives a perspective that works with flowers and also open up the horizon as a background.
I USUALLY try to use a larger aperture to reduce the depth of field and isolate my subject. But there are times when I want to include some details of the background, so a larger depth of field may be appropriate. So I often shoot it both ways.
Exposure can be tricky, so I’m all for bracketing!
Mary
Better-Photography.com
Conveys nothing. I was looking for how to keep the entire depth of flower in focus and rest all blurred in the background. How to know what should be the most optimum aperture size to have just enough depth of field to keep the entire flower (x, y and also z dimension) just in focus, and at the same time it should look soft as well as luminant.
I wish you could also explain how you took the top most photograph of the flower against the direct Sun.