One of photography’s most alluring qualities is its ability to transform our ordinary world into something extraordinary. With a camera in hand, bringing to life one’s imagination becomes a real possibility. This short yet in-depth tutorial featuring Gavin Hoey proves just how far some attention to detail and a bit of ingenuity can take an image:
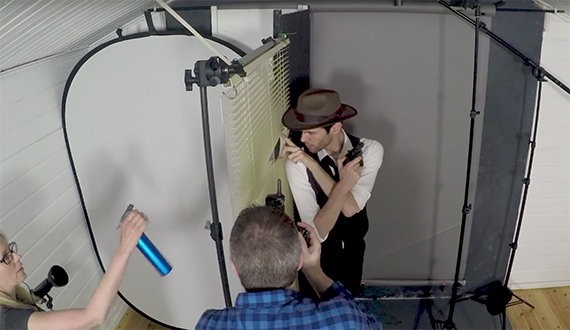
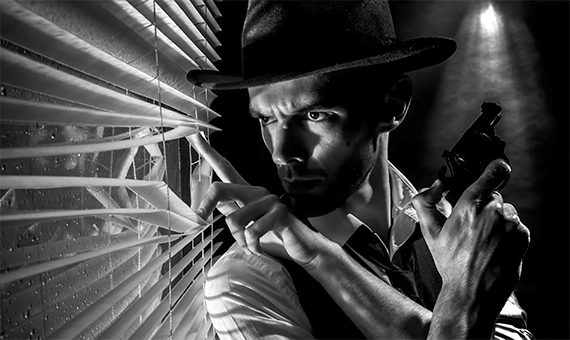
Though he’s confined to a small home studio, Hoey manages to imply a more spacious and complex environment through the use of props and creative lighting. With nothing more than a free-hanging set of venetian blinds acting as a divider and a convincing model, he’s able to fabricate a still of a P.I. examining the outside world from the inside of a dark, moody office.
The trick to making it all seem so convincing lies in the light. Rather than using an encompassing softbox that would expose every inch of the scene, he carefully controls the power and angle of each light, illuminating portions of the composition separately. He points an eVOLV 200 equipped with a honeycomb grid directly through the blinds at a specific angle to create moody shadows across the model’s face while dispersing the light just enough to remain convincing. Additional speed lights are placed high above the model, pointed downward, to create the illusion of an overhead lightbulb and prevent the back of the model from being lost in the shadows.
Only after the lighting is set in place do props and world-building details really come into play. Most notably, Hoey brings in a piece of plexiglass to create a faux-window. Though it may not seem like much, the reflections, dirt, and scratches that it adds make it all the more easy to step right inside of the photograph. He even brings in an assistant with a spray bottle to create raindrops and cultivate an even stronger mood.
Of course, half the magic to perfecting an image happens in post-processing through Photoshop. Naturally, this sort of shoot demands a conversion to black and white. But equally important to creating the feeling of a film noir is a strong contrast adjustment. Play around with your adjustments and keep an open mind as to what could improve your shot. For instance, a slight boost in clarity could provide an unexpected boost in flat midtone contrast. If local adjustments are necessary, don’t fret. The adjustment brush can quickly bring back small patches lost to strong highlights or shadows.
Finally, it’s important to adjust the hue, saturation, and lightness of colors for any black and white image. This may seem counter intuitive, but a few slider adjustments set to impact a particular color space can completely alter the look, feel, and overall quality of a photograph. Try focusing on skin tones like orange and yellow; you’ll find that working with HSL is one of the quickest and cleanest ways to recover or mask fine details.
With that being said, don’t be afraid to deviate should you decide to take on this challenge. Rearrange your lights. Bring in different models. Generate a different mood. Because this tutorial isn’t meant to be followed step by step and replicated. It’s meant to spark imagination and provide inspiration for new, equally exciting ideas.
Like This Article?
Don't Miss The Next One!
Join over 100,000 photographers of all experience levels who receive our free photography tips and articles to stay current:


Very Nice ! I’m an experienced portrait photographer. But I want to start doing Film Noire, and apply it not only to adults, but teens as well.