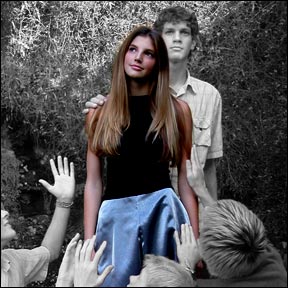
This tutorial is to help you learn how to make certain spots color after you have converted a color photo to black and white. Ok after you have the picture that you want to work on open in photoshop:
1. Convert the photo to black and white using a Channel Mixer Adjustment Layer, If you need help with this step please refer to our “Conversion to Black and White Tutorial.”
2. Make sure you have Channel Mixer Adjustment Layer selected in the Layers menu.
3. Click on the Brush Tool,
4. (make sure the colors you are working with are black and white).
5. Using the color black, carefully brush over the parts of the picture that you want to be in color, (you made need to adjust brush sizes for the small details). When you do this the parts that you brush should turn back to color.
For Further Training on Photo Effects:
There is a best-selling eBook on how to do amazing photography tricks and photoshop effects. It can be found here: Trick Photography and Special Effects
Like This Article?
Don't Miss The Next One!
Join over 100,000 photographers of all experience levels who receive our free photography tips and articles to stay current:


Sorry, I forgot that is good idea to check the mask independently – click on mask with Alt key pressed. You will see the unerased (or unfilled) areas immediately.
Much easier is to make it on inverse mask (filed with black) and make the area you want to be color as grey. At the end you need to invert mask again only ;)
Superb guide line for areas of colour in B/W photos
I found it very easy. Convert to color using the gradient map – use the third one in the pop up box – then I did use a BASIC brush to bring out the color where I wanted it. It was truly easier than I expected.
I tried to use the brush as well and I did not get any results. The Conversion to Black and White Tutorial was simple and easy and I ended up using the eraser tool on the channel mixer layer and that worked great.
I really like your articles! I was able to convert the photo to black and white but when I use the brush to bring the colors back to different areas it makes them all a transparent pink color instead of the original colors. Is there something I have set wrong? I tried it numerous times.
It is the Pencil tool (B) which needs to be used and not the Brush tool (Y). It would work fine then :)
What is this style called? “Colored Monochrome?
Thank you for these tutorials on B & W, I will definitely be around and learning from this site.
Absolutely, fantastic!
Than you very much. Explain quiet easy and it works.
This is the reason I wanted to learn to use this wonderful tool
From Guatemala
One day a time
Rodolfo
Thank you this was truly helpful and something I had previously thought way beyond the scope of my abilities.
Great resource.