Long exposures give images a dreamy and dramatic effect. They capture the world in a way human eyes cannot. And clouds, with their subtle movements, are perfect candidates for long exposures. Photographer Mike Perea shares his tips to help you take amazing long exposure cloud photos:
Perea demonstrates two ways to take long exposure photos of clouds. The first method is by simply using filters, and the second is by taking multiple short exposures and merging them in post.
Filters for Cloud Photography
Composition
To take long exposures of clouds, start by setting up your composition. While composing for long exposures of clouds, it is always a good idea to set something interesting as your foreground element. See if you can include some great landscape or a landmark in your foreground. Also, by composing in a way such that the cloud trails seem to be moving away or towards you will make the image further interesting.
Calculating Exposure
When adjusting your exposure, start without the filter. Make use of the histogram and also take a test shot to ensure that the image is well exposed. Next, using an app like Photopills, determine what your exposure should be depending on the strength of your ND filter.
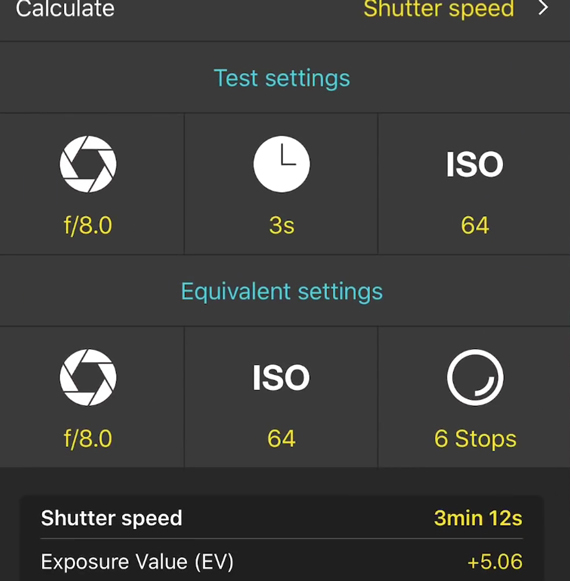
Using Photopills app to calculate exposure while using an ND filter
For instance, Perea got a good exposure at f/8, 3 seconds, and ISO 64 without using a filter. Using the Photopills app, he determined that his shutter speed should be 3 minutes and 12 seconds using a 6-stop ND filter.
Since most cameras only support up to 30 second shutter speeds, you will need either a wireless trigger or an intervalometer for very long exposures.
Multiple Shots for Cloud Photography
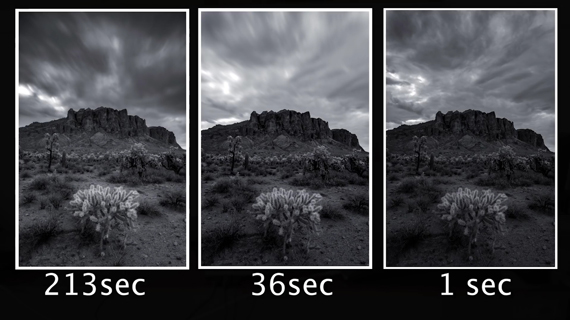
This method of taking long exposure photos using multiple shots comes in handy if you do not have an ND filter with you. Consider this situation: the lighting permits that the slowest you can go is 0.5 seconds; anything slower and everything will be overexposed. What you can do is take multiple consecutive shots at 0.5 seconds and later combine them in post to get a long exposure effect. For instance, if you take 20 shots, each at a shutter speed of 0.5 seconds, you can get an equivalent of 0.5 * 20 = 10 seconds.
Combining Multiple Photos to Make One Long Exposure
In his demonstration, Mike uses 36 images, each taken at 1 second to get an equivalent of a 36 second exposure. Here’s how you can do it:
- Load all the images into Lightroom and go to the Develop module. Make basic adjustments in one of the images, select all of the images in the sequence, and click Sync… This will apply the changes to all of the images. While they are all selected, right-click and click Edit in > Open as Layers in Photoshop…
- In Photoshop, do a quick check to make sure the images are in proper order. With all of the layers selected, click on Edit > Auto Align Layers… Make sure that the Projection is set to Auto and click OK. This will make sure that all the photos are aligned.
- With all the layers still selected, go to Layer > Smart Objects > Convert to Smart Objects. This step will merge all the layers and convert into a single layer called smart object.
- Go to Layer > Smart Objects > Stack Mode > Mean. This step will finally give the image a long exposure look by introducing the motion blur of the clouds.
Merging multiple photos takes a lot of effort. And that is why it’s convenient to have an ND filter handy. But, if you find yourself without an ND filter, this is how you can do it. Remember, what matters is how the final image turns out—not how you make it!
Like This Article?
Don't Miss The Next One!
Join over 100,000 photographers of all experience levels who receive our free photography tips and articles to stay current:


Leave a Reply