As I excitedly sat down to process hundreds of images taken during an extended landscape photo shoot I was shocked to find spots and specks on almost all of my images! And the later the shot was taken the more there were. It soon became apparent it was caused by the camera’s dirty sensor. Fortunately, after many hours spent cleaning the images up in post-processing, while beating myself up mentally for letting this happen, I was able to salvage most of the images to a degree that I was satisfied. A hard lesson learned.
How did I allow this to happen? Well, due to my inexperience and laziness I was changing lenses on my DSLR in the field without taking a few basic precautions, which allowed all kinds of dust, dirt, pollen, moisture, etc. into the body of the camera. All this was building up on the camera’s sensor.
This is commonly referred to as “sensor dust.” It can cause spots, specks, smudges, color distortion, reduced clarity, etc. on an image. And by the time you realize it has happened, it’s too late as it has already affected the quality of the image.
Every time a lens is removed from the camera body it becomes an open window for all manner of particles to get in. Also, as the mirror and shutter are mechanisms with moving parts they can throw off oil and other debris. When the shutter is activated all this is stirred up and redistributed inside the camera. When the camera is on, the sensor becomes statically charged so it attracts all these unwanted particles like a magnet.
The term “sensor dust” is a bit of a misnomer as there is at least one filter that sits in front of the actual sensor. Dust accumulates on the filter, not on the sensor. And “dust” refers to any type of unwanted foreign matter such as dirt, lint, dust, pollen, oil, grease, etc. Whatever it is called, “dust” can build up to a degree where it can degrade the quality of an image.
Checking for Sensor Dust
Sensor dust is almost impossible to see with the naked eye. Even with a loupe, you may only see the large pieces of dust. The best way to see if and how much sensor dust is present is to view an image that would clearly show any dust on the sensor.
There are a few methods to utilize from simple (will do in a pinch) to a bit more extensive (recommended).
The technique is pretty basic and it only takes a few minutes. To start you will need to take a shot of a brightly lit, clean, solid-white piece of paper taped to the wall. (You can also take a shot of a cloudless sky but I prefer the paper-on-wall method.)
Set the aperture at f/11. This setting is a good place to start. Smaller and larger aperture settings show different results. The smaller aperture will provide a better view of the dust that is on the sensor while a larger aperture will show fewer dust spots. You may wish to take three images: smallest, mid-range and largest aperture to see the difference. I usually take the image at f/11 as that is right around the “sweet spot” of my lenses. This provides a good view of how any sensor dust will affect my final images.
Next, adjust the manual focus to infinity, and position the camera a few feet away from the paper. You want the image to be out of focus so only the details of the dust on the sensor will show up on the image, not any spots that may be on the paper. Shoot an image making sure that only the paper is in view, not past the edges of the paper.
From this point, there are two different paths to take to review the image for sensor dust. The first is to look at the image on the monitor on the camera. Zoom in a few clicks to enlarge the image and then scroll back and forth and up and down and look for specks throughout the image. This will provide a quick check (though not thorough) to detect sensor dust as only large pieces sensor dust will be able to be seen.
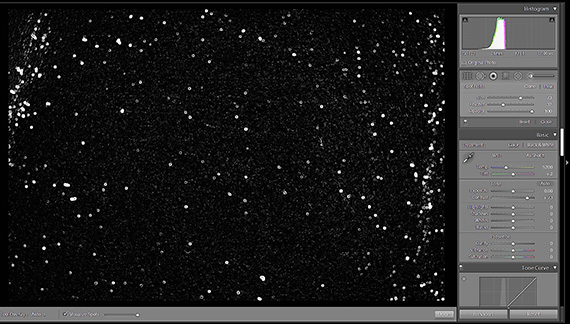
Another technique, which I believe is the far better way to check for sensor dust, is the “visual spots” method. To use this method, you will need to import the test image to Lightroom. This method can also be utilized in Photoshop and Camera Raw, but I prefer using Lightroom as it’s a quicker and simpler method.
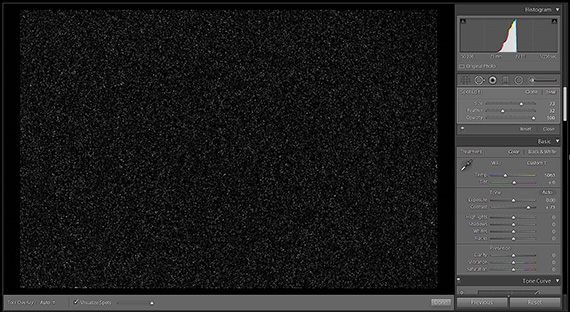
Open the image in the Develop mode, set the size of the image to Fit or Fill, and activate the Spot Removal tool. Check the Visualize Spots box. Then move the slider located to the right of the Visualize Spots box back and forth to adjust the amount of background noise. You can also fine tune the image by adjusting the Contrast and Dehaze sliders. You may also want to zoom in on areas for a closer look. This will provide a detailed view of any debris on the sensor.
Here is an example of what a dirty sensor looks like in Lightroom with the above viewing adjustments applied:

A clean sensor should look something like this using the Visualize Spots tool:

Another way to detect sensor dust is by simply viewing the image in any photo viewing application. Open the image, zoom in, and scroll around checking for spots:

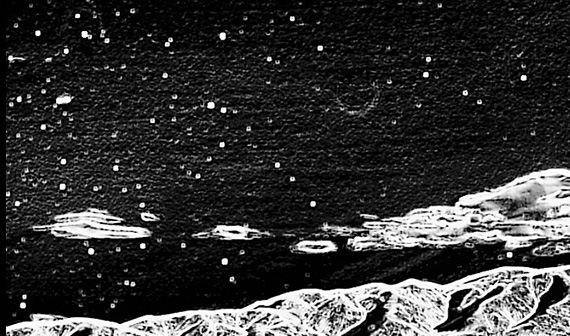
The same view utilizing the Visualize Spots tool in Lightroom:

You can plainly see the true degree of sensor dust using the Visual Spots tool in Lightroom.
Cleaning a Camera Sensor
If you do find that sensor dust is affecting the quality of your images, it’s decision time. Can you get by with a few specks on the sensor and just clean them up in post-processing using the Spot Removal tool? Or does the sensor need to be cleaned?
If you believe the sensor is in need of cleaning you can either do it yourself or take it to a camera repair source. I recommend spending a short amount of time learning how to clean your camera sensor. It’s a quick process. If you have a steady hand and are able to follow a few simple instructions and precautions you should do fine. Cleaning your sensor only takes a few minutes. You not only can do it anytime and anywhere but it also keeps the cost of camera maintenance down. Also, it will cut down the time spent removing spots in post-processing and provide an overall better image.
If you’re not comfortable with working on the inside of your camera then, by all means, take it to a camera repair source for cleaning. Sensor cleaning runs from about $35 to $75.
Sensor dust is inevitable so even if you feel more comfortable taking it to someone for cleaning there are still some things you can do to help to keep your sensor clean. These are discussed in the Prevention section toward the end of this article.
Keeping the sensor clean is an ongoing consideration and if you can learn the basics of how to help keep sensor dust to a minimum and learn how to clean the sensor when needed you will be a much happier photographer.
Sensor Cleaning Tools and Products
Here is a list of the basic tools and products you will need in order to maintain a clean sensor. Some kits include the main items and you can supplement them with other items as needed.
- Hand blower. Purchase a high-quality hand blower. Cheap blowers can release chunks of rubber onto the sensor. Consider the ones with filters.
- Photo lens brush. Used to dust off the sensor. Again, purchase a high-quality brush made specifically for lens cleaning that can be kept covered or sealed when not in use.
- Sensor cleaning swabs. Used in the most common method of sensor cleaning. These come in different sizes. It’s important to use the correct size for the dimension of the sensor in the camera you will be cleaning. Here is a link to find the correct size swab by camera brand and model: https://photosol.com/swab-sizes.
- Sensor cleaning fluid. For wet-cleaning the sensor. You want a product that is specifically made for cleaning camera sensors, dries quickly, and will not leave streaks or residue.
- Sensor loupe with lighting. Useful during the cleaning process.
- Lint-free wipes. Helpful in cleaning the outside and inside of the camera. Not recommended for cleaning the sensor directly.
- Lint-free gloves. Recommended in helping keep dust and lint to a minimum when cleaning the sensor. Why add to the problem.
- Canned air. Optional but useful.
More about canned air. Many photographers suggest never using canned air for cleaning inside the camera chamber because the propellants may have oil, moisture, or contaminants that can end up on the sensor. On the other hand, my camera repairman uses compressed canned air when cleaning cameras and their sensors. If you do use canned air, keep it pointed at a 45-degree angle when spraying to reduce the risk of releasing contaminants. Never shake the can. Use a gentle pressure spray (as a strong blast of air may damage camera parts inside the chamber).
I do not believe there is any canned air product that is 100 percent contaminant free. Use it accordingly and be prepared to use the wet-swab method described below if you use a canned air product. A hand blower is much preferred for removing loose particles from the mirror chamber and sensor area.
Optional tools include lens pens, gel sticks, and spinning brushes. These are discussed at the end of the Cleaning Methods section.
Prior to Sensor Cleaning
Before starting the cleaning process make sure the camera’s battery is at least 50 percent charged. The camera shutter mechanism will be activated in order to access the sensor. You could risk damage to the mechanism if the shutter closes due to a low battery while you’re cleaning. Some cameras won’t allow you to access the sensor area if the battery is weak. Do not set the camera to Bulb or long exposure timer settings when cleaning the sensor as the shutter may close unexpectedly and cause damage as stated above.
To minimize further dust getting on the sensor, do your cleaning in a dust-free environment, turn off any ceiling fans or heating or air conditioning units, and wear lint-free gloves. Wipe off the lens and camera prior to removing the lens. Always keep the camera body pointing downward when removing the lens to help prevent dust and debris from settling into the camera.
The first step is to use a hand blower (or canned air) to remove any dust or debris in the mirror area. With the camera off and pointed downward, remove the lens and blow any dust off and out of the chamber. You want to get rid of any dust or debris so it doesn’t fall on the sensor once the sensor area is accessed. Sensors may be scratched by dragging debris across them with a brush or cleaning swab so it is important to try to remove as much debris as possible before any cleaning tools come in direct contact with the sensor.
Sensor Cleaning Methods
Below is an overview of sensor cleaning products and methods. You should fully follow the instructions provided with each product prior to attempting cleaning your camera’s sensor.
There are two kinds of sensor dust. There’s dust that simply sits on the sensor’s surface and can be removed by blowing or brushing it off or using a dry swab. And there’s dust that may have become “welded” on due to moisture, grease, oil, etc. This usually requires sensor cleaning using the wet swab method.
Depending on how dirty the sensor is you may wish to do each step individually and then check the cleanliness of the sensor. Or you may just wish to make some or all these steps part of your routine with each sensor cleaning.
Blowing
Turn the camera on and set it to “Cleaning Mode” or “Lockup Mirror for Sensor Cleaning.” These options are accessed through the camera’s menu. With the camera pointed downward, position the tip of the hand blower close to but not inside the camera body and blow on the sensor a few times. If you will be using canned air use the same positioning and spray gently, keeping the can at a 45-degree angle. Do not place the blower or canned air nozzle tip into the camera body; the sensor is a delicate piece of equipment and can easily be scratched or damaged. Never allow anything to touch the sensor except appropriate cleaning tools such as a brush or sensor cleaning swabs.
Brush Method
With the camera in Cleaning Mode and the sensor exposed, simply move the brush across the sensor a few times to remove any debris. Some brushes are statically charged to help pick up any debris from the sensor.
Don’t let the cleaning brush come in contact with any other part of the inside of the camera or with your skin. It may pick up oil, dust, etc. and spread it onto the sensor.
After using the brush method you may wish to blow off the sensor to help remove any residual dust.
Swab Methods
The swab method uses a specialized cleaning tool that is wiped across the sensor. This can be done with a dry or wet swab.
Only use the appropriate size swab for the size sensor that you are cleaning and only purchase swabs that come in individually sealed packaging.
If you touch the cleaning end of the swab with your bare skin throw it away; debris or oil from your skin may be transferred to the swab and then onto the sensor.
Dry Swab Method
As mentioned earlier it is important to remove any loose particles off the sensor using a hand blower or canned air as dragging debris across the surface of your sensor with your cleaning swab may cause scratches.
Using a new clean swab, swipe the sensor from one side then, without lifting the swab, swipe it back to the other side. Do this only once and discard the swab. Reusing a swab may cause undesired results such as scratching the sensor. For best results, you may need to do this more than once using a new swab each time.
Wet Swab Method
Some sensor dust may have become “welded” onto the sensor which may require the wet swab method. This is done in the same manner as the dry swab method except that a cleaning fluid that is specifically made for sensor cleaning is applied to the sensor swab.
Apply only one or two drops of the sensor cleaning fluid on the tip of the swab as too much fluid may create unfavorable results. Again, swipe the sensor from one side then without lifting the swab swipe it back to the other side. Do this only once and discard the swab. As with the dry swab method, it may require using multiple swabs to get a clean sensor.
Re-check the results of your completed cleaning using the methods described above.
Optional Cleaning Methods Using Other Tools
- Lens Pen. A generic term for a tool that has a brush on one end and a small chamois cleaning tip on the other end.
- Sensor Gel Stick. A stick with a gel cube on one end that has a sticky substance that picks up dust and other particles from the sensor or lenses. Never drag or wipe the gel stick across the sensor or lens as it may leave a sticky substance behind.
- Spinning Brushes. The thought of anything spinning placed on the sensor makes me a bit nervous. When using any brush inside the camera chamber you run the risk of it picking up any oil or grease on the walls inside the camera chamber and then spreading it onto the sensor. Then you may have made a bigger mess to clean up. The best way to remove grease or oil from the sensor is by cleaning it using the wet swab method described above.
I haven’t been impressed with the results of the optional products mentioned. You may wish to read reviews on the internet and decide if these methods and products would work for you.
Of course, there are quite a few articles and video tutorials on the internet on how to clean sensors. You may want to review some of those prior to cleaning the sensor on your camera.
How Often Should My Sensor Be Cleaned?
The simple answer is, whenever it needs it. And you won’t know that unless you do a sensor dust check. Here are some factors that determine how often the sensor needs cleaning:
- how often the camera is used
- the number of shutter actuations
- how many lens changes are done
- environmental conditions (wind, dust, high pollen count, humidity, etc) of lens changes
- the prevention measures you take when changing lenses
Some photographers check before every shoot assignment while others not so often.
Prevention
The best way to remove sensor dust is to prevent it.
Here are some tips for helping keep your sensor as dust-free as possible.
- When removing the lens always point the camera body downward.
- Have the next lens ready to install prior to removing the existing lens.
- Only change lenses in an area that is not windy or dusty. If you do need to change lenses in that environment consider using a “lens changing bag”.
- Keep the lens body, base and CPU contacts clean using a lint-free wipe.
- Periodically blow out the camera’s mirror chamber to keep dust in that area to a minimum.
- If your camera offers “Sensor Shake” or some of sensor cleaning method you may consider using that to help remove any dust that has gotten on the sensor.
- In post-processing utilize the Visual Spots tool to keep tabs in the cleanliness of the sensor.
- If you know there is sensor dust and you are not able to clean it right away consider shooting at a lower f-stop to minimize the number of dust spots that will show up on an image.
As a side note, if the sensor gets to a point where it needs to be replaced because of scratches or can no longer be completely cleaned, it may be possible to have just the filter replaced, not the complete sensor unit. This is a much less expensive alternative. Some camera repair shops will tell you that the whole sensor unit needs to be replaced. But an internet search of “sensor filter replacement” will yield results of reputable camera repair companies that offer that service.
A clean sensor will greatly reduce the amount of time spent in post-processing and improve the quality of your images.
A clean sensor helps make for a happy photographer.
About the Author:
Adrian Skiles is a freelance photographer based in Atlanta, GA. He has been a photographer for most his life, specializes in real estate and landscape photography, and has written numerous photography articles.
Like This Article?
Don't Miss The Next One!
Join over 100,000 photographers of all experience levels who receive our free photography tips and articles to stay current:


My pleasure!
Thank you Adrian, for this excellent article.
Much appreciated.
A very good and thorough article. I wonder why there is no urgency in the camera business to address this problem at the source. There must be creative people who can help find a solution for this problem. Issue should be to find a mechanism to cover the the camera-body once a lens is removed and to address potential dust or dirt on the rear lens-elements or barrel when positioning a lens on the camera-body. It must be very difficult to realize this at a reasonable prize, else it would have been added as a part of the camera-bodies.