Whether you accept it or not, we all love macro photographs. I mean, who doesn’t like an intensely detailed bug or a flower on a silky creamy background? The first thing that we do after getting our hands on a DSLR for the first time is to go to our backyard and start taking flower pictures. But in reality, macro photography is much more difficult than it seems to be. I normally shoot landscape and street photography but recently I decided to give macro a try and found it to be much more challenging technically than any other type of photography.
I’m new to macro photography, so I’m not an authority on it. But I’ve been learning a lot, so I decided to write a blog post to keep everything in order so that I can start improving.
Like every picture, a macro has its aesthetic as well as technical aspects. Start with the aesthetic qualities, because they’re easier to learn and don’t require any extra gear.
Aesthetic Qualities
Simplicity
Macro is all about one and only subject. Unlike landscape or street or any other type of photography, it usually doesn’t—and shouldn’t, in my opinion—have an any layers or multiple points of interest. The image should be flat with all the attention leading toward the subject and minimum connection with the background. When I say minimum connection, I mean, aesthetically, the background should not grab the attention of viewers. It should be very simple. We can achieve this by either blurring it or using high contrast compositions.
Details
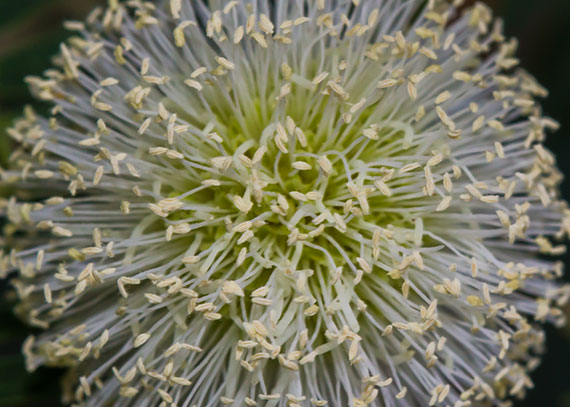
The ultimate goal of a macro shot is to show the unique, fantasy world that we normally cannot see with our naked eye. So choose your subjects wisely. Don’t select subjects that we’re used to observing in detail normally. Choose subjects and their angles that we are normally unaware of. Try to show the absolute level of detail that even if we look closely with our naked eye, we can’t see. That’s where macro photos actually shine. That’s why a lot of people go toward insects, as we don’t normally observe them so closely. As the saying goes, the devil is in the details. Get extremely close to your subject and try to bring a completely new world to your viewers.

Composition
Just because there are minimal components in macro photography doesn’t make it less worthy to put effort into the composition. In fact, composition is extremely vital for the success of macro photos. Composition rules like the golden ratio, the rule of thirds, diagonals, and leading lines were never so important. It’s very important to create dynamic and fluent compositions or else chances are that even with immense details, the photograph will still fall flat on its face. Utilize all the composition rules to make your macro photos eye-catching.
With all its simplicity, macro photography is not at all simple when it comes to the technical aspects. Below are some of the technicalities to keep in mind while shooting macro photography.

Technical Challenges and Their Solutions
Limited Depth of Field
Normally when we take portraits or stock or street photography, we do everything in our power to create creamy bokeh and shallow depth of field. But when it comes to macro it’s the other way around. We do everything to get a few extra millimeters in focus so that we can capture details properly. Because we’re focusing very closely (normally only a few inches), depth of field is literally in millimeters.
Now, you can do a couple of things. You can move back a little and lose some details but get more focus or you can increase aperture. Both approaches have their own pros and cons. You can only increase aperture to a limit where diffraction won’t happen, otherwise the entire picture will be soft. Even if you increase aperture within limits, since it changes exposure you need to either slow down your shutter speed or increase ISO. Yes, welcome to the hell of the macro world. It’s a whole trial and error process to see what’s acceptable for you in given conditions.

Exposure / Lack of Light
As mentioned above, you need to increase your aperture to your maximum limit if you want your tiny subject to be completely in focus. But with this approach, your exposure will be down by miles. In order to get proper exposure, you can do a few things:
- Decrease shutter speed if possible (stationary subject)
- Increase ISO to acceptable limits
- Use some sort of flash
- The best solution is a combination of all of the above.
Nowadays camera ISO performance is pretty good, so you can go with this option safely. Flashes and some modifiers are also cheap. Even pop-up flashes will work. I do all macro work with a pop-up flash. It can produce decent results. Shutter speed cannot be changed in many situations but whenever it’s possible, go for it.

Noise Reduction
Even after all these remedies, your pictures might still have a lot of noise, especially if you’re using crop sensor camera bodies like me. And since macro pictures are normally simple in composition with very plain/creamy backgrounds, noise is very much visible. You might not come across this noise issue in other types of photography, but you need to seriously know how to reduce noise in you photos now. Noise reduction and sharpening go side by side, and I can point you some of very good tutorials that really helped me overcome this.
The whole point of this section is not to de-motivate you but to actually prepare you to handle all these issues. They are not as big as they seem. But if you really want your photographs to be like the ones you see on the Internet, you need to work around these issues.
Macro photography is really fun. Even on days when you feel dull and you don’t want to go outside for landscapes, street, or any other type of photography, you can do macro in your backyard or even in your room. It’s demanding but at the same time very rewarding.
Gear
If budget isn’t a problem, you can certainly go for following gear to help you in your task:
- Ring flashes for beautiful even lighting or even separate TTL flash for controlled lighting.
- Full frame body for better ISO performance.
- A good tripod with cable release for stationary subjects.
- Flash modifiers and backgrounds for creating mood in your photos.

If you’re on a budget, don’t let it hamper your spirit. You can do everything without all fancy gear. You just need to be patient and know have to how to work around these issues. The word is persistence. Stick to your goals. You don’t even need a dedicated macro lens. If you’re on a budget, you can go the following route:
- Instead of a dedicated macro lens go for a reverse ring or extension tubes. They’re a little difficult to use but much less costly than lenses.
- Instead of ring flashes, purchase pop-up flash modifiers.
- Learn thoroughly how to reduce noise and increase sharpness in Lightroom and/or Photoshop.
That’s it. Happy hunting!
About the Author:
Imran Zahid works as a software consultant in Oman and is originally from Pakistan. He is a self taught photographer who says it’s his lifetime passion.
Blog: http://theshadesphotography.worpress.com
Portfolio: https://500px.com/imrzahid
Like This Article?
Don't Miss The Next One!
Join over 100,000 photographers of all experience levels who receive our free photography tips and articles to stay current:


Please list the articles to help with noise reduction.
Thank you
What articles do you recommend for learning
how to deal with noise reduction.
Thank you
I was very confused reading the article. Pino made the correction re aperture – accepted by Imran. As others may read the article in the future would it be possible for Imran to alter it at this stage? Also – if you are very close to your object light from a pop up flash doesn’t get to the subject. In poor light a ring flash or light is needed.
Thanks Pino Domenico for your clarification.
Another great article; however a small but important clarification:
When the Author refers to “Increasing” your Aperture, it really means Increasing your f/Number.
Since the f/Number is in the denominator, this is actually a DECREASE in Aperture.
“Aperture” is expressed as a fraction of the focal length. So a Relative Aperture NUMBER of, say 4.0, on a 100 mm lens is really f/4.0 = 100/4 = 25mm. On a 200 mm lens, it would be f/4.0= 50mm (this the physical diameter of actual opening to let in light).
So now you also know what the “f” in f/Number stands for.
Photographers don’t worry about the Physical Aperture, because the lens will automatically adjust it when you zoom, and it’s the Relative (not the Physical) aperture that matters in exposure calculations.
For example, if you are familiar with the inverse square law of light radiation, then you know that doubling the distance from the light source to the subject causes the subject to receive just one-quarter of the light on the same-sized surface area – and yet, when you meter the subject in Manual Exposure Mode, you don’t have to re-calibrate exposure if/when you move further away.
So why doesn’t the Inverse Square Law apply to the Subject-to-Camera distance?
That’s because Aperture is measured as a Fraction of the Focal Length. As you move back, the light from the image will fall onto a smaller area on the sensor (which, if you did nothing else, would concentrate that light thus cancelling its getting dimmer). As you zoom to enlarge, the physical aperture (the actual diameter of the lens opening) is automatically increased to let in more light onto a larger area of the sensor. … Amazing.
Note: If using on-camera flash you will need 2 EV (4 times) more light for twice the distance, because that is a Source-to-Subject distance, and that’s where the Inverse Square Law applies. Most on-camera dedicated flash units are used in TTL (Through The Lens) flash metering mode. The flash will send a test pulse, measure it, then trigger the shutter and fire with the appropriate amount of light. You would only have to increase the output if you were using a flash in Manual [flash] Mode.
So, it’s important to clarify whether you are increasing the f/NUMBER or the “Aperture”
“Keep on Shooting” – pd