Light painting is one of the lesser known techniques in photography and is usually only carried out by serious night owls… and some very keen photographers. Primarily performed at night and outdoors, such night captures can make scenes look more dramatic than they would under normal conditions.
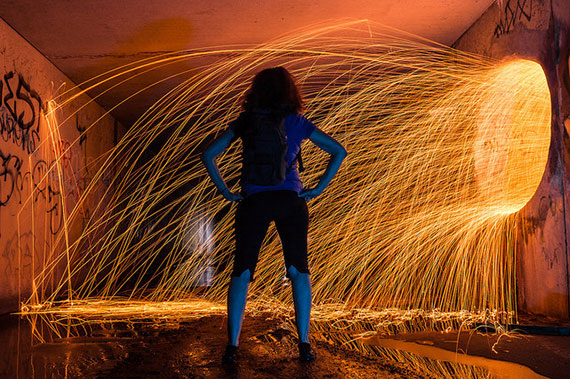
Photo by darkday; ISO 100, f/9.0, 13-second exposure.
Light painting is not a new thing. It’s a technique that has been used for over 100 years. And contrary to modern belief, it’s not at all easy to get the optimal result. Accuracy in exposure settings, the right tools, the right atmospheric conditions, and patience are all key to a great night captures involving light painting.
Light painting technique involves two methods: moving a light around in the frame during a long exposure, similar to writing with a sparkler, or using a controlled light source, such as a flashlight or speedlight, on or off camera, to light a particular part of a scene.
The latter is more of a contrived and creative technique that can yield spectacular results, especially in a commercial setting. LED torches are the tool of choice here. A few dollars at Kmart, will get you a small pocket sized, but extremely bright and useful LED torch, which is also daylight balanced, so you won’t get any undue yellow shift in colour to whatever you light up. I often use colored gels or filters that go with my Canon speedlight. They go over the light source to further increase the dynamic feel of the image.
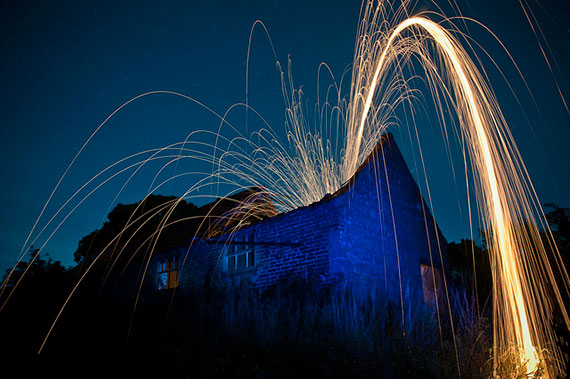
Photo by Owen Signal; ISO 200, f/6.3, 326-second exposure.
A major part of light painting involves setting your composition. Often hard to do when you’re in the pitch of night with all the necessary evils at hand. No moon, no ambient light, and quite often in the middle of a quiet nowhere, all alone. If you’re well prepared, you’ll find that the tiniest amount of light in such a setting will have either a dramatic or devastating effect in your shot, so paint carefully.
I always test the setting, with sample shots of various areas, to measure the reflectiveness off anything shiny or wet, the time absorbed when lighting dark corners, and the relevant amount of exposure to suit each. From there, you’ll need to orchestrate which parts of the scene are to receive a “heavy brush” of light exposure with the torch or flash, and which are to receive a “sprinkle”. And you thought it was an easy technique! Using a torch, will provide you with so much more control, as a speedlight flash will never “choose its target.”
For this article, I thought I’d step you through how to create your own image using the light painting technique. Light painting does take a while to grasp, as there are many places you can make minor mistakes that ruin the shot. But with a little knowledge and advice, anyone can try this technique.
Equipment Required
- Digital Camera
- Tripod
- Light Source
- Flash, torch, or any other light source you can think of (I’ve used my iPhone before!)
- An open mind!

“light painting orbs” captured by jack.chih (Click image to see more from jack.chih)
Scope Out the Scene
OK, first, set your tripod up to a predetermined height and leave it to the side. Time to scout for a scene. There’s no point setting all your equipment up to find that you just have to move later because something is killing your shot or getting in the way. I take my camera and walk the scene, looking for interesting things, watching that my background is not too congested, and that I have a way of separating my subject from the “junk”.
Setting Up Your Shot
Switch your camera to manual, and auto-focus. Zoom in and find a light source or light area that is the same distance away as the subject you want in focus, an dpress the shutter halfway down. If need be, artificially light the subject with your new LED torch. Once focused, zoom back out to your desired length and, without touching the shutter or the focus ring, switch back to manual focus. Make sure you’re also not touching the focus ring when you compose.
This is something that no tutorial can tell you how to do, this is in the eye of the photographer. Be creative and show off your creative eye.
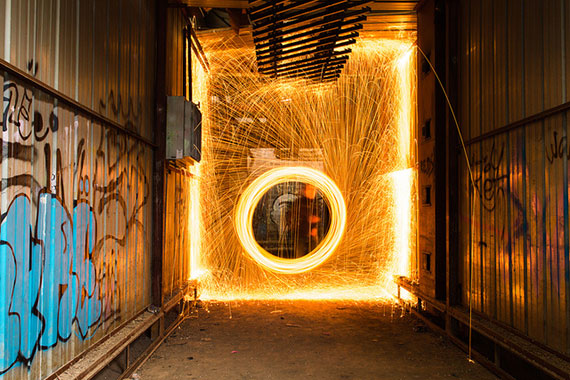
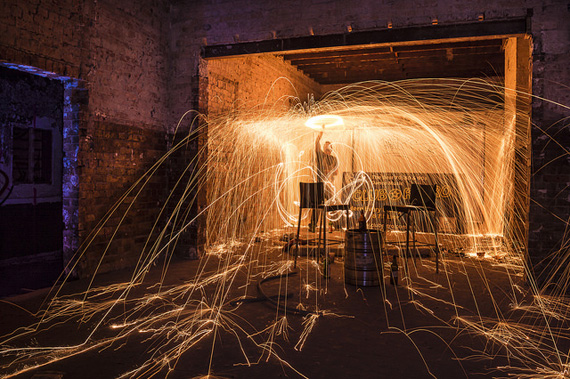
Photo by Jean-Marc ALBERT; ISO 100, f/13.0, 13-second exposure.
Quick Tip: Wide angles make for much more interesting settings at night than longer focal lengths.
Setting the Correct Exposure
Nearly there, but getting the exposure right, is crucial. The best way to expose your shot manually is to use your camera’s built in light meter as a rough guide but not as a precise judge. When you first start you will need to follow it tightly, but as you gain more and more experience you won’t need the meter at all.
Set the camera mode to Av (aperture priority). Now, set the aperture anywhere in between f/4 and f/8 to achieve maximum sharpness. Deeper apertures of f/16, etc., will help your sharpness factor but will take much longer to expose–sometimes too long.
Two things you’ll need to be mindful of here. First, that such a shallow aperture setting of f/4 or f/8 will mean you will have to be accurate when focussing. And second, but just as important, the difference in exposure between these two apertures can greatly vary your result, depending on the conditions you’re in. Your in-camera light meter will tell you its suggested exposure time when you half depress the shutter. Let’s just say the camera suggests a shutter speed of 10 seconds. Remember 10 seconds. Now set the ISO to 100. Take your 10 seconds and multiply that number by 32. This gives us 320 seconds. Divide this by 60. This gives us about 5.5 minutes.
Getting the Shot
Now, drag out your light source and begin painting in sections of your scene, by shining your torch onto the scene during each test exposure. Check the results with each test image you capture. Look to achieve a nice ambient overall exposure without too much digital noise or excessive highlights. Using the results you measured in each of your test shots, you should now be able to see what parts of your scene require more light painting, and what parts only require a quick flash past.
“Wild Nights” captured by darkday (Click image to see more from darkday)
Now plug in a remote shutter release, and set the camera to Bulb mode (move the shutter down past 30 seconds). Get a timing device (phone, stop watch, or similar) and get ready to wait. Press the remote shutter release and lock it on. Start the timer. Wait the desired time, and check the results. Look for excessive highlights or shadows with no light (which will fill with digital noise), and adjust your torch technique to suit.
There are few things to remember here. The longer your torch shines or the more times you flash your speedlight, the light will accumulate and therefore increase the overall exposure. This is why you should run test shots and paint carefully. It’s not an exact science to start with, but after a few test shots, your accuracy can be high, especially if you take notes–whether mental or written–to help you orchestrate the final image.
What do we call this? Planning. The ideals of every good photographer should begin with good planning. In light painting, its essential.
About the Author:
Steve Rutherford is a photographer with a publication based in Australia.
Like This Article?
Don't Miss The Next One!
Join over 100,000 photographers of all experience levels who receive our free photography tips and articles to stay current:


Uh, you say to set the ISO to 100 AFTER getting the suggested exposure, but you don’t say what it’s set to BEFORE you get the suggested exposure.
How did you come up with 320 seconds, What is the logic behind multiplying with 32.
Nikhil , nor do I understand why multiply by 32
For a few years I have been experimenting with “painting” with a digital camera.
However, I move the camera and let the lights streak across the sensor.
Either I quickly move the camera in a short exposure, or use a longer exposure of
5-15 seconds to allow a lot of camera movement.
There are many examples on my Facebook Page listed in the “WEBSITE” .
Hi,
I din’t understand this:
“Set the camera mode to Av (aperture priority). Now, set the ISO speed anywhere in between f/4 and f/8 to achieve maximum sharpness. Deeper apertures of f/16, etc., will help your sharpness factor but take much longer to expose–sometimes too long.”
I think the “ISO” was not properly explained, or there was an error in the text.
Sorry for any mistake because I don’t speak English right, I am Brazilian, I love photography, and every day I read these articles.
Thanks
Thanks for catching the error, Eduardo. It’s been fixed. :)