Landscape photography is a great adventure, but also a challenging endeavor for any photographer. Here are ten tips for both beginner and advanced photographers working on improving their landscapes.
10 Tips and Tricks for the Beginner
1. Shoot close to sunrise and sunset to achieve more balanced exposures. Shooting during the harsh daylight produces very contrasty light, and it’s difficult to capture details in both the shadow and highlight areas. If there’s one thing you take away from this guide it should be this!
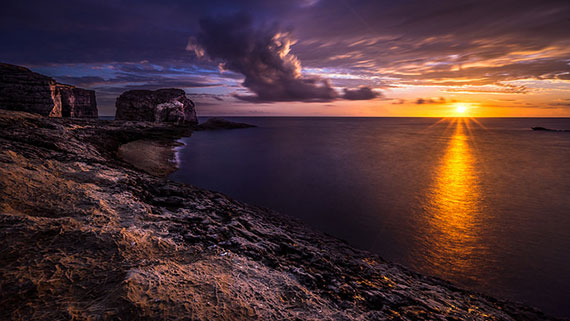
Photo by Giuseppe Milo; ISO 50, f/22.0, 30-second exposure.
2. Compose an image to exclude more and include less. Remove any element that doesn’t add to the image. Simplicity is often the key!
3. Shoot in RAW format for maximum quality if you’ll be doing any post-processing. This is really a big deal!
4. Switch to manual focus, focus one-third of the way into a scene, and do not use the smallest aperture of the lens (e.g. f/22). Instead use at least 2–3 stops up from the smallest opening in order to achieve sharper images.
5. Use a remote cable release or the self timer in addition to a tripod to increase sharpness. This makes such a big different especially when long exposures are required! To increase sharpness even further, engage the camera’s mirror lock-up feature if it comes with one.
6. Use Live View in conjunction with full magnification to manually focus. Thank God for Live View!
7. Shoot waterfalls under overcast conditions. This allows the shutter to remain open for longer in order to achieve that nice silky water movement that you see so often and wonder how it is done! Alternatively, shoot in shutter priority mode (Tv) and dial in a shutter speed of at least 1/15 seconds, or better still use an ND filter to achieve the same effect.
8. To achieve turquoise blue water, shoot when the sun is directly positioned overhead (i.e., around midday).
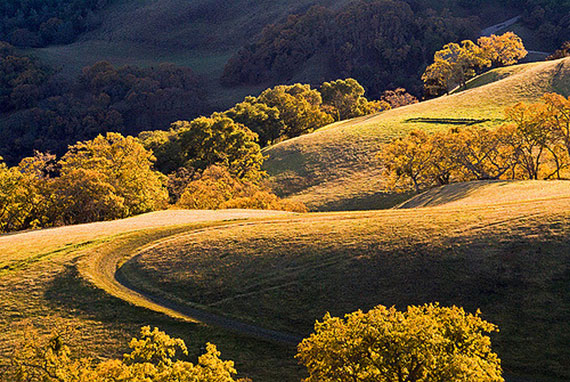
Photo by Sathish J; ISO 400, f/6.3, 1/500-second exposure.
9. Compose a scene with naturally occurring lead-in lines within the foreground and use them to guide the viewer to the main subject. An interesting but not dominant foreground also gives the image depth.
10. Shoot at the lowest possible ISO (e.g., 100) to produce the best possible quality images. Using a tripod will be a big advantage!
10 Tips and Tricks for the More Advanced
1. Expose to the right. What does this mean? Using a digital camera’s histogram, ensure that the range of tones are pushed as far as they can go to the right-hand side of the histogram graph without touching the right side. Doing this will increase the amount of information recorded in the image and therefore quality!
2. Don’t just rely on a single capture to create an image. Take two or three different exposures and blend them together later in Photoshop by combining the best elements of each. Yep—this is a big secret from the pros!
3. Wherever possible, try to avoid using filters as filters typically soften images and therefore reduce sharpness. As an example, instead of using ND graduated filters, capture one image exposed for the foreground and another for the sky and then blend them in Photoshop. If you need to use a filter to achieve an effect (e.g., using an ND filter to achieve a silky water effect) then take a separate image without the filter and another with the filter applied and blend in those areas containing all of the juicy detail that you’re after.
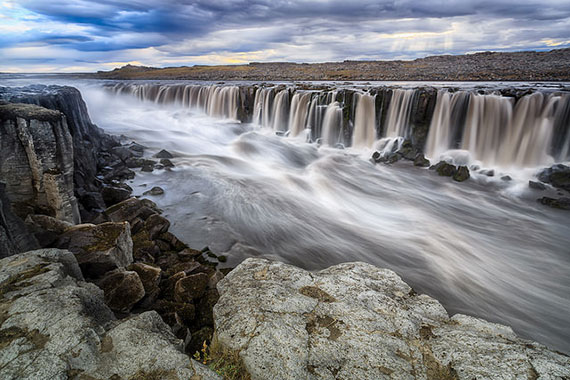
Photo by greenzowie
4. Always do your homework on a location in preparation for a shoot and if possible ensure that you have visited the location to pre-visualise the optimum composition. Pre-visualise also how the scene would appear under the optimum lighting conditions and then return well in advance of the optimum lighting arriving. Use the harsh daylight hours to perform your homework on a location.
5. Take multiple captures of water movement until the optimum water movement has been captured. If the water movement is too slow, increase the speed of the ISO and vice versa. Adjusting the ISO ensures that not only the exposure is left in tact but also the depth of field.
6. Capture panoramic images by stitching multiple image captures together. Ensure that the camera is set to manual shooting mode, manual white balance, manual focus, overlap each image segment by approximately 30 percent, and ensure the tripod is perfectly level. Positioning the camera in a portrait orientation will also give you more scope when it comes to cropping.
7. In tricky lighting conditions, experiment using different metering modes rather than always rely on the Evaluative/Matrix metering mode to determine the correct exposure. For example, use the Center Weighted or Spot metering mode.
8. To yield optimum depth of field, use hyperfocal focusing by identifying the hyperfocal distance using both the lens focal length and aperture and then focusing on the hyperfocal distance.
9. To further improve depth of field and sharpness and get images appearing tact sharp from the near foreground to the distant background, capture two separate images with the first focused on an element in the foreground and the second on an element in the background. Then blend the two images together later in Photoshop. Photoshop makes this easy by automatically selecting the sharpest sections of both images and combining them!
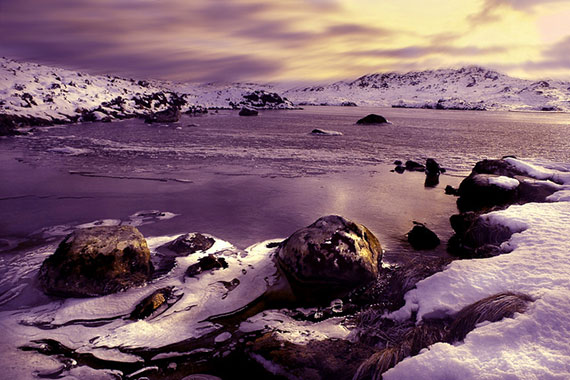
Photo by grayeme; ISO 100, f/16.0, 1/60-second exposure.
10. Use The Photographer’s Ephemeris to research locations to shoot in advance and easily identify sunrise and sunset times at any time of the year for a specific location. This tool is a must have, and best of all it’s completely free!
About the Author
Ricardo Da Cunha is an Australian landscape photographer. He is an experienced trainer and offers private one-on-one day courses in either half/day (4 hour) or full day (8 hour) sessions. Aimed for beginners and amateurs, a complete full day private course consists of the first 4 hours of tuition out in the field in image capture and the other 4 hours is spent behind the computer in post image capture processing.
Like This Article?
Don't Miss The Next One!
Join over 100,000 photographers of all experience levels who receive our free photography tips and articles to stay current:


Thank you for your information its very useful for us.
Such a Wonderful blog to see and the great tips are useful for the photography lovers.
thank you for the tips they will be put to good use.
Love all the tips
– do your homework
This applies not only to landscape photography but all sorts of photography. I still remember when I first started, I did not do enough questioning of the location and thought I was shooting outdoors. Turns out I was shooting indoors for 2 kids that were running around non stop.
needless to say I have since learnt to do my homework on the location and ask lots of questions
Hi guys,
So I have been in the market for a new camera. Been looking at Canon’s, but and torn between that and a sony. Do you guys have any input into which may be better suited for me? I wont be doing ‘professional’ photgraphy, but it is a possibility down the road. I saw on http://www.bestcamerahq.com that it had the EOS Rebel T5i rated pretty high, and after reading some reviews I think it may be a good choice. My budget is around 1,000$, my last camera was. Do any of you have any experience with the EOS T Model? Thanks for any input.
Thanks for the mention of TPE in the article and to John Masters for the generous comment!
You mentioned that it is best to shoot in RAW format if you are doing any post processing and I definitely agree with you! The more you edit a photo, the more data that you lose. I also recommend having an extra battery with you if you are planning on shooting for a long period of time. I do a lot of shooting up in Yellowstone and it helps to be prepared in case your battery dies.
Wow awesome article my side advice is Tend to think that landscape photography is the ultimate expression of calm, peace and serenity. And it’s true, but we forget that also the natural landscapes sometimes express movement, rage and strength . If you want to get original and attractive photos I recommend that you start working this facet too. Follow photographing serene landscapes but occasionally tries to capture this movement I tell you. There are several ways to capture: the wind in the trees, ocean waves, a waterfall or a moving clouds, etc.
I think most of these suggestions are extremely helpful and I seriously hate being even slightly critical, but I have to disagree with tip #4: “Switch to manual focus, focus one-third of the way into a scene, and do not use the smallest aperture of the lens (e.g. f/22). Instead use at least 2–3 stops up from the smallest opening in order to achieve sharper images.”
I totally agree with manual focus most of the time, but I feel very strongly that the advice to open up the aperture 2-3 stops from f/22 is NOT good advice to give beginners.
If f/22 is the smallest aperture on a lens, you’re telling new photographers to shoot landscapes at f/11 (2 stops from f/22) or at f/8 (3 stops from f/22), which will most often not give them nearly the depth of field they’re looking for.
The difference in sharpness between f/22 and f/11 is negligible on all but the cheapest lenses unless you enlarge to 200% or more! When you blow up an image (pixel peeping) to where you can start to see the slightest difference in sharpness, color, and contrast, you have enlarged that image to a size to which images are printed to in only in extremely rare cases.
I have never had an image rejected because the end user / buyer said something like, “It’s obvious that you used f/22 on this, and the lack of sharpness is unacceptable.”
I do know and appreciate the nearly magical abilities of Photoshop to focus stack images, and it certainly has its place and is a life saver when needed, but that’s a lot of unnecessary work that could often be avoided by using f/22 in camera.
I’ve seen enough and done enough pixel peeping comparisons to see the difference between f/22 and f/11 to know that the f/22 shot is not going to be rejected, given the same care in focusing and using a tripod.
Is there a difference? Yes, but it’s not big, and certainly not enough to start beginners off by having them focus stack landscape images in Photoshop to get front to back depth of field when f/22 could have done the job instantly and sharply enough to satisfy any photo stock agent.
I am also happy that you included learning and using The Photographer’s Ephemeris at suggestion #10.
I am disabled and I can only get out for photo shoots for a couple of hours at a time and only every three to four days at best.
The Photographer’s Ephemeris has been a HUGE help for me in preparing for landscape and architectural photos where I get great shots in the best light possible. This one tool, TPE, has me evangelizing all of my photographer friends on its helpfulness.
I recently, finally, entered the 21st century by getting my very first smart phone, mainly so I could use the Android version of The Photographer’s Ephemeris while out and about.
Thanks!
> > 10 TIPS AND TRICKS FOR THE MORE ADVANCED
3. Wherever possible, try to avoid using filters as filters typically soften images and therefore reduce sharpness. < <
This is not always the case, so for me this comment is misleading. Maybe with a kit zoom lens and filters of questionable no-name quality, but with decent optics and quality camera lens filters who will be able to differentiate between the skilled use of filters and post-production?
Skilled landscape photographers such as Charlie Waite & Joe Cornish have their own methods and secrets, as do I. There is no such thing as a right or wrong treatment for a stunning landscape image.
I know both Charlie & Joe choose LEE Filters as their preferred camera lens filters. They are not cheap, but I've yet to see an image where the quality is softened through use of a LEE Filters camera lens filter, or even Tiffen, Hoya, Mirumi and Hitech lens filter.
Just a quick addition – you may want to include getting the horizon straight! First thing I saw in the blue water photos was a downhill horizon – some cameras have a grid in live view that will help with that!
Thanks for writing it up.nice work
Thanks for writing it up. Didn’t know about the Photographer’s Ephemeris software.
Nice collection of tips. Certainly given me a few things to think about.
Hello Ricardo
Im Brazilian and Beginner enthusiatic photographer. Thanks for your acurate advices. Like me, I imagine that others beginners need more information than blá blá blá, you can catch the atention e pass what is really usefull. God job.
Hugs
Fernando
I follow you..
MUY BUENOS TODOS ESTOS CONSEJO LOS PONDRÉ EN PRACTICA MUCHAS GRACIAS
Hi Stuart in the tips I was referring to the desktop version of The Photographer’s Ephermeris only. Sorry that wasn’t clarified for you.
Cheers mate!
Ricardo
Thanks for the tips, some I knew some I didn’t and some are just ‘well that’s obvious so why haven’t you done it yet Stuart’ :)
But I did want to say that I don’t know where you get your info from but The Photographer’s Ephemeris is NOT free. In the UK on Android it is £3.10 and £5.99 for iOS based devices.
wow nice ! thax for this tips !