On a full-frame camera, focal lengths of 35mm or wider are considered wide angle lenses. These are great for landscape photography.
Settings for best results:
A) Aperture Priority Mode
Whenever I conduct landscape photography, I always shoot in Aperture Priority mode. Reason being I am able to shoot with more choices of appropriate f-stops and depth of field. I normally use the optimal aperture of my lens, and that is between f/8 to f/14.
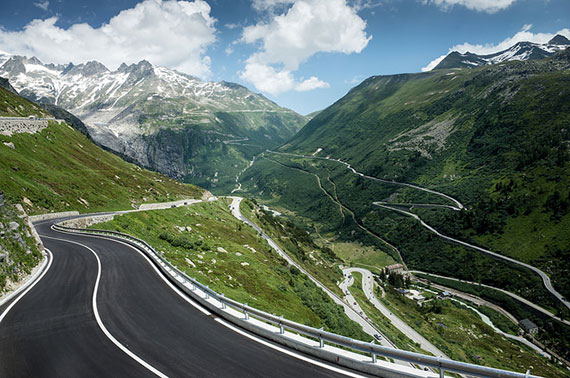
Photo by gato-gato-gato; ISO 100, f/8.0, 1/180-second exposure.
B) Hyperfocal Point
When you are photographing landscapes with a wide angle lens, try this; include foreground interest and focus onto the hyperfocal point. The hyperfocal point is the closest distance a lens can be focused while keeping objects at infinity acceptably sharp. This maximizes the depth-of-field.
Why not just focus on infinity with the smallest aperture available? Well, using the hyperfocal point enables the photographer to access a wider aperture. Other than that, a majority of lenses work better with the aperture opened up by one or two stops.
Tip #1: Try a Polarizing Filter
Polarizing filters can bring about different effects towards your landscape photography attempts. The type of effect produced differs in accordance to the angle of the sun towards the filter.
Polarizing filters can help to increase the intensity of the blue skies. It can also help reduce the reflections on water. Even if you were to use your image-editing software, there’s no way you can reproduce the effects or results a polarizing filter can give, at least not as convincing.
This fact makes the polarizing filter a must-have lens gear for landscape photographers.
Tip #2: Bug Eye View
Place your camera on the ground to photograph landscapes. Doing this creates a bug’s eye view of a landscape. The result will turn out pretty unusual, yet dramatic composition. Reason being that a photograph of a landscape taken from an angle of ground level is not something we are used to viewing from.
It will be great if you have a tripod that can go all the way to ground level to photograph a bug’s eye view of a landscape. However, when you use an ultra-wide angle lens, you will have to be extra careful as to ensure that the tripod’s legs are not shot and will not appear in the bottom of the shot.
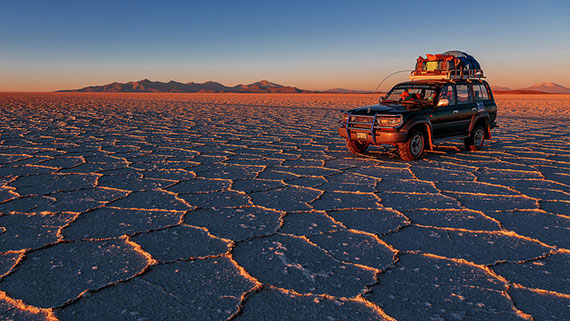
Photo by roman korzh; ISO 200, f/8.0, 1/125-second exposure.
Tip #3: Avoid Camera Shake
You can avoid the risk of producing blurry photographs caused by camera shake when you set your camera’s self-timer on a tripod or other stationary object. You can also opt to use a remote release that functions to trigger the shutter.
If you have no access to utilizing a tripod, as long as your camera has Live View, you can set your camera low to the ground and keep close to your subject.
About the Author:
This article was written by Michelle Lee Fui Jinn from tipsforphotographers. It takes time to practice and improve your photography skills.
Like This Article?
Don't Miss The Next One!
Join over 100,000 photographers of all experience levels who receive our free photography tips and articles to stay current:


With all the power of Lightroom, including using the Graduated Filter, I seldom if ever use my Polarizing filter any longer. I also make sure my shutter speed is at least 1/125 sec or faster to eliminate blurry photos. Shooting in Manual allows the selection of f/8 or so, with a fast shutter speed and ISO still set at 100 or sometimes 200. With my Z 14 to 30mm S lens on my Nikon Z6ii camera I RARELY bother with a tripod any longer, unless I’m shoot in low light and also unless I’m “pixel peeping” (blowing a shot up to several times magnification from the original setting) I am perfectly happy with the results I get. JMHO
Incluring a recommendation for Polarize in an article on super wid e seems perilous without a Cautionary note that sky color can vary wildly across the image. Super wide and CPL are are a tough combination.
About your CPL filters. When you install a CPL for landscape be sure your camera and shot is 90 degrees of the path of the sun. Then look for the tic mark at the top of the filter, and match it to the tic mark on the rotating ring of the filter. Look through the viewfinder and rotate the outer ring of the filter either right or left, while viewing the subject. When the blue sky, and standing water have no glare, and the sky is right, you’ve set the filter. Now, mount your camera to either a tripod, or mono-pod, set your exposure etc and shoot. If you are using expensive lens and feel you get crappy photos using your CPL, you to up the game with a better CPL. Depending on the lens, mainly angle of view, you may need a thin rimmed filter. The thin CPL filter almost eliminate vignetting, and a CPL with the best coating and glass will eliminate those crappy shots using $60 filter. My 82mm CPL cost in the neighborhood of $160-$200.
Thanks for the tips.
Nice articol.
None about:
– White Balance
– Color Space use in camera
All good tips .. you might want to consider expanding info on the hyperfocal point in a future post … would be good info for some folks, I think. Best, Lois Bryan
I’m with Richard that way. I find I have more control over my exposure and depth of field in manual mode. I realize everyone is different in approach and comfort levels with settings. There are many paths to the top of the mountain.
I do just the opposite in camera settings for landscape.
Set my camera to manual and adjust the aperture based on how much depth of field I want.
Next, I adjust the shutter so my camera meter reading is where I want it.
Works great for me.
With regards to the comment on a tripod that goes down to ground level, if you put the tripod column upside down and hang the camera upside down you can get a ground level shot, all you do is turn the picture the right way up.
The author said “It will be great if you have a tripod that can go all the way to ground level”… any suggestions for a good tripod that does this?
Also, i have a question regarding the suggestion that a polarizing lens would be a good thing. They produce a great effect, however when you are using a lense that cost 1,500 + and then put a 60.00 polarizer on it the image quality is compromised and i am frustrated with this. when i blow up images that have been shot with a polarizer the clarity of the image is poor. Does anyone have a suggestion? Are there polarizers out there that have the kind of optical quality that will maintain image integrity?
thanks.
what is hyperfocal point?
Back in the old days when lenses had markings which showed focus ranges, setting a shot at the hyperfocal point was easy and quick. How do you suggest doing it with a modern lens?
nice tips, thanks…
Great tips. Definitely need to pick more filters.
Great tip about taking landscape photography putting the tripod low to the ground. I’m learning about photography, and one of the things I’m trying to develop is a better eye for it. Things like finding interesting angles or unique settings. Thanks for the tip on the aperture settings too!