1) Start with a clear view. This first tip might sound very obvious, but it is key to make sure your camera lens is clean and if you are using a digital SLR, you also need to make sure that the sensor is clean. This is easy to do and will avoid your images having any unwanted dots, smears or marks on them.
Use a lens cloth that is only going to be used on the lens. Firstly, breathe on the lens and then clean it with a circular motion.

Photo by Justin Kern; ISO 100, f/8.0, 60-second exposure.
For the sensor, to reduce dirt getting onto it, always turn the camera off before changing the lens and try to do so in a ‘controlled’ environment like the back of a car. Essentially, try not to change the lens on a really windy beach or in the desert! Most DSLR cameras have automatic sensor cleaning when you turn the camera on and off so that helps a lot!
I know you can always Photoshop dirt out in stills, but if you are using the video function on your camera then removing specs and unwanted dirt is not an easy option – unless you have got months of spare time on your hands.
2) Read your camera’s manual. I know it sounds boring, but 1-2 hours with the manual and your camera in hand will guarantee that you will learn to understand it quickly. The sooner you can operate in full manual mode the better. It is the only way to start pushing your photographic skills.
3) Positioning. It is vital to get your subject in the right spot. If you are shooting a portrait or a group of people, position them where you want them. Make sure there is nothing growing out of their heads and if you want to feature your background then do so. Ask you subject(s) to move forwards or backwards and framing your shot with your subject framed hard left or right can work really well. Never be shy to move your subject(s) around, it is the best way to learn.
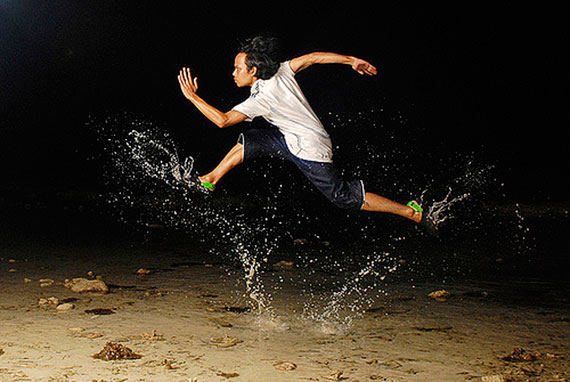
Photo by Anan Mohamad Amri Adanan; ISO 400, f/5.6, 1/160-second exposure.
Don’t be frightened to shoot vertical. Vertical can really suit certain shots, especially portraits. Try it out.
4) Framing, this is what 80% of photography is all about. Look at images in magazines, watch movies and see how they are framed. You need to allow enough headroom, but not too much other wise the image can look clumsy. Don’t crop half a hand or part of their head. Try not to place people directly in the centre of the frame. Soon your eye will get used to framing and you will know what looks good. The best thing I was ever taught was ‘If it looks good, it is good!’
5) Lighting is really important and helps set mood and atmosphere. While using additional flash units can be a little advanced, setting your internal flash to the correct level for your lighting environment makes a big difference. This is where we come back to reading the ‘dreaded’ manual. On most cameras accessing the flash control is only a few clicks away on the menu. Learning how to do this will definitely help. If you have a DSLR, get an external flash and experiment using it off the camera.
6) Being able to control the exposure and shutter speed manually will mean that you can expose what you want to expose for and not what the camera thinks you want to expose for. When the camera is in auto exposure mode it will expose whatever is largely in frame. For example, if you are taking a picture of your subject and a waterfall is in the background then the camera will close down the iris to expose for the white waterfall and as a result your subject will be under exposed/ dark.

Photo by Niklas; ISO 100, f/8.0, 1/250-second exposure.
By knowing how to use exposure and shutter manually (which each directly affect each other) this will allow you to take control and make decisions on what part of your image you want to expose for.
7) Learning the basics of depth of field (DOF) and how exposure (F Stop) increases or decreases what is in focus will expand your creativity no end.
Shutter speed will directly affect your F Stop. Also learning about how slow and fast shutter speeds can affect your work will increase your creativity. Switching to manual focus for specific shots is also very helpful especially with macro (close up) work. This means you can set the focus to exactly where you want it to be.
8} Having your camera on hand. Again this might sound obvious, but Photography is all about catching a moment and moments only last a moment… So leaving your camera in your bedroom or buried deep in your bag is never a winner.
9) Direction and angles of light. If you are shooting in daylight and want the best picture possible, then use the sun to your advantage. Backlit photography can look fantastic, and is very helpful to separate your subject from its background and can give a much more 3D image. Just be aware of lens flare entering the lens and decide if you want that effect. You can flag the flare by using a lens hood or simply using your hand.
When possible use a piece of white card or a reflector to bounce light back onto your subjects face. You will be surprised how effective this method is and it will dramatically lift the shadows from your subjects face and improve your images.
10) Try to use your zoom lens like a prime lens. Set your zoom lens to about 50mm, which is approximately what our eyes see – this will give you the experience of what it is like to work with a prime lens. Then, rather than zoom the camera in and out, keep it fixed and physically move yourself around. Get close to your subjects and down on their level. Don’t always shoot from standing up, just because it is the most convenient.

Photo by Racineur; ISO 158, f/6.3, 1/1000-second exposure.
About the Author:
Harvey Glen is a professional Director of Photography (DOP) with over 10 years experience shooting commercials, documentaries, music videos, channel idents, corporate videos and drama. Harvey uses his DSLR camera to combine his passion for both stills and high definition (HD) video filming (directorofphotographyblog), a resource for DOP’s, cameramen, photographers and people who just love to get behind the lens and shoot.
Like This Article?
Don't Miss The Next One!
Join over 100,000 photographers of all experience levels who receive our free photography tips and articles to stay current:


I’m glad you mentioned that moving our subjects around is the best way to learn about optimal positioning for photos. My sister mentioned she wants to get a custom-designed backdrop so she can start taking professional-quality photos of her kids at home. I’ll have to share your article to help her master the basics of photography as quickly as possible!
Didn’t know you were taking these pictures on your own, great job.
Keep inspiring…🤘🏻
dear sirs,
can you give me some tips as how to photograph a bed without lateral convergence nor distortion in length or width..??
rgds+thks
dr.ashraf kubbara
Good list. I’d make one change: tips #5 and 9 should be tips #1 and 2. Then framing/composition then base everything else from that. A well composed shot in cruddy light is horrid at best. Nonetheless, great list, #10 is an excellent tip. Beginners rely on the zoom to make the shot, when the thinking should be, “here’s the composition I want, what focal length will get me there?”. The #10 tip is an excellent training step for that.
I’d like to add a #11: spend the extra money and get the proper lens hood for every lens in your bag and use them every time, even indoors. Nothing kills image quality like stray light across your lens. Lens hoods stop all that and protect your lens so you don’t have to resort to those flare-causing warts known as “UV protection filters”. Digital sensors are way more sensitive to stray light than film ever was so you absolutely must protect your camera from excess stray light. Expensive lenses come with them, cheaper lens don;t and must be pruchased separately. It’s worth every penny.
Do NOT breathe on the lens. Saliva is acidic and will damage the coating. Use lens cleaner!