This is the first tip I would like to give you.
Simplify
If you view the interior in front of you, take notice in what needs to be there and what doesn’t. Remove everything that would “eat up” focus in the final photo and leave everything that grabs the attention. For instance, a piece of dirty paper, or anything unorganized is something you’d probably won’t want in the picture, but with that said—a red toy lying in the middle of the floor might actually be something that makes the photo stronger.

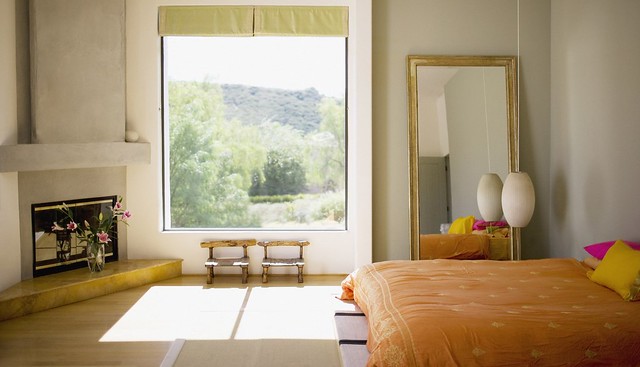
photo captured by Wicker Paradise
Also, everything doesn’t have to be perfect, a badly done bed can make it look cozy and more spontaneous, but it has to have a purpose. Something that just doesn’t fit, or give a sense of annoyance doesn’t. This is something you’ll learn in time—what will fit and what will not—but keep in mind that the photograph needs to be simplified. I myself use the function of Live View in my camera to get a better view of the final picture. Something that proved to be extremely helpful, yet ate power like crazy so after a three hour photo shoot the 5D Mark II battery was nearly dead. So if you are going for a long session and plan on using Live View, bring spare batteries.
Be Aware of the Lines
Interior design is a lot about form and you as the photographer need to capture that. Be aware of every line in the interior and how you can use it. In the case of photographing a kitchen recently, since it was very white and the cupboards where clearly divided into a grid, I used this to create a lead in into the picture—kind of like a road in a landscape.
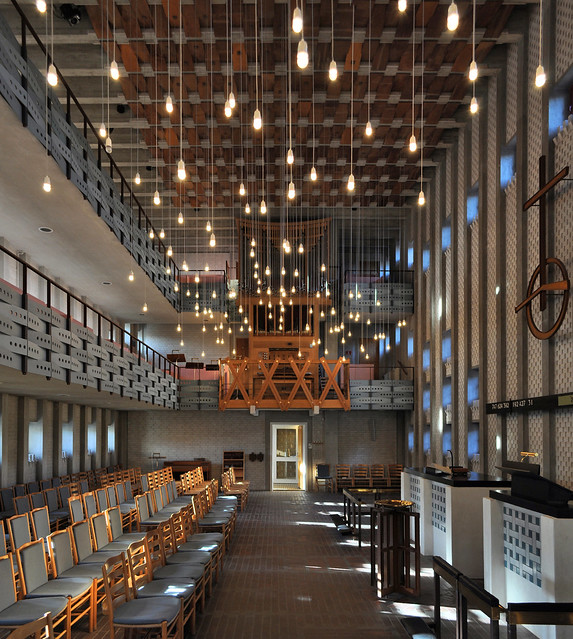
“interiors” captured by Tom Merton
Lines that are supposed to be perfectly horizontal or vertical must be so in the final picture. For instance, the shelves are supposed to lean into the picture, but the floor would look really odd if it tilted just slightly. It needs to be perfectly straight. This is something that is kind of hard to do sometimes without extremely expensive equipment, so you can fix it afterward in Lightroom. I shoot as good of a shot as I can and then make sure afterward that the lines are flawless. In real life they are—it’s the distortion in the lens that bends them.
To help you out you can pretty much imagine a grid across the picture. If a line from a floor, door or whatever breaks that grid just slightly, it’s wrong, but if it breaks it a lot (kinda like the cupboards that would go diagonally through the grid) it’s okay.
Don’t Forget the Unique Details
Every interior designer has a few elements they’re proud of or something that’s unique in that specific interior design, and you definitely want to capture that. A good interior designer has put a lot of thought and care into every single detail. If you notice and capture a detail that they worked hard on, guess who feels satisfied with your work? The designer.
“interior. hans christian hansen, architect: tagensbo kirke / church, copenhagen 1966-1970.” captured by seier+seier
Overview
Once you’re walking around in the property and you find all these cool details, it can be easy to forget about the overview. However once you shoot an overview, or any view for that matter—never shoot from eye level. Everything on eye level is boring, it’s the same view every person sees every day.
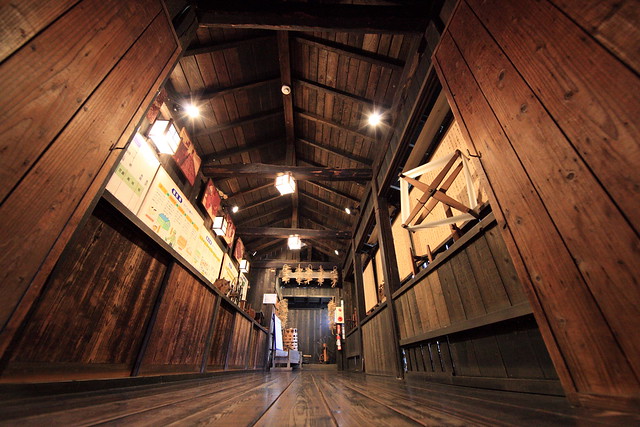
“Japanese traditional style farm house / 農家(のうか)” captured by TANAKA Juuyoh (田中十洋)
So instead, go either extremely low, extremely high—or what I prefer to do is to look for the lines and objects and get on their level and just slightly above. This way I get an interesting view yet still some depth. A table, for instance, at its own height is just a line, but if I raise the camera up just a little bit I’ll get some depth.
My last tip from this experience: bring a tripod. I shot during the day to get a good light, we turned on every light-source to get some life into the picture and finally placed the camera on the tripod, adjusted it perfectly with Live View and I took the shot with a two second shutter timer. This is because I didn’t want me pressing the shutter button messing with the sharpness of the final photograph. And since interior photography requires a really small aperture, the shutter speed will be several seconds.
About the Author:
This article was written by Mikael Cedergren (mikaelcedergren.com).
Like This Article?
Don't Miss The Next One!
Join over 100,000 photographers of all experience levels who receive our free photography tips and articles to stay current:


For interiors a tripod is essential – period! And I cannot recommend strongly enough carbon fibre tripods.
Not just for weight saving, but as they, by nature are very light compared to a professional aluminium tripods, you are less likely to damage any furniture or walls if you accidentally bump them with a tripod.
Believe me I talk from experience as a professional interiors photographer
Good topic for discussion. I shoot on average six or more real estate listings shoots a week, and have long ago stopped using my tripod. I shoot with a Nikon D810 and Tamron 15-30mm lens, generally left on 15mm. In tight spaces, e.g., galley kitchens, I find myself leaning way backwards in order to shoot a tight wall, something I couldn’t do with my tripod. Same goes for small bathrooms (most of which I shoot in portrait mode), and small offices. I do like how HDR shots look, but frankly just don’t have the time to shoot and process them any longer, as they require bracketing, and yes, a tripod, etc. When shooting three locations in a day, plus having to process them in Lightroom and Photoshop afterward, I tend to do the best I can with the time I have available. Thus, no tripod, and no HDR shots. For our small market town, apparently my clients are happy enough with my work as I stay very busy. Tripods photos and HDR shots are great if you have the time to shoot and process them, so I’m not at all knocking them. I just find handheld shots taken with a good camera and excellent V.R. lens at 1/125 sec are fine for my clients’ needs….
Photography is the best way which helps in selecting or rejecting a property. If the seller has beautiful images of a place, then buyer will definitely get impressed and finalize the deal.
You are absolutely right. @Myko
If you’re going to talk about the lines in interior photography, you must talk about lenses – normal, wide angle, ultra-wide angle. Do you want line distortion or not? Floor or high shots with a wide angle will give you major distortion of lines and shapes – not what the designer intended. For Real Estate photos tend toward wide angle but are usually overdone. The RE photos here were very well done..
Some great tips thanks. I like how you have used a HDR technique for your interiors, it really gets the details out. And definitely need a tripod when shooting interiors.
I appreciate the extremely low or go high tip. Time to get different perspectives!
•
i always regret not taking my tripod everywhere.. but already loaded with kit, just can’t take the extra weight…. time to dip hand in pocket for a carbon fibre perhaps?