Back in the early 1970s I learned a lesson about depth during the “String Art” craze. It was so popular it was actually being taught in schools. Basically put, you created geometric shapes, placed a certain number of points on those shapes, and connected those points with different colors of thread. The end result looked like a “Spirograph” drawing (another 70s classic), but these were more 3-dimensional. When I first learned this, the school had us poking holes in poster board and then stringing it. My family regularly attended arts and crafts shows.

photo by Mario Mancuso
We started doing something similar by using wood covered with felt, then using ½ inch nails in place of the holes. Gradually we tried bigger nails like 1 inch and 1.5 inch in size. We found that by creating more depth physically, it also created more visual depth.
Most string art kits only used the ½ inch nails and would only do five or six rows of thread. By adding more depth in the physical dimensions (the nails), we were able to create images with ten to twelve rows of colored thread. Eventually, I designed a coffee table that stood, three feet tall with inlayed glass. This creation was 24 layers deep.
Recently a student asked me the following question: “Color impacts both the mood and emotion of a photograph; yet some people still prefer black and white. Why is that?”
My immediate response was this: “Those who learned black and white photography first, were taught more art concepts. A great photo has to do more with leading lines, composition, and contrast than a single color theme. Most black and white photographers learn to capture the full range from black to white (the Zone System), most people who only see color rarely create as much visual depth.”
In pondering my reply, I realized that there is very likely a whole generation of photographers out there who have either never heard of the Zone System or may have heard of it, but don’t understand how it applies to images today. Let me see if I can simplify this.
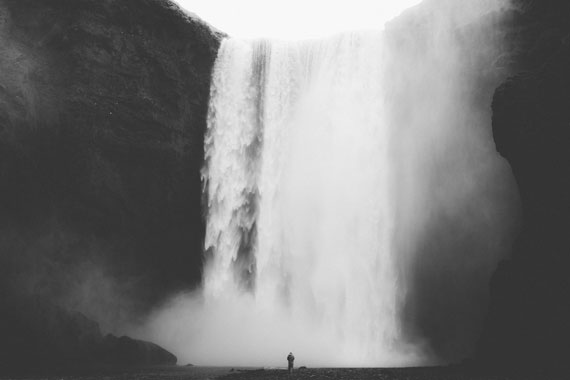
Photo captured by Jose Murillo; ISO 400, f/10.0, 1/200s.
If you listed the ten greatest photographers of all time, Ansel Adams would no doubt be on that list. He and another man by the name of Fred Archer developed the Zone System way back in 1941. Realizing the limitations of the media, they were striving for a way to create more visual depth. “Expose for the shadows and develop for the highlights,” was the phrase that many photographers used to explain what they were doing when they used the Zone System.
Imagine a set of stairs. The bottom step represents pure black (Zone 0). The top step represents pure white (Zone 9). The step in the middle (Zone 5) represents the 18 percent gray that all cameras (traditional or digital) believe to be the correct exposure. From the mid-point (Zone 5), each step or zone (up or down) represents a change of one f-stop. Therefore, Zone 4 requires an exposure of one f-stop less than your camera indicates. And of course, Zone 6 requires an exposure of one f-stop more than your camera indicates.
Since Adams and Archer were shooting mostly black and white, the second half of the system had to do mostly with “pushing” or “pulling” of development times. Most color films are not that forgiving with changes in development times; however, digital media and digital photo editing software (like Photoshop) can put you back in the Zone. If you learn to how use your “exposure compensation” on the camera, you too can expose for the shadows. If you shoot in RAW mode, the information you need to pull out the highlights will still be there.
In a normal shooting mode, if you use exposure compensation to take the image at Zone 4 you will darken the entire image. But since RAW mode saves all the exposure data (both shadows and highlights) it would be similar the second part of the Zone System.
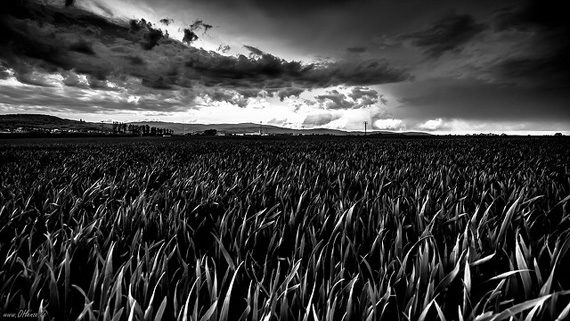
photo by Olli Henze; ISO 200, f/7.1, 1/400 exposure
Let’s say you want to photograph an interesting rock formation with a blue sky and fluffy white clouds. The rock formation is shadowed but has lots of interesting textures. You want to bring out as much detail in that rock formation as possible. You meter the shadow areas of the rock, which indicates a shutter speed of 1/60 second with an f-stop of f/2.8. Then, you meter the sky, which indicates the same shutter speed but with an f-stop of f/16. Keep in mind that in high contrast scenes, you MUST expose for the shadows if you want to show those details. You decide the shadows fall within Zone 2, (very dark, but not a true black.) By using your Exposure Compensation Settings, you would stop down three stops and shoot at 1/60 at f/8. In other words: Zone 5 – Zone 2 = 3 stops less light.
If you follow the steps above, you get the details in the shadows that most people miss. The next step would be to transfer your image to you computer and start playing with the sky. Obviously, this will vary depending on what type of software you are using, but by being both camera smart and computer smart you will have an edge over 99 percent of the tourists that just point and shoot.
When I was young, I learned to go beyond the basics by creating more depth. Creating depth by physically changing the rules is one thing, but when you deal with a photograph, paper is still paper. To get more depth in a photograph you have to increase the visual range beyond what most cameras want to give you. Regardless,if you shoot with film or you shoot digital, the best way to achieve more depth is still the Zone System.
About the Author
Award winning writer/photographer Tedric Garrison has 30 years experience in photography (better-photo-tips.blogspot.com). As a graphic art major, he has a unique perspective. His photo eBook, “Your Creative Edge,” proves creativity can be taught. Today, he shares his wealth of knowledge with the world through his website.
Like This Article?
Don't Miss The Next One!
Join over 100,000 photographers of all experience levels who receive our free photography tips and articles to stay current:


Great article Tedric Garrison!
I date back to the era of punch cards and computers, there was no digital photography back then as computers filled a large room and weighed tons. At that time I got into B&W photography including developing and printing in the darkroom. I learned how this all works from the fundamentals, which no longer occurs in today’s “point and click” world. I was into B&W photography as art. Adams, Archer and Picker are some of the greatest photographers of the century. They understood how the cameras of the day and the films and equipment worked together and what the limitations were. The zone system they developed and perfected works well, and is very applicable to digital photography shot in the raw mode today. Most of the comments above obviously do not understand because they lack the fundamentals, through no fault of their own! People who grew up using calculators instead of slide-rules may not have memorized the tables, and have the ability to do math in their heads because of technology. Kudos to RDavis you get it, and you explained it well in your post. To those who need more info to understand better, Adams “The Negative”, and Picker “Zone VI Workshop” will help. Amazon has a lot of books that could help, but if you don’t like to read to learn, your chances of producing Art are small. Analog photography is not dead yet, but choices are too limited at present. There may be a renaissance occurring slowly as with audio and music. Now that I have the time, I’m deciding which direction (perhaps both) to pursue. They are not mutually exclusive. Newer is not always better.
I think where some are confused here is that a spot meter will alway set your exposure for zone 5, or mid grey. If you spot meter something white like snow, it will look grey (causing underexposure) in the image produced. If you spot meter something nearing black, it will likewise be rendered as a mid tone grey, causing overexposure of the lightest areas. That is why the author said to reduce the amount of exposure on the rocks because they should not be grey but darker with some readable texture, as they would be in zone 8. Evaluative metering takes in the lighter and darker areas of the image and finds the middle ground, which in most cases (where there are a wide range of tones), the image comes out with a good exposure. However, understanding the zone system and how meters read a scene is helpful to every photographer because not every scene has a full range of tones or there are times you might want to purposefully over or underexpose the image for artistic reasons. But for us digital photogs shooting in RAW is a convenient way to accomplish what couldn’t be done with film because it allows us to retain the details in darker areas as well as in the lighter areas.
Reading through some of the coments. Rick is exactly right, and I quote; “You meter the shadow areas of the rock, which indicates a shutter speed of 1/60 with an f-stop of f/2.8…
You would stop down three stops and shoot at 1/60 at f/8. In other words: Zone 5 – Zone 2 = 3 stops less light.”
How would you get more detail out of the shadowy area just by reducing the aperture without altering the time?
If you take the article at face value, you actually will end up with less detail in the shadow areas than you should to arrive at a full range print. I have used the Zone system for many, MANY, years. What we do with film is to actually jump the exposure up to get adequate detail in the shadow areas. As an example, if I were photographing the for instance that the author used I would not stop down from 1/60@ f-2.8 to f-8, That would leave me with shadow areas that are vacant of detail, and usually we change the exposure time leaving the f-stop the same, since depth of field is almost always a problem in landscape photography, BTW. I almost always take the deepest shadow area where I want to have detail separation on either Zone IV or V to insure what I call “big fat shadows”. We then vary the processing time to bring the highlights back down into a printable range.
In digital you face the opposite issue, much like exposure using transparency material. The exposure should be done to retain highlight value without blowing them out, or blocking them up, thus the phrase, move the histogram as far to the right as possible without clipping them off.
In applying Zone theory to digital, it really is very simple, as most things are. There are 256 tones in a digital file. Dividing those 256 tones into ten zones is simple. These figures are approximate, but close enough for discussion. 256/10 = 25.6, or for discussion sake, 25. In P’shop if you open the “info” pane and then place the eye dropper tool in the darkest area of the photograph, black, it should be 25 or less on the info tool pane. Zone II would be about 50, Zone III 75, Zone IV 100, Zone V 125 (almost exactly at mid tone gray) etc. Zone I is not the darkest value that will print. In film it’s the least amount of light needed to show up on a negative, but it will not be printable. Zone II is Zone I + one stop of light, Zone III is one stop more etc. Zone III 1/2 will be the darkest gray that can be printed on paper while retaining tonal separation. Going up the scale Zone VIII will be the lightest gray tone that can be printed on paper while still being a little darker than paper base white. The misunderstanding that most commonly occurs is that of thinking the film, or in this case the original file, is limited to 10 zones. It is not. Modern black and white films can carry a 15 stop, or more range of light, but paper can’t print it, your ink jet can’t either, BTW. It can print only about 4 1/2 zones, so what we are doing in processing film, is to move the lightest tonality down the scale so that it prints in proportion to the darkest tone., and we can hold detail in all areas of the final print (not the digital file) from the darkest to the lightest with adequate contrast and detail in all areas.
When I teach workshops about “The Art of Black and White Photography” I often get people that are concerned that in order to make the darkest area actually black, or just slightly lighter than black, they have to place the shadows in that area, or on that Zone. Not true. In printing you can make the dark areas darker using film by simply giving them more exposure. Using digital you can move the dark areas down just by using a levels adjustment layer, but in order to do that there has to be detail on the original negative, or in digital parlance, there has to be detail in the darkest areas of the file. If the detail isn’t there due to inadequate exposure, you can never add it back through processing the film more, nor can detail that isn’t in the original file be recovered in LightRoom or any other RAW processor.
I never got that detailed, but I learned the “expose for the shadows, develop for the highlights” rule in the first photography book I got. Makes sense for film negatives. But doesn’t digital run a serious risk of blowing the highlights if you’re using this method? I’ve always heard that with digital, it’s better to err on the side of underexposure, but your Zone would err on the side of overexposure.
The visual end effect of zone system is a spread of tonality from black to white; as dark an area as can retain details in it, and highlights which contain some texture (not paper white). Most digital cameras have a dynamic range exceeding 9 stops. If you learn to peg your exposure to retain whites with texture and not blow them out, then use curves to adjust the rest of the image into the zones – where your darks still contain detail, you’ll have done what Adams et al had designed a system to acheive which was to fit the range into the limits of the film by placing exposure in the shadows and controlling if the highlights were white enough (by developing longer) or not blocked up (by under developing). A good technique to get you that high end control is ETTR – expose to the right – where you expose such that you never have blinking highlights you can’t pull back in your editing software. You’ll have maximized the ability of the sensor to record as much image as possible the most useful way. Read up on ETTR too and give it a try to create great tonality – I do both btw.
I also find this recommendation counter-intuitive, incorrect, maybe:
“You meter the shadow areas of the rock, which indicates a shutter speed of 1/60 with an f-stop of f/2.8…
You would stop down three stops and shoot at 1/60 at f/8. In other words: Zone 5 – Zone 2 = 3 stops less light.”
How would you get more detail out of the shadowy area just by reducing the aperture without altering the time?
I would use a larger aperture or more exposure time to get more details out of the shadows… Now that I know the parameters for both the highlights and the shadows, I’d try to increase the exposure in the shadows a few steps. Doing so will likely cause some highlights to blow out. I’d experiment and see how bad it is and choose a point that’s acceptable to me.
For what I understand, digital photography is not the same as film. Shooting film, yes, I agree, expose for the shadows and develop for the highlights. However, I don’t think the same concept applies to digital. I believe that you do the opposite: you expose for the highlights and develop for the shadows. It is more difficult to recover detail in the highlights in digital photography. Once it’s blown out, it’s gone.
Wouldn’t the recommended setting (1/60, f8) severely underexpose the rocks, insuring that you would get virtually no detail? What about using the histogram in your camera to pick the widest aperture that would not produce any blown out areas. This would overexpose the sky, but you could then selectively darken it in post processing.
Excellent article:))
Great article very interesting, can you suggest some further reading?
Also just to clarify I have this correct… In your example after metering for the sky (at 1/60 f2.8) equal to zone 5, to expose for the shadows at zone 2 you need to stop down 3 stops, from f2.8 to f4 to f5.6 to f8 keeping the shutter speed at 1/60. Is that correct?