Photography is a way to be creative. Whether it be by taking regular landscape photographs or making surreal and abstract images. Another fun technique you can try is light painting. The gist of light painting is, well you guessed it, to paint with light. This article will tell you how it works, what kinds of light painting there are, and how you can try it for yourself.
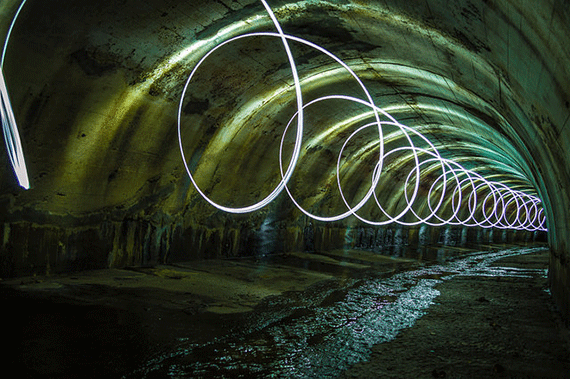
Photo by darkday; ISO 100, f/3.5, 23-second exposure.
So how does light painting work? First we need to know how a camera works and how lighting works.
A camera captures the light that is reflected from the different surfaces around you. If there is a lot of light, your camera won’t have any trouble capturing it. If there’s no light or little light, however, it takes longer to gather all the information to create a good photograph. Your camera compensates for the lack of light by using a longer shutter speed.
So, how does this apply to light painting? When you’re painting with lights, you use the fact that your environment reflects little light and use a light source that emits a lot of light.
Techniques
There are a couple of different techniques of light painting:
- The first is moving your light source. This creates long streaks of light that can take any shape or form. This is one of the most fun techniques I’ve ever come across. It really gives you a chance to use your imagination and create beautiful images.
- A second technique is moving your camera. This will almost always blur the whole image and create a very abstract effect.
Photo by Owen Signalman; ISO 200, f/8.0, 549-second exposure.
Light Painting Supplies
Now let’s try it for ourselves. You are going to need a couple of things before you can start this light painting tutorial:
- The first thing is obviously a camera. This doesn’t have to be a super fancy camera but the more settings you can customize the more control you will have over the quality of the image. The most important setting you will be adjusting is the shutter speed. When there is little or no light, your camera will probably automatically adjust itself, but sometimes you want to change the setting and make the shutter speed even longer.
- The second thing is a tripod. This is also very important because when you are light painting you want to reduce the motion blur on the background while still maintaining the long shutter speed.
- The third thing you are going to need is a light source. It really doesn’t matter what kind of lights you are using, but I’ve found that LED lights work best. They come in different shapes and sizes and you can easily draw a lot of different shapes with them.
How to Light Paint
Now comes the fun part. Go out at night and find a scene where you want to paint something. It can almost be anything. You can try painting faces or smileys on trash cans, write graffiti on the wall without doing anything illegal, etc.
Adjust your camera settings so it’s using a long shutter speed and use a timer to trigger the shutter.
Now comes the painting part. Because the lights you are using are a lot brighter than the environment your camera will register it a lot better. The cool thing about this that while you are running in front of the camera trying out this nifty light painting tutorial, you probably wont be on the image itself. The movement you create is probably too fast for the camera to register, which leaves only the lines the lights create.
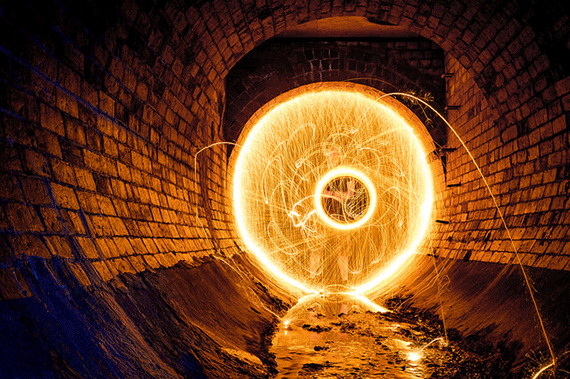
Photo by darkday; ISO 100, f/10.0, 40-second exposure.
Now that we’ve come to the end of this light painting tutorial, you know how to create nice painting with light. The next step is to go out and use your imagination.
About the Author:
Robin Lipton is a photography enthusiast who regularly blogs about all things photography.
Like This Article?
Don't Miss The Next One!
Join over 100,000 photographers of all experience levels who receive our free photography tips and articles to stay current:


I am intrigued by ‘light painting’ but I feel there should be a differentiation made between the apparent two techniques. In this article there are “stick people’ and ‘swirling lights’. This to me should be referred to as ‘light drawing’ whereas work such as that done by professional photographer David Black (check it out at Kelby One) should be referred to as ‘light painting’. There is definitely a difference. Both take skill but I much prefer what I refer to as ‘light painting’ (David Black style) the better of the two. Regardless of your choice, let’s try to describe them as they appear…drawing vs. painting.
Thanks a lot for sharing…
Great tutorial. There really is no limit to what you can do if you just change a few camera settings. This light painting really does look awesome!
I was so happy to see the title in my inbox since light painting was something I’ve wanted to read about and never got to it, yet this tutorial was nothing less than a disappointment. It’s like talking about a topic but not really talking about it…..there are no actual photographical details(aperture, focus,white balance, iso…etc) and how to do different things with light painting….
WOW! This is fantastic photography and i will be check out this Robin Lipton’s’ blog..
Thanks for sharing with us..